The Exterior Staining Project: Beyond Halfway

The house staining project is… going.  I’m more than halfway through now, and it looks very nice, but the going is slow thanks to ladder troubles, weather, and energy levels.  I’ve found that I cannot set up the 32′ extension ladder by myself.  I can shift it around once it is up, but whenever it needs to be brought to a different area altogether I have to wait for L.  This has caused a big delay, because fully half or more of the best weather days went unused for staining.  I thought I’d have finished by now.

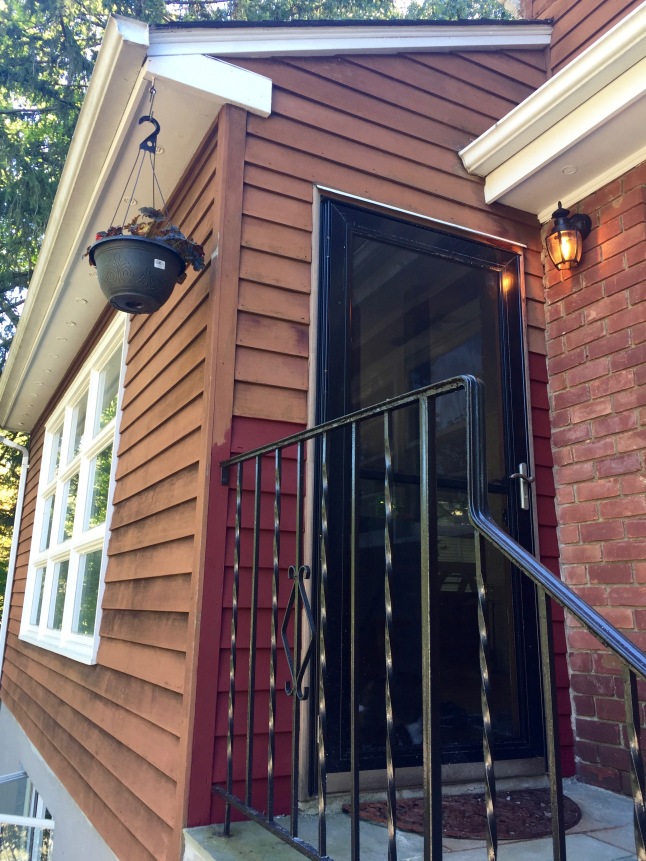
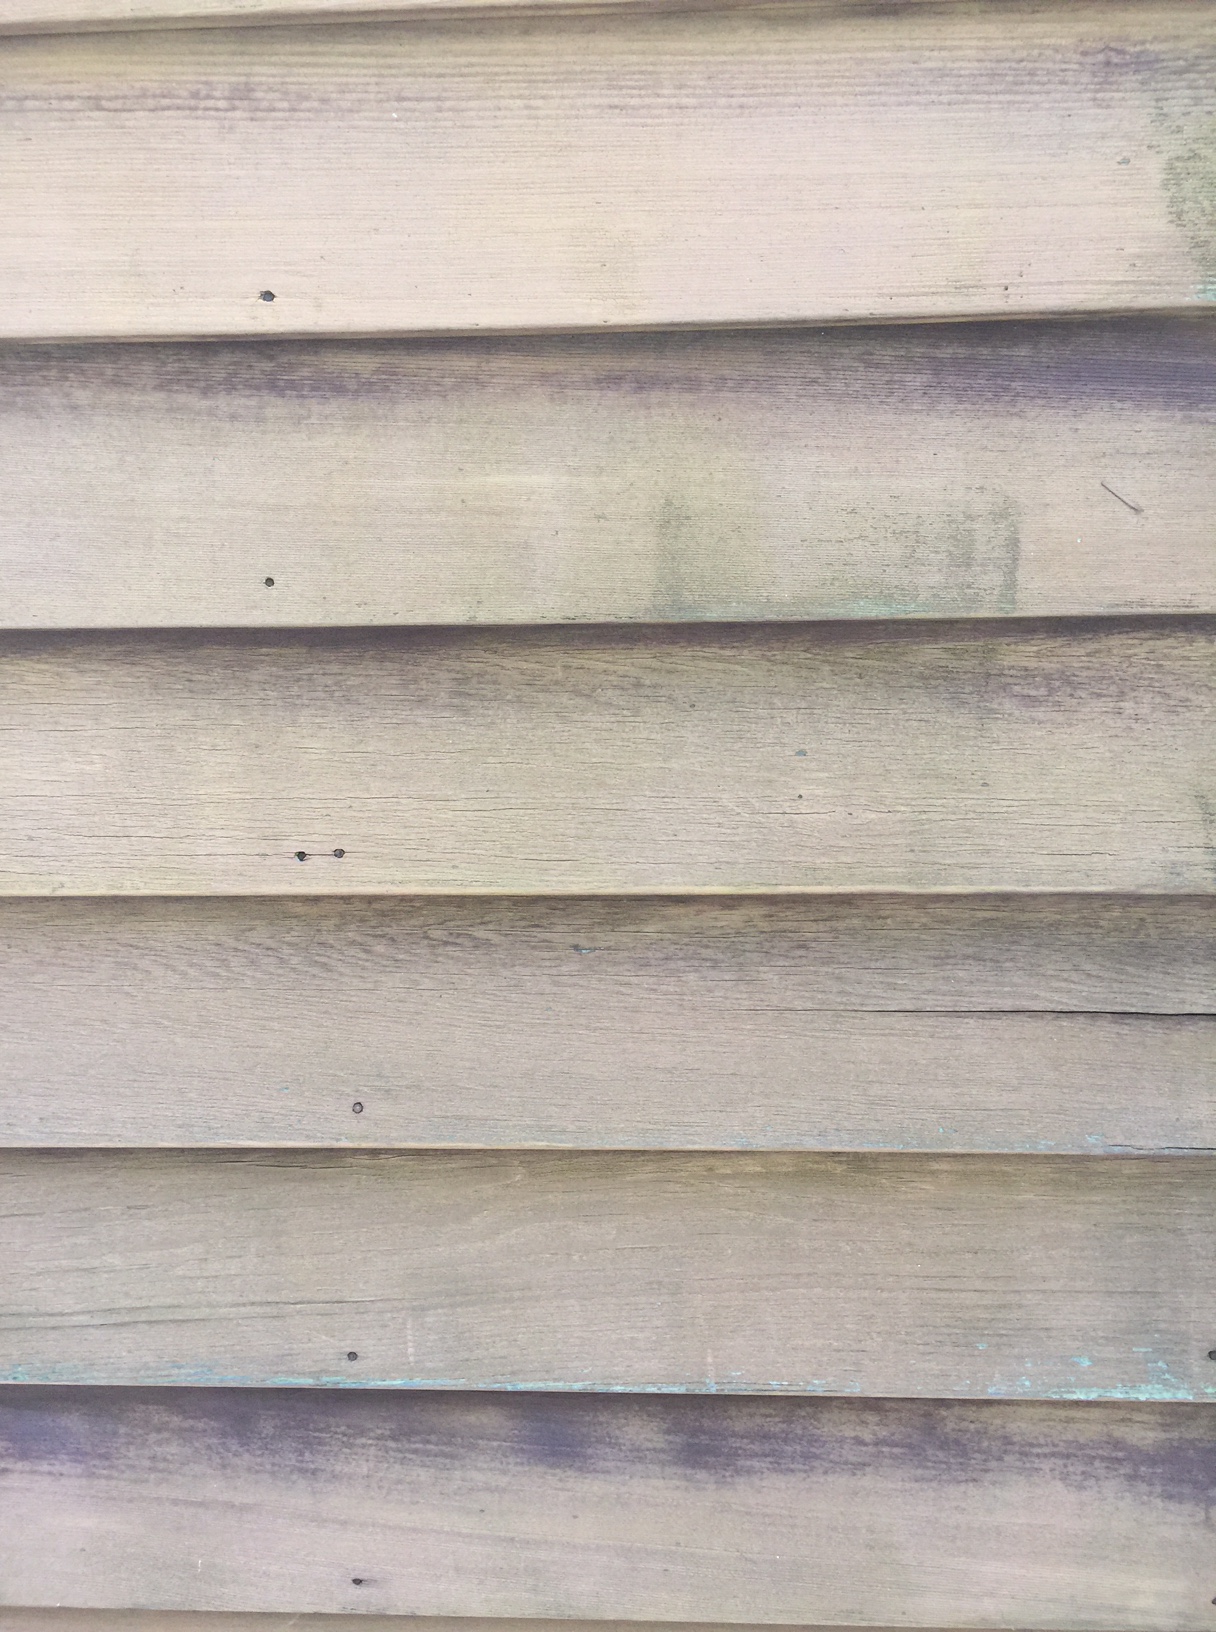
I knew the siding was calling for some stain, but I hadn’t realised just how badly it was needed until I began.  The difference is dramatic here

the difference.jpg

siding in dire need of stain.JPG

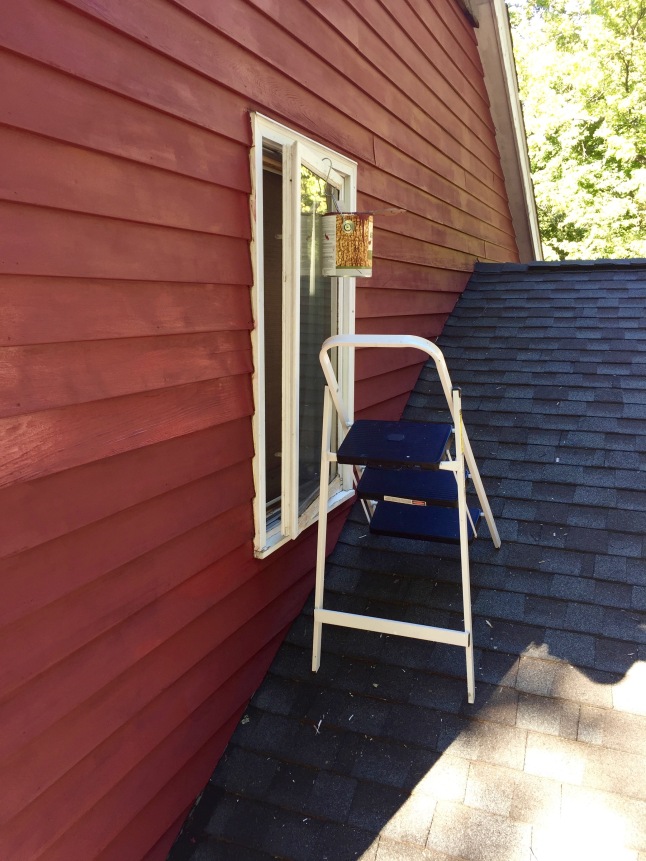
After doing the back section of the kitchen addition I headed up to the roof.  The siding on the upper addition was in rough shape, and I wanted to coat it as soon as I could after pressure washing lichens and stuff off of the wood.  It would be a nice little boost to feelings of productivity too, being a smaller section, and I love to spend a warm fall day on the roof anyway.

Reaching the highest areas was an obstacle, but I was surprisingly comfortable with this set-up.  It worked out just fine:

how I reached.jpg


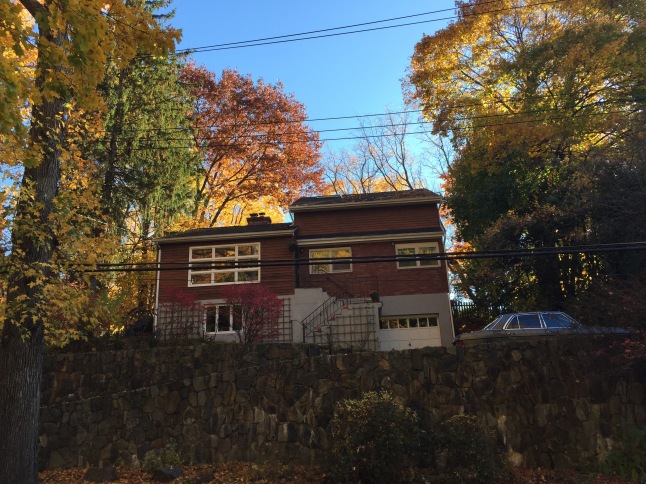
Last week I was focused on finishing the front of the house.  The big ladder had finally arrived, and I quickly stained the living room section.  Yay!

one section of the front.jpg

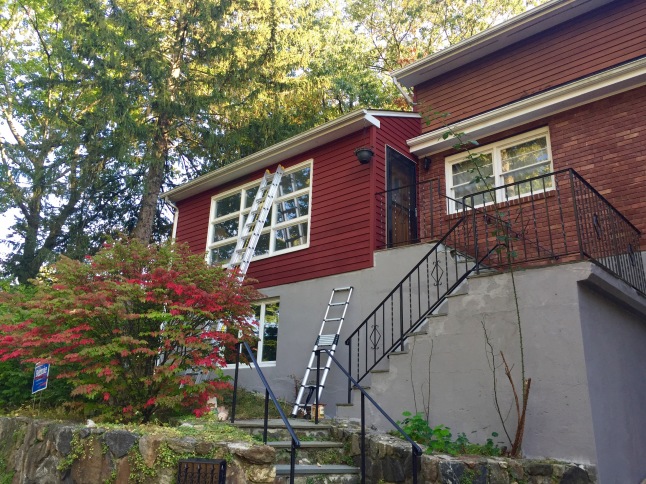
Then I ran into trouble.  The big ladder was actually too tall to use on the upper landing at the front door, because it extended beyond the gutters and held me too far away from the siding to reach decently (if at all,) so I had to switch back to the telescoping thing which feels very bouncy and fun.

ladder scare.jpg

It wasn’t awful to do that first corner using the telescoping ladder, but I found myself very nervous when I began the next section over.  To reach the very top I’d have to climb above the gutter that it was leaning against, and I didn’t trust the gutter very much, and the sway of the ladder was unnerving too.  I couldn’t bring myself to go high enough without the “support” that the corner had provided.  So, I moved onto the portion reached by the extension ladder.  It felt gloriously stabile!  However, it was also resting on the gutter, and while I could stain to the left, my brain wasn’t happy with the idea of looking to my right or brushing beyond the centre of my body.  Seeing the drop off of the landing made me freak out that the thing would crash down or something to the right.  The left was perfectly fine thanks to the visual mass of the house… despite that actually being no help at all.  Silly brain!

Therefore I switched to the back of the house and completed the lower level.

Over the weekend we drove up to visit my family, and the scary-ladder topic came up (with much agreement that they are indeed unnerving.)  On Monday I got back to work and no longer found myself fearful after all.  Great!  So, I finished what I could reach with the ladder on the landing and also moved it to the steps to get the patch that I’d missed before.  A cinderblock and board helped with levelling.  No problem still.

front.jpg


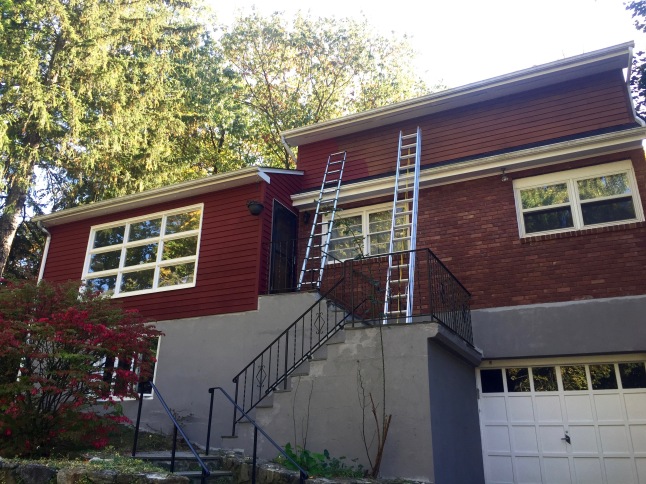
The front was so close to completion, but I was stuck without any help.  The weather remained dry and favourable although cold, but the ladder needed to be brought down to the driveway to get over the garage.  I used very little time on Monday before hitting a standstill due to the ladder.  Tuesday was wasted too.  😦

Yesterday L. worked from home and moved the ladder twice.  First we brought it from the front steps, where I’d dragged it on Monday, down to the driveway so that I could complete the front of the house.  I was so excited that it would look good to all the people walking by!  However, nerves got to me again.  We struggled to set up the ladder but eventually did get it in place.  The feet had been slipping a lot on the hard surface while we were setting it up, and that bothered me a bit.  On top of that it was now extended much more than before and was flexing like crazy.  I began scampering up to test it, and I didn’t go quite halfway before feeling uncertain.  Maybe I could have steeled my nerves, but with L. only able to help so much it seemed more productive to leave the front and take the ladder to the back of the house where I was certainly able to work.  L. encouraged me to climb down immediately, and we brought the ladder to the back.  There I was perfectly comfortable with the more calming landscape (with decently flat grass, the rise of the hill behind me, and a tall neighbouring house set above us rather than the hard surface, visual drop off of the hillside, retaining wall, street, and neighbouring homes far below.)

back progress.jpg

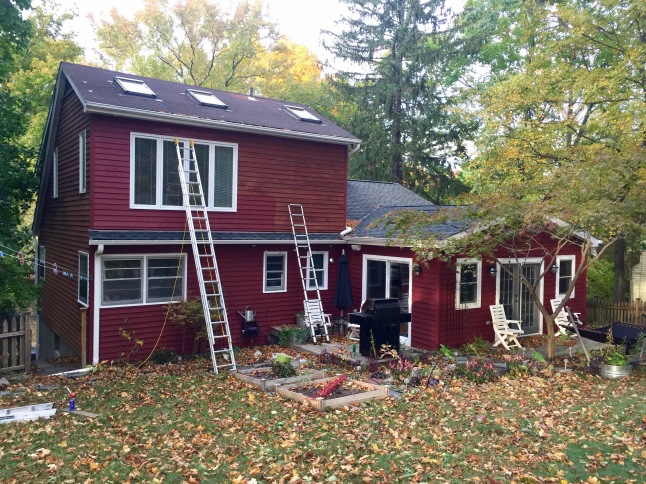
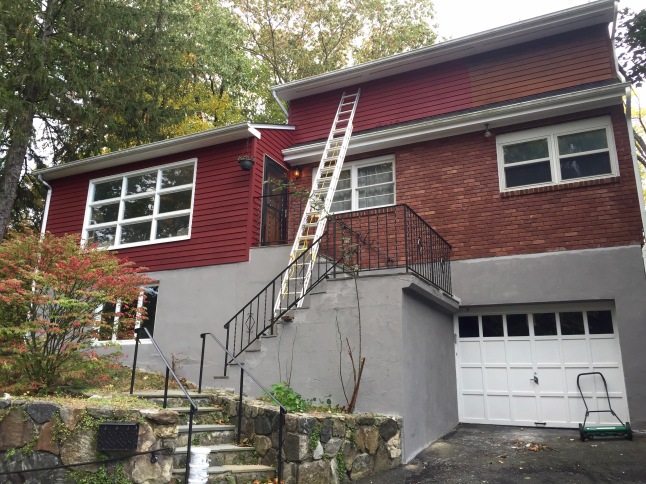
Annoyingly I had to stop working for an appointment in mid-afternoon which kept me from finishing the section before today’s rain.  Otherwise the back would have been totally done leaving the pathetic patch of the front and each side of the house remaining.

Today we have nasty, cold, rainy weather all day.  While tomorrow is going to be dry and Saturday warm with some sun I doubt I’ll do any staining due to weekend plans with L.  There will be rain on Sunday, and on Monday I have an appointment to set up our second round of IVF.  By Tuesday things will be dry.  I’ll have to do as much as I can before it rains again on Friday, but it looks like it will be nicer and warmer than I was expecting.  Surely I’m running out of time in that regard, so wish me luck that I can finish this thing!

Meanwhile I have neglected to do any gardening posts all season long since spring.  Perhaps through the winter I’ll share gardening cheer and photos between projects?  Currently I have some bulbs left to plant, but that isn’t conducive to pretty “job complete” photos, heh.  I surprised myself with a shipment of fall bulbs that I ordered in spring.  Just as I hoped, I completely forgot about them until I received a tracking email, and it was fun to figure out what was on the way.  In fact, I had to search each bulb on the website to see what they were.

surprise bulbs.jpg

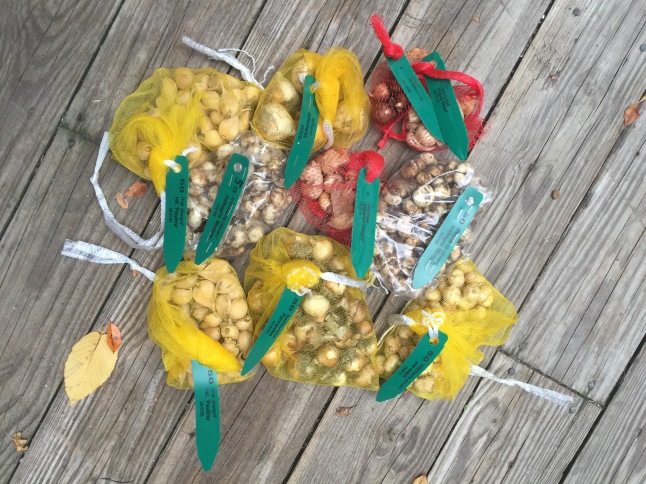
I’ve already planted a few bags but still have to get to the rest.  Leaves have fallen everywhere and are in the way, but nice days are meant for staining not raking.  Last year’s saffron began sprouting up a couple of weeks ago, but I only found one or two shoots of this year’s planting.  Either the squirrels messed with them or the vendor isn’t as reliable. (I believe it was the squirrels.)

saffron.jpg

The garden has looked about like this since mid-August, but it will not for much longer.  We almost had frost these past few nights.  Of course one of the black pearl pepper plants, planted in April, finally began blooming!  There are two tiny peppers on it now.

fall garden.jpg

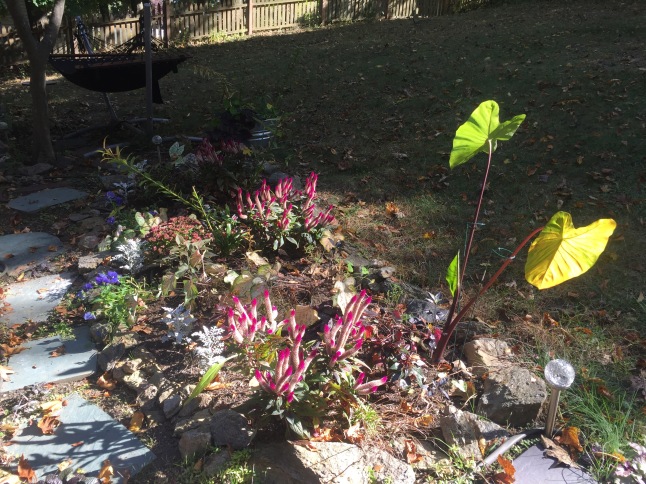
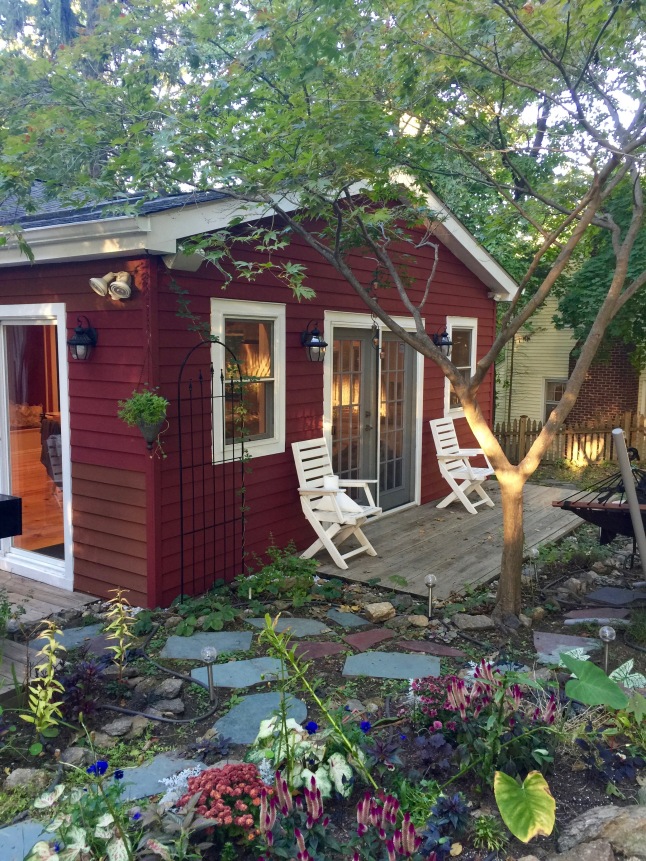
Due to the cold weather I brought in the three hanging planters with black petunias in hopes of keeping them blooming all winter, but we’ll see how that goes.  Here they looked nice against the new red on a warmer day:

stain and black petunias.jpg


In Time for Halloween: Borg Queen Cosplay

I still find the term “cosplay” a bit odd.  Didn’t we used to just say “costume?”  😀  It seems I have to add the word to my vocabulary permanently though, so here is my Borg Queen cosplay that I did for the Star Trek Mission New York convention last month:

Star Trek Missions New York cosplay contest Borg Queen.jpg

Unfortunately I don’t recall where I pulled this photo from, and when I tried doing a Google image search just now it didn’t bring me to the source.  (Perhaps I didn’t search correctly?  Google only led me to the definition of “female.”  Weird.)  I expect it was from the Mission New York event itself?  Sorry to whoever ought to be credited, but thank you so much for taking the best shot that I have of the costume!  Once again I failed to take decent photos for myself.  😦  This is a serious problem when I want to show my work and have crappy mirror selfies only.

So.  I made this Borg Queen costume at the end of August after vowing never again to wear such a costume after last Halloween.  I’d made my first rendition for Halloween 2014 and thought it turned out great.  I even won a contest for the first time!  However, I barely had any photos of it.  When Halloween rolled around last year I decided that I could re-use it easily enough, but I still didn’t end up taking great photos!  Wtf?  (The problem seems to be that L. rather dislikes taking photos, or taking the time to properly take photos, and also it always gets dark before I’m done putting everything on.)  Anyway, the weight of the headpiece caused a massive headache, and the adhesive was unpleasant to remove, so I vowed never again.  Then L. asked if I wanted to go to a Star Trek convention, and I simply couldn’t not try the Borg Queen again.  At least I had enough experience that I knew I’d have just enough time  and mostly which materials I needed.  Even with the bald cap I knew what I was getting into.  This post is going to be extremely long, but I hope you’ll enjoy seeing so much of the progression of this costume.

First of all, the Borg Queen is a character in Next Generation and Voyager.  This is what she looked like:

In general the Borg seem like really fun costumes to tackle, but L. suggested I go straight for the queen saying that I resemble her enough to pull it off well.  It would be really neat to do a drone costume, and perhaps easier in many ways, but I went into the unknown territory of bald caps and makeup.  Yikes!

For Halloween 2014 there was so much trial and error.  I probably spent twice as much as I needed to by trying materials and finding they didn’t work as planned.  I also re-made several things over and over too.  For example, I first attempted to sculpt with silicone from the hardware store, and it worked decently well… until I discovered that nothing would stick to this material (liquid latex in particular.)  Another dead end was using bits of latex gloves for sculpting rippled skin.  It looked good but wasn’t functional.

2014:

I’d hoped to do a really cool body too, but that did not work out.  Generally I thought that the neckline and head were iconic enough not to require an amazing body anyway.  These were the best photos (and pretty much the only ones.)  :shakes head:

For this costume I used beads and picture hanging hooks for the neckline attachment, and I sculpted the pulled skin with liquid latex and bald cap sculpting ended up being done with latex painter’s caulk.  Bottle caps made great neck bits, a cap from teflon tape, and some cable management coils were wonderful for the headpiece.  I did research and purchased Prosaide (normal and a thicker formula) besides the liquid latex and bald cap as far as real FX supplies.  Great stuff!


2015:

Last Halloween I only bought a bald cap, cut the sculpted portions off of the old one, and adhered them to the new cap (with Prosaide.)  I re-used the neckline hooks, and I added a corset (that I made some years ago.)  The makeup was not as smooth nor were the edges and transitions of latex.  These are my best photos.  :sigh:  I wore it to hand out candy and then we had a few beers at our favourite neighbourhood bar.


Okay, so now that I’ve shared all of that backstory, on to 2016:

This time I wanted to go all out.  I had to do something better for the torso and planned even on the legs and footwear to be amazing.  However, time and creativity did not allow for as much as I dreamt.  L. told me to expect all sorts of awesome costumes and competition at the convention and in the contest, so I tried really hard with this costume.  I am proud of it although I see plenty of things that could have been done better.  This time I can most likely even wear it again, but I do not have plans to.

I began with some print-outs to refer to and these basic materials:

The Golden’s iridescent paints were an old friend by now.  I absolutely love what the coarse stainless steel paint has let me do for previous costumes, and I tried out a few new ones too.  InstaMorph was new to work with, but I found it to be very useful and versatile.  Colouring the InstaMorph with this for a metallic look worked out very well.  I did give a coat of the stainless steel paint for an even better look.  Another new material that I hadn’t tried before was Worbla.  I’d seen it used in wonderful costumes online, but before this I hadn’t bothered to buy and try it myself.  If you look on Youtube there are people creating amazing things with it, but they made it look much easier to work with than I thought it was.  😉

The first thing I worked on was the Borg Queen torso.  Since I was using a new material it was the part I was most concerned about having time for, but it did go faster than I’d anticipated.  To make her torso I laced my old corset onto my dress form to use as a base.  I wanted to be certain of measurements, and this made the perfect sized form.  My plan was to wear the corset underneath the costume also, because I didn’t want to bend and break something!  It was not too difficult to sketch out a general shape on pattern paper, pinned onto the form, to use as a template to cut craft foam.

I bought two large pieces of black Worbla on eBay, and I sandwiched Worbla over craft foam to make the torso pieces.  The process ended up killing my cheap heat gun (RIP) and was very uncomfortable for my fingers.  Perhaps I am particularly wimpy in that regard (I have circulatory issues) or maybe I wasn’t patient and should have held the heat gun farther away?  The Youtubers looked much happier when moulding it than I was.

When the Worbla portion was all sculpted I began to work on the headpiece, because it must be done in layers and left to dry for days between.  First, I glued a teflon tape cover in place with latex caulk and let it dry.  Next, I hot glued the cable management coils into it, the other ends onto the cap, and filled the void with more caulk.  Caulk is perfect for sculpting the skin where the coils enter the skull, but it has to be done in two or three layers before doing the detail.

You can see that I began sculpting the plastic parts with InstaMorph while the layers of caulk dried.  It was nice to work with but also made my fingers somewhat uncomfortable.  I wished I had tried this product long ago, because it was so perfect to use.

To attach the neckline stuff to the leotard I only had to heat it up and stick it on.  It was really easy, but I accidentally melted a hole through the fabric in the back… so an extra bit was added not inspired by the real Borg Queen to cover it.  The only other problem was that the plastic did not stretch to fit over my hips when dressing.  I encountered the problem when in a rush to get ready!  My solution was to keep pulling until it broke enough to put on, and then I contorted with the heat gun to re-stick the pieces that separated… while I wore it.

After making the torso with layers of Worbla and craft foam I wasn’t too certain the Worbla layers would stay together, and I saw a tutorial that advised brushing a layer of Elmer’s glue onto it before painting.  Instead I used several thick layers of Modge Podge.  Then I gessoed them, with black gesso to save steps, before painting the metallic effects.  The shipping time for the iridescent paint caused worry, because it might arrive too late for the event, so I tried one with mica instead.  I didn’t like it for this costume though.  It was too shimmery rather than metallic, so I ended up coating the back section with gesso again and sending L. to Blick for the proper paint since he works nearby.  The irritating thing is that I have plenty from past costume but could not find it ANYWHERE.  I spent an entire day sorting through every box in the storage room and unpacking some that were still unopened from our move a year and a half past, but the paint is missing.  L. saved the day by going to the store for me, and I also asked for a bottle of the copper paint too, because I’d noticed that the Borg Queen had bronze-red accents too that I now felt could not be ignored.  Adding some warmer tones would really bring things to life, I thought.

completed-borg-queen-torso-pieces
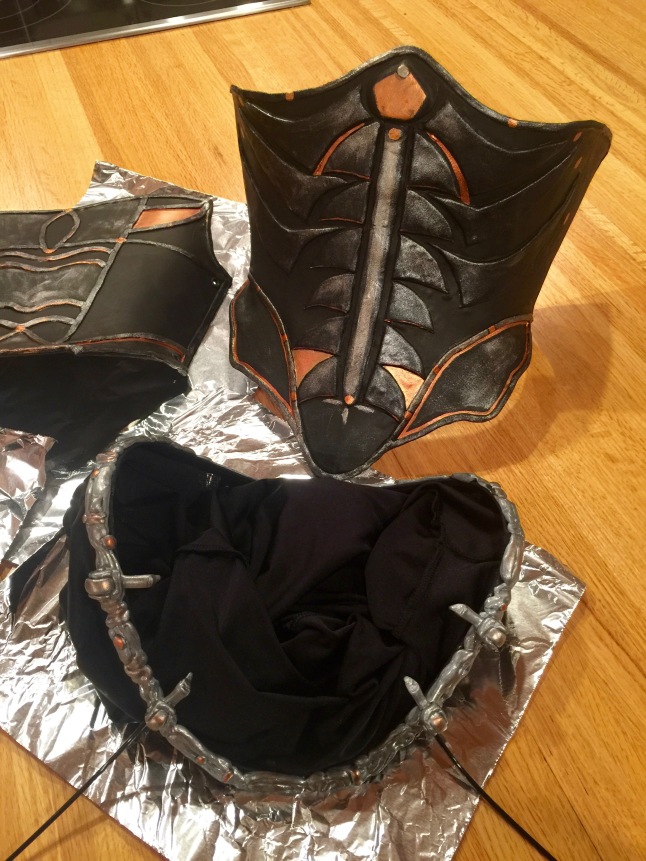
All done, aside from the makeup and assembly of course.

I’d really wanted to make the legs look good too and bought a few types of metallic and black pearl fabric paint, but I couldn’t really figure out a way to apply it and not have problems.  Finally I chickened out of trying, because I was afraid to ruin the leggings too soon before the convention.  It is a shame though, because I don’t like that portion of the ensemble as a result.

The convention was really something else.  I did not realise just how much attention this costume would attract.  It was surreal and amazing to experience.  When we first arrived to the Javits Centre area I was almost worried we had the wrong place or day, because we didn’t see anyone dressed up at all.  Even inside it was a bit echoey and empty when we entered, but we met up with our friend and found seats at the back of a panel event.  along the way I received some smiles and stuff, but it wasn’t until the panel audience exited that I experienced the full effect.  We were some of the first out of the door, being so close to the back, and before we could figure out where to go someone asked for a photo.  Suddenly it was several people, many people, tens of cameras and phones ringed around me in a swarm.  I wasn’t prepared at all, so it was really bizarre and overwhelming for a bit.  I couldn’t decide how to smile, or not smile, and I’m sure the photos taken then showed a very awkward Borg.  This kind of thing continued all day though, and very soon I was admittedly enjoying every second.  😀  L. and our friend S. kept joking about the fact that we couldn’t walk more than a few steps before being stopped again for more photos.  I’d hoped to snag a bunch of them online, but only a couple popped up that I could find.

A highlight was that when we went for autographs the actors were really kind and impressed.  I’m going to totally pat myself on the back here and forget any semblance of modesty, haha.  😀  It was really neat to exchange a few words with Armin Shimerman, for example.  Wearing all the bald cap and all made me better appreciate how hard it must have been to act while wearing such uncomfortable and limiting things.  The reactions from him, Jonathan Frakes, John de Lancie, and Robert Picardo really made me proud of the costume although I did not win in the cosplay contest.  Speaking of, I do believe that Terry Farrel thought it was pretty cool, because she asked me tonnes of questions about making it and really checked out the details while she was judging.  😉

IMG_4956.jpg

Borg Queen cosplay contest onstage.jpg

Federation Trump cause me to giggle far more than I should have when I first saw him, by the way.  Khan-ye West and Kim Cardassian really cracked me up and had hilarious presence on the stage.  The Enterprise dress was a cool idea too, and I wouldn’t have come up with it ever.  The Khann that won did a really great job too with all sorts of details, and I think the holodeck duo would have won if Khan-ye and Kim weren’t there, because they did really well too.  There was a very good Garek too, but she wasn’t in the contest.  Actually, I saw plenty of fun costumes out there all day.  🙂

I asked on the convention app if anyone would share photos since I took too few, and here are two I found:

I will not lie, this is the coolest thing that happened that day… Robert Picardo asked if he could take a photo with me and Tweeted it!  😀  So, here is that:

Borg Queen with Robert Picardo.jpg

A Big Project: Staining Wooden Siding (what have I gotten myself into?!)

img_6095

I got myself into a bit of a mess of a project, and there is nothing to be done except somehow complete it.  😀  With luck there will be enough dry and warm days to do so.

Our house has wooden siding.  The newest section was a kitchen addition/expansion off the back, and there is plenty of life left in the stain on it.  However, the rest of the back is only passable, and the front is weathered badly.  Many spots are silvered wood instead of stain, and somebody was too aggressive with a power washer before we bought the place.  Time to stain!

Foolishly and optimistically I decided to DIY.  Last week I power washed and even lugged the washer up onto the roof to get the worst sections cleaned up there.  So far (and I’ve only put in about five hours, really,) it isn’t awful, but I am pretty sure already that next time this will be a pay-a-professional sort of job.  😀  Honestly, it has been perfectly pleasant so far, but realistically I expect severe regret to hit at some point in the next week or two.  I’ve only finished one section completely and a few boards in another.  The going is slow.  I’m also waiting for a 32′ ladder that will not arrive until next Wednesday.  Drat!  I have no way to transport one, so I went with Amazon for the quickest shipping and best total price, but this Prime item required more than the usual two days… and I’d not counted on that fact.  It really sucks, because this week until Saturday is the best weather for staining.  I can only hope more dry groups of days will be in the forecast.

Once it became clear that I’d really be tackling this project my husband asked me “what colour?”

It was an easy choice to go with the current stain colour.  The previous owners had left us a handy reference can, and I always thought that the colour was pretty great.  I’d describe it as a red: a rusty-orangish-terracotta-slightly-brownish-red sure… but basically a red.  It perfectly fits the house which is a 1960 “contemporary,” according to the real estate listing.  With a large grid of windows, some brick; too many front steps, stone, and masonry “features” in the front; and two major additions that transformed it from some sort of mundane ranch to something less easily categorised: the interesting but somehow neutral brown-red worked.  To the eye the siding colour and brick melded attractively, and nothing competed for attention except for the sad expanse of foundation  lifting the structure above the hillside.  (The cinderblock steps and front foundation were enhanced with a parge coat and topped with bluestone.  It looked gorgeous but wasn’t done properly, and now is it spalling and crumbling apart most hideously.)

Why change such a well chosen colour?

We like to take walks around the neighbourhood and judge discuss what we like and don’t like about the houses and landscaping that we pass by.  Sometimes there is a detail that I’d like to copy, and sometimes we laugh that you just cannot account for personal tastes.  Near us there is a stunning home.  It’s a stuccoed Tudor style probably built in the ’30s, and it is painted a vibrant red.  The area has quite a few similarly styled homes, but the colour makes it shine like a jewel set in the towering dark pines of their yard.  It is cheerful.  Even on cloudy days it seems there is more sunlight there, and we both love the red.  So, when I went to the local hardware store to have some Arborcoat mixed up, the old can’s tint formula in hand, I hesitated.  Instead of having the lady there send me on my  way with a few cans of the terracotta hue I said to her “you know, I had planned on keeping this the same, but I think my husband would really like a brighter red, but I don’t know…”  She replied that men usually do seem to prefer louder colours and eventually she sent me home with a couple of sample jars: Redwood and Barn Red.

Immediately I liked the old terracotta when I brushed a fresh swatch of it near the front door.  The barn red seemed… really red.  Wow.  Okay… Lastly, redwood struck me as far too orange without a second thought.  Later L. came home and didn’t hesitate to exclaim that the red was awesome, and that barn red it would be.

Oh.  Uh…  I wasn’t so sure.  His selection caused me a lot of angst over the next day or two.  I brushed more samples in other areas.  I sent photos to my mother for her coworkers to vote on.  It was driving me crazy.  For the record, my mother was also leaning toward the terracotta, but all the votes were enthusiastically for the barn red.  I went back and purchased a few gallons mixed as barn red, and the guy who mixed it responded that it was a nice colour and “welcome to 1950” when I expressed concern at the change and brightness.  That night I actually had bad dreams about the decision!  On Sunday we went sailing with some friends, and at some point I asked their opinions as I related the dilemma.  After seeing photos they voted barn red, and I was glad when they began to tell us about a really stunning red house up the block… the same one we’d been so fond of too.

So, I began staining on Tuesday.

I haven’t gotten terribly far yet, but I’ll admit that it does look quite nice after all on the end of the kitchen with French doors that I did complete.  I’m really enjoying the Arborcoat solid stain and how well it goes on.  It is my first time using a Benjamin Moore product, but I always appreciate a stain or paint that is a pleasure to work with, and luckily the Aborcoat is very nice indeed.

Now I have to get back to work on it.  I’ll report back with progress (or when I’m done,) and about other things that I am working on.  I’ve also been fixing up our windows with fresh paint, re-glazing, pretty new sash locks, and re-furbishing/removing the old storm windows.  Any days that aren’t suitable for staining have plenty of other work to fill them. Oh, and I did a temporary facelift on that crumbly, ugly front foundation and steps.  That isn’t complete but already looks much better.  I just don’t know if it will last until spring or whenever we can have a professional repair it solidly.  For that I cleaned the crumble, patched with Quickcrete (until I ran out,) and rolled on a coat of Behr foundation paint.  I still have to finish the patching, paint the edges and corners, and roll another coat, but it looks so much better.  The best part is getting rid of the pale, bluish paint that clashed jarringly with the rest of the place.  The clay taupe-grey that I selected in-store worked out great.  I took a risk in grabbing two gallons without seeing a colour chip at home, so I a pleased it worked out.

Here are a couple of shots that show how nicely the terracotta matched the reddish slate stepping stones:

And here is a reference photo of the front of our place from the street.  It was taken last fall:

front-photo-from-last-fall-2015

And then the masonry mess:

And a bit after with the paint.  I think the darker shade is far better:


Compare: