A Fabulous Pram Re-make Part I: ’90s Emmaljunga “Viking” Stroller/Pushchair

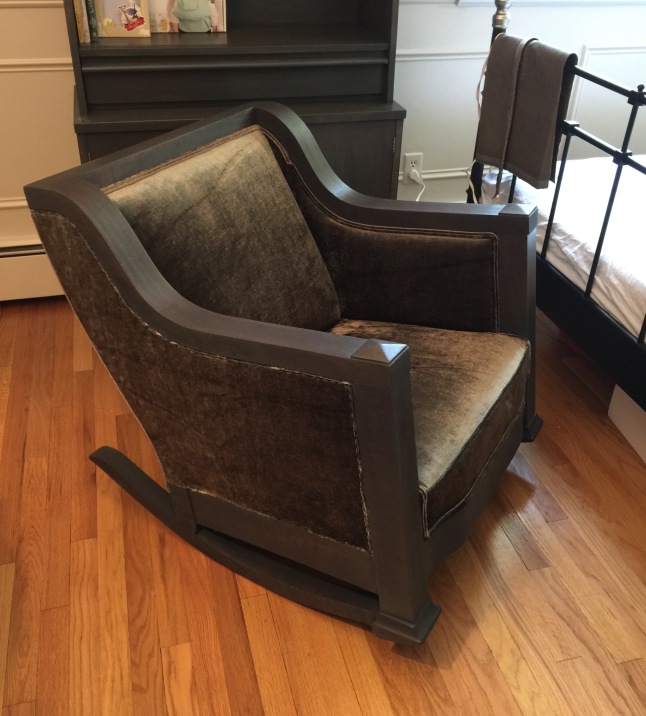
So, it has been a little while!  I last wrote just before giving birth to my daughter and was rushing to complete my last project.  Well, I did finish that stroller chair the day after my last post as I’d hoped.  Today’s post is to detail that process.

Unfortunately I couldn’t begin the second portion of the project before Mini’s arrival, because I didn’t have the necessary fabric and wasn’t willing to tear apart the original bassinet.  Now I do have another one to use and the required yardage, so I began the pattern for the pram today Tuesday.  It seems I can only work on things for a half hour or so at a time these days, so I’m afraid it may be a while before I write about it in favour of actually finishing the piece in order to use before she grows out of it. Hopefully.

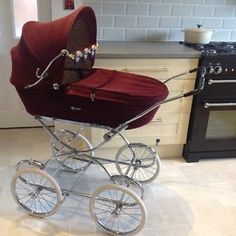
The timing was off, but I acquired another “viking” pram and stroller set with fabric in poorer condition than the first.  I only wish I’d had it sooner, because the better hood portion was torn apart to re-cover, and the second is very faded. It’s sad, but I’ll either fix the first one somehow or find some way of making it all work to have an original red set as an option besides what I’m about to show you…

This entire project was quite unnecessary but inspired me far too much to let go.  I had some fabulous fabric in mind to make a really unique and special stroller.  Did I need another pushchair? Not at all, but I wanted to show the world (or at least whoever happens to see it) the pretty thing I could make and to have a fancy stroller for my daughter.  Babies do have a tendency to make people want adorable little things, eh?  Reactions to the linen re-make of the Hedstrom pram has been fantastic, so I can’t wait to have the “viking” done!

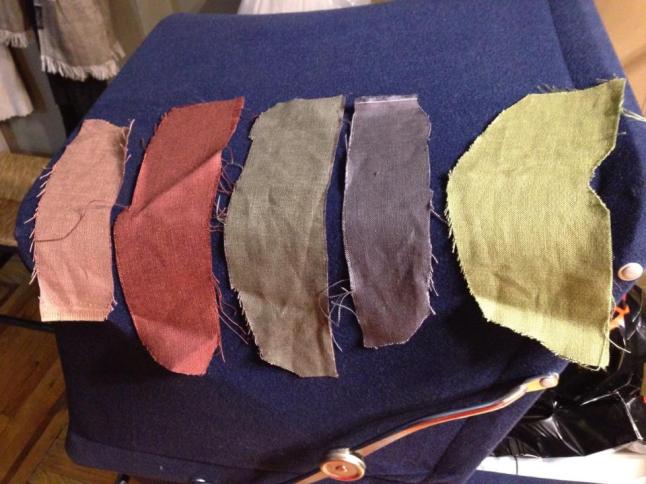
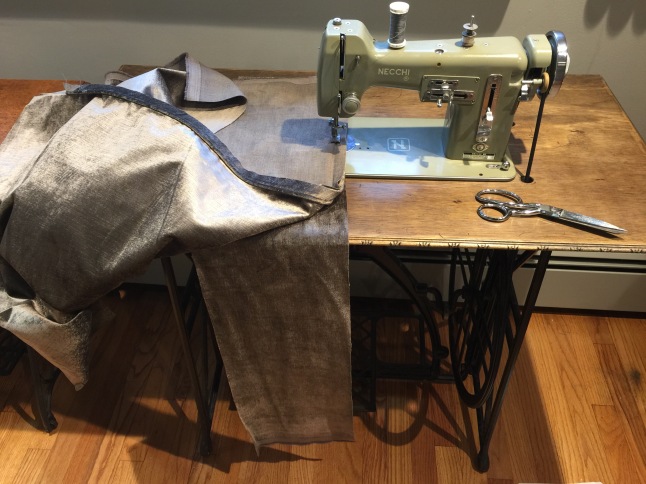
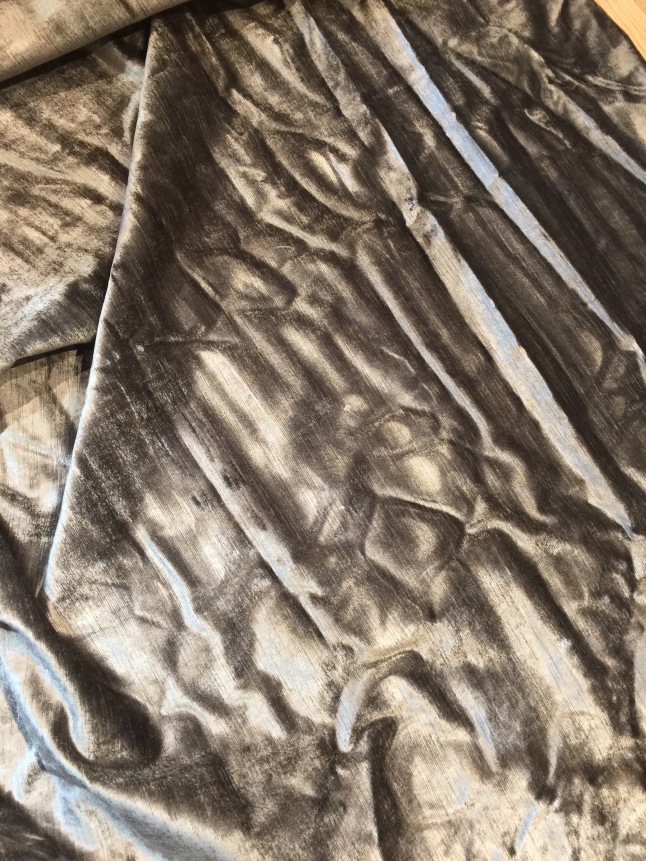
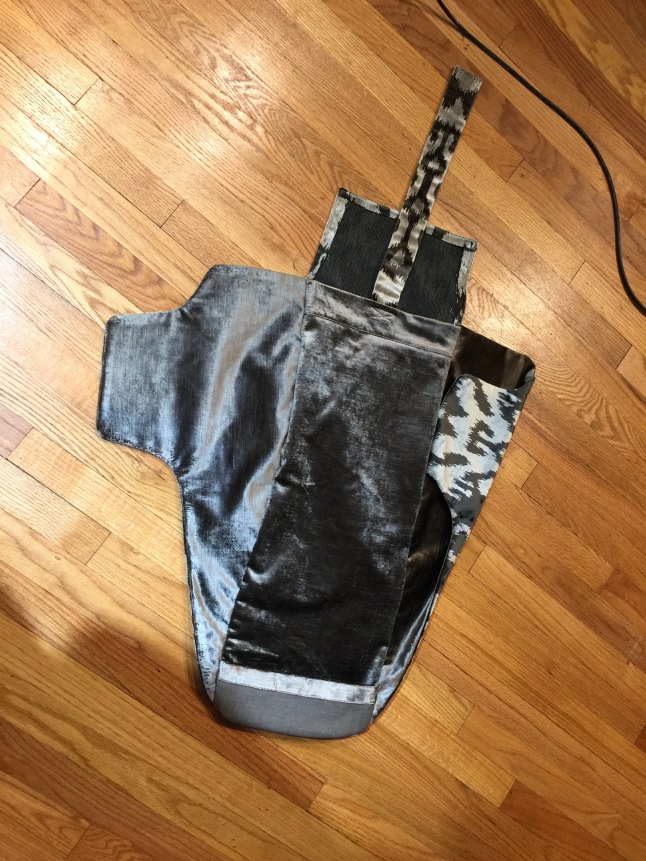
Here again are the fabric and the stroller seat attachment:

I don’t know about anyone else’s taste, but I love this ikat patterned velvet!  There is a black colour-way that I slightly prefer, but this grey is reasonably neutral besides being fabulously bold.  Whatever colour I’m wearing should go just fine with it, but it makes a statement for sure.  So inspiring!  

Choosing how to use the ikat and plain grey velvet was a difficult decision, and I was very uncertain for days.  I didn’t have enough of the expensive ikat to use it exclusively, and I also felt it was a tad too bold not to tone down with a solid anyway.  It was an easy decision to use the plain grey for the underside pieces of the seat cover, but the hood canopy was a tricky matter.  I was afraid that using ikat as the outer fabric would look “too much.”  I wanted a fabulous stroller and to avoid an unnecessarily busy look in favour of something well planned and eye catching.  To achieve this I began by cutting out the pieces of the seat cover carefully positioned over the portions of the design I liked best and with matching in mind.

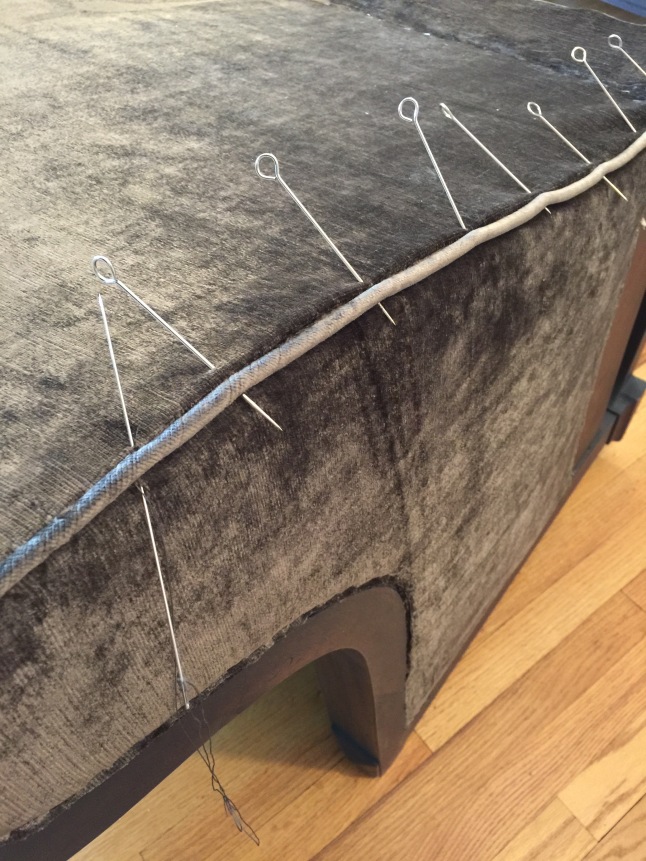
Then I tried to settle on the hood design.  I considered using the ikat outside with the inner portion lined with the solid grey.  I thought about doing the front crescent, inner and outer, with the ikat and the lower portion and bag section in the grey.  Then I thought about scrapping the pattern from the original and using a hood design better suited to the ikat!  I could make the bag section less tailored and of one shirred piece, like my Simo stroller, or I could create shaping in my own way with darts or at least make a few changes to the pieces to better frame a large print.  However, I chose to stick with the original, and when I was sure about some of the pieces cut them out to arrange final placement by pinning them to the frame before sewing.

Eventually I settled on the interior being ikat with the grey outside.  I felt it looked more intentional and liked the surprise inside rather than have it look like I was simply saving on material with lesser fabric inside.  (Even now that it is complete I’m not entirely sure I should have gone with this placement, but I do like it most of the time.)

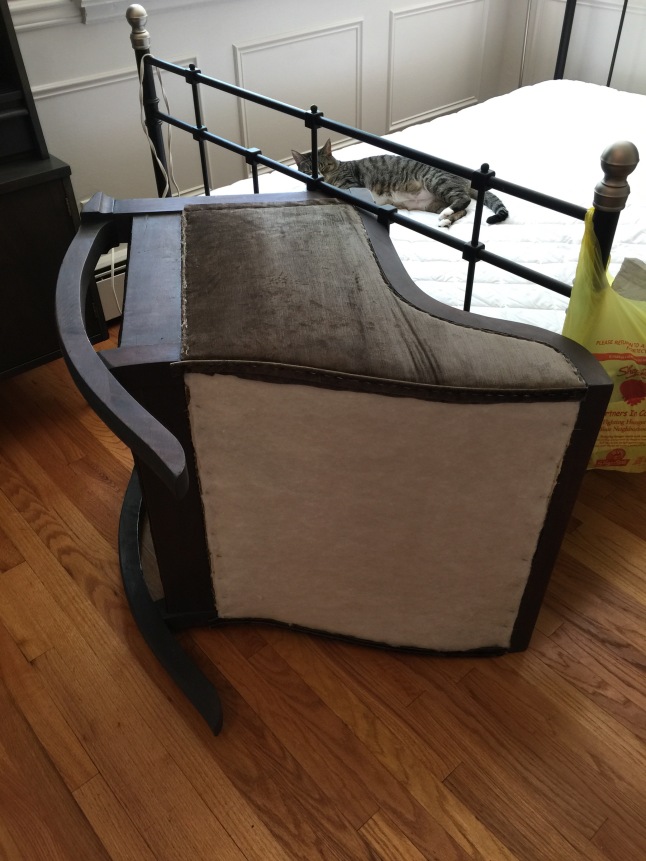
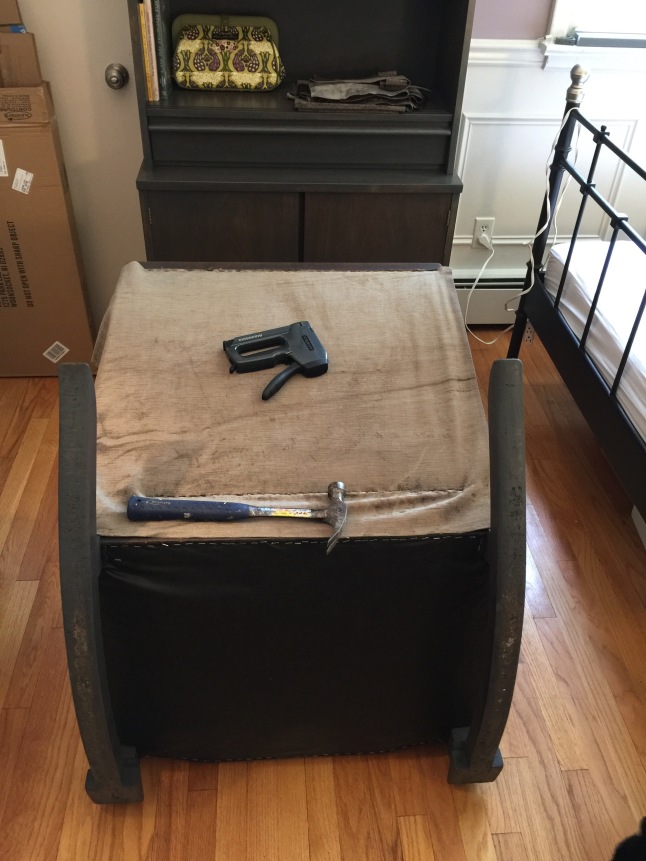
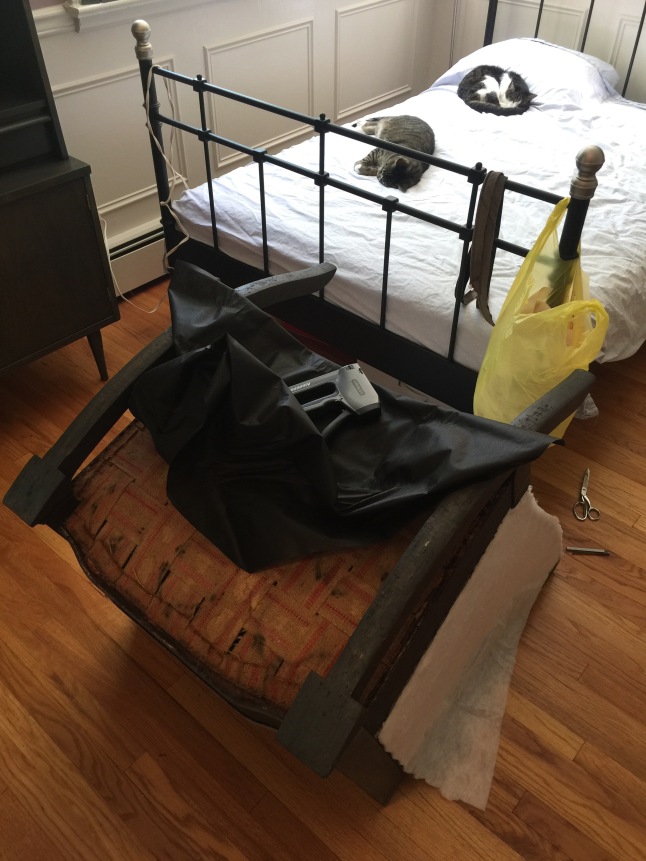
The original cover had a little batting to pad the wooden seat support, but I wasn’t keen on adding a layer like that.  Instead I used a scrap of memory foam (mattress topper) and stapled it under muslin to the boards.  Cushy!

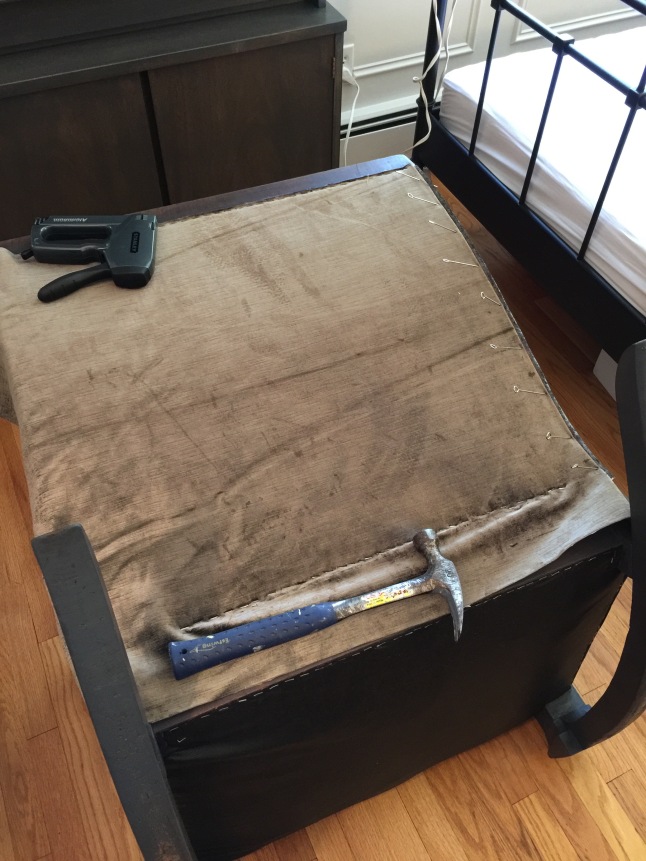
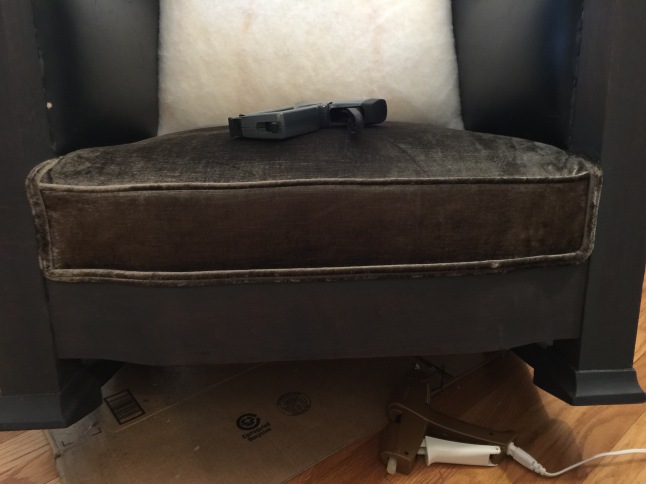
Next I worked on the seat cover.  It was pretty easy except that I mistakenly pinned the flap that secures the cover over the chair frame backwards and had to rip that section out to re-sew.  Due to the velvet and there being many layers I took a lot of time to hand baste each seam before stitching on the machine.  Even so, I managed to catch the edge of one side in a seam.  Drat!  Here you can see the backwards flap and the caught edge before I ripped them out and fixed it:

oops.jpg

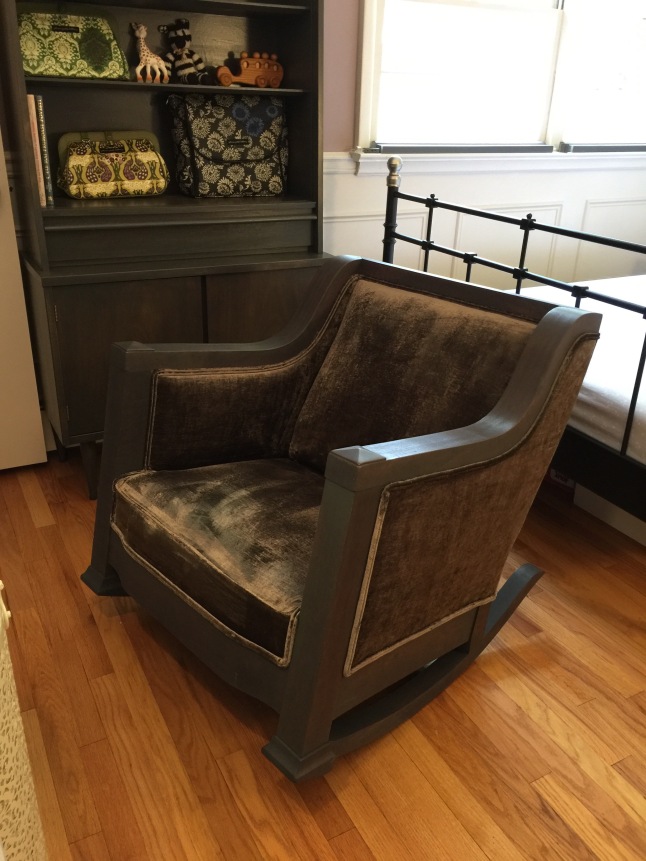
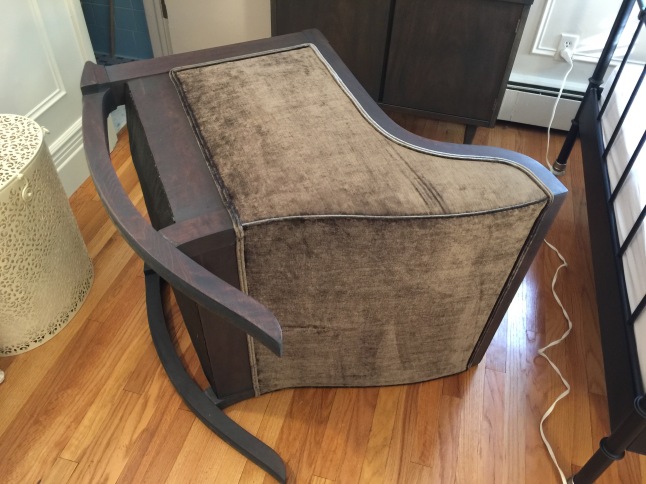
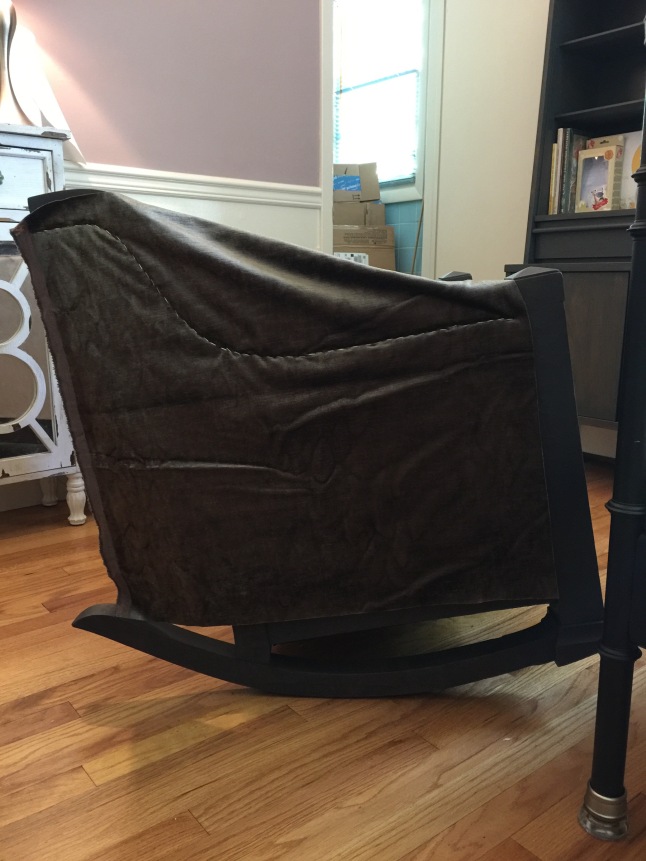
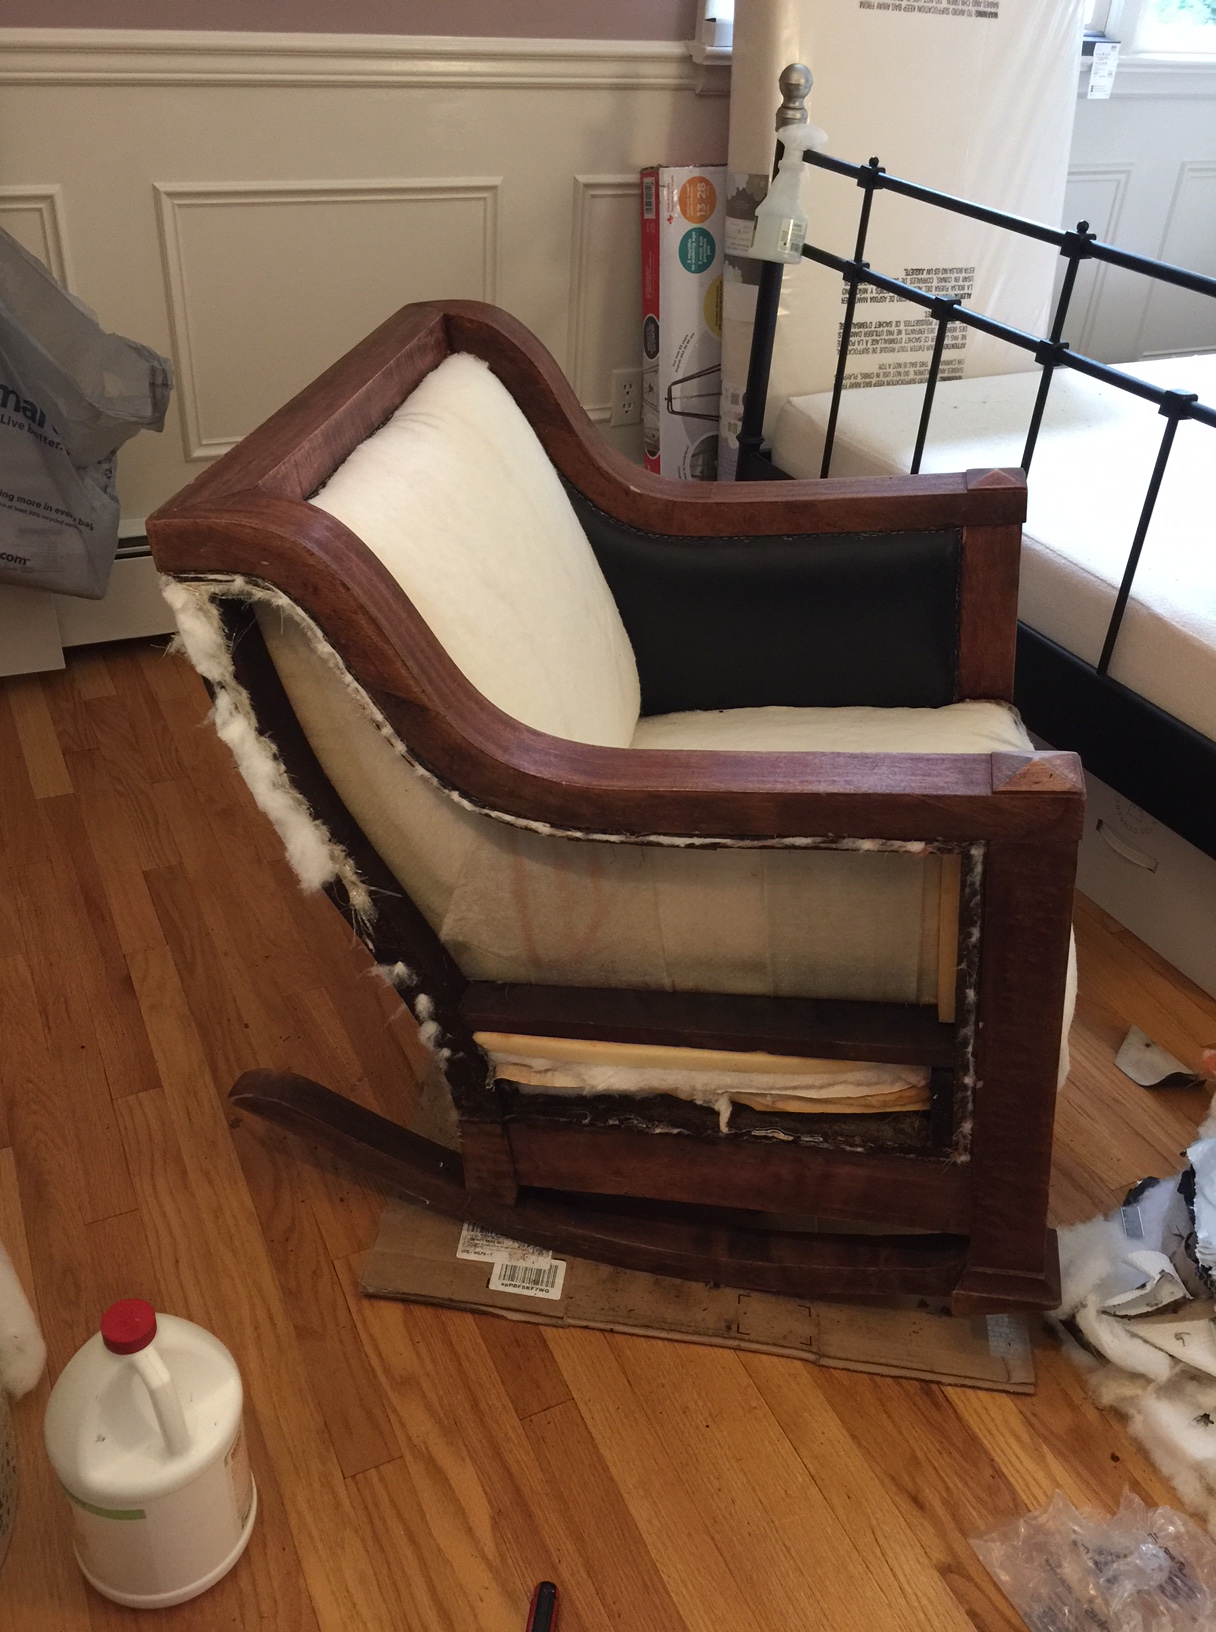
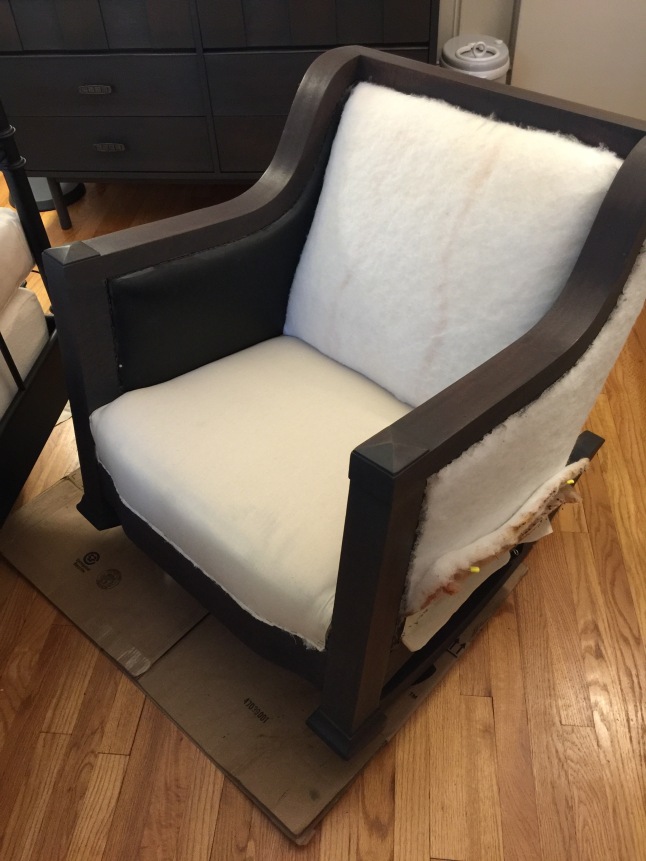
Very soon the seat was done!

I was very pleased with the results and so tackled the hood.  It involved a lot of pins and hand stitching, and I’m still not thrilled with the way I worked around the riveted bit by slashing the fabric to slide around as best I could.  (This part is making me very hesitant to commit to starting that part of the pram now!)  The shiny metal bit is a distinguishing feature of the “vikings” but it complicates re-covering terribly.  I might have drilled out the rivets, but two are also anchor points for the weather shield, and I wasn’t confident about being able to replicate a secure rivet that would endure a lot of use.  Now I have a tiny unsightly flaw around them though, and it is driving me batty.

One things remains to be done.  I made a pattern for the weather cover, but I haven’t cut the ikat or vinyl for it yet let alone basted or sewed it.  I have time before this stroller will be used, so that is on hold while I try to complete the pram before Mini grows too big for it!

IMG_0894.jpg

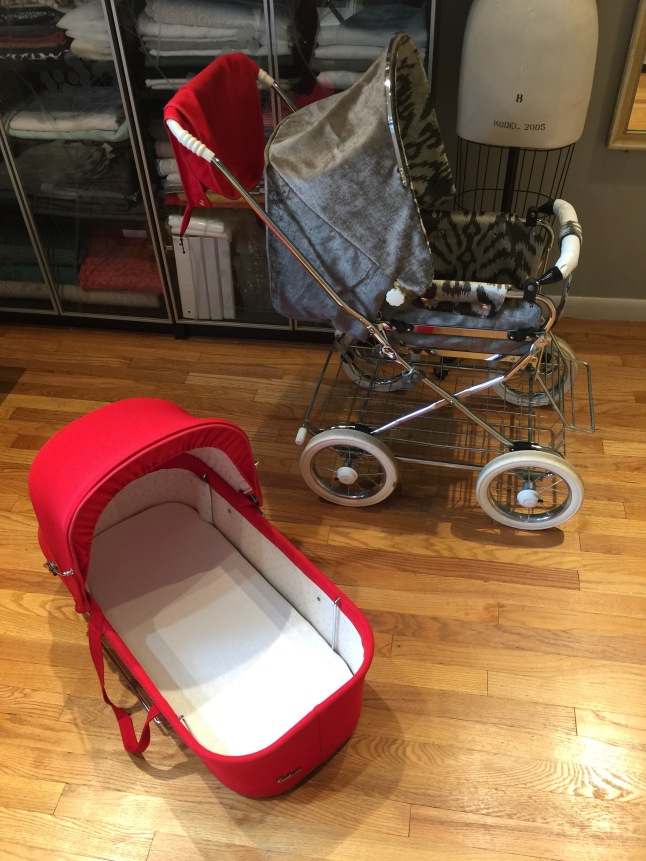
You can see how adorable the red is too and why I wanted to have the option to use it also and not ruin it?

Today yesterday Tuesday I began to pattern the bassinet hood.  It only took a few minutes of pinning muslin to it and tracing the edges, but then I had to stop for other chores and to spend time with Mini and L.  It felt pretty good to finally make even a little progress though.  Today or in the next few days I’ll continue.  I plan to make Tyvek pattern pieces from the tracings, cut pieces from the velvet, and complete the hood section before working on the body of the bassinet.  (I bought a roll of Tyvek long ago to make patterns, because it ends up being much cheaper than Swiss paper but more durable than paper.  I can’t stand the feel of paper anyway. A drawback is how opaque it is.)  The seat of the stroller uses snaps and design to be able to take it apart and even switch out the covers, but unfortunately the hood pieces do not allow for that nor does the bassinet.  Mostly it does disassemble fairly easily by removing three screws, folding away some metal spreader arm things, and it is nearly the same construction as the Hedstrom bassinet.  It will be a fiddly project but hopefully not too bad.  The biggest wild card to deal with are various rivets to replace with something as similar as possible or to adjust the design a bit.  I’ll see.  

Re-making Vintage Prams & Strollers Part I: a Hedstrom Bassinet/Carrycot

This is something I haven’t really found anyone else writing about: re-making/re-covering/re-upholstering old prams.  Although in researching them I’ve found some bloggers using older prams for their kids I haven’t seen anyone take one apart to revamp it with new fabrics.  That kind of surprises me!  Today I’ll talk about the first pram that I re-made, and then I’ll be posting about an ongoing project that I’m excited about.  The new project is unfortunately going to be subjected to delays thanks to lack of materials on hand and the impending arrival of Mini.  (She was due this past Saturday and is being evicted one way or another before this weekend.  While I’m very excited I’m also worried about ever finishing the newest pram!)

Prams and strollers/pushchairs, vintage or not, weren’t on my radar until I spotted an old Hedstrom in one of my favourite thrift stores a few years ago.  I didn’t need it.  I hadn’t known I wanted it, but once I found it; I did.  😀  Sure, I hesitated while the more sane part of my brain tried to win, but I kept pushing around the store as I browsed, it was only something like $10, and soon it was going home with me in hopes that we’d be making use of it some day.  I just liked how it looked, all metal and old fashioned, and I thought it seemed practical with the detachable bassinet and gentle rocking motion.  The fabric wasn’t so lovely and a bit crumbly, but I knew I could either clean or fix it up.  Once home the frame polished up nicely, and I began Googling old prams.  Right away I decided on using linen to re-make the bassinet, because I just didn’t like the knit navy fabric very well or expect it to last much longer.

543365_10151402842864756_1559025897_n

It was very difficult to select a fabric.  A somewhat lime green was my favourite option with a fairly muted red next in line.  Dusty shades of pink, green, and blue were runners up.  On the one hand I wanted to use a fun colour, but on the other I was afraid to have it clash with my outfit too often and also deferred to L’s preference and used the dull khaki green.  I still have the lime yardage and wish I’d used it instead, because it would have been a much more dramatic change and look, and this has influenced my choices for the new pram project.

150632_10151402843369756_915124798_n

Anyway, I have very few photos on hand from re-vamping the Hedstrom.  I tore it apart completely and jumped in with creating a pattern from the old pieces and re-builidng as best I could.  I had to replace the rivets with bolts and cap screw things, and sadly I didn’t make a matching cover to snap on, although I did include the snaps on the body to attach one.  I’m not sure what happened to the remaining fabric to make the cover.  😦  Everything was replaced except the frames and supports.  I used a fancy vinyl inside and to cover the mattress board.  The mattress support has a portion that snaps up into a seated position, which is nifty, and I made a mattress cover and pillow to match with the same green ticking striped cotton as the hood lining.  I was fairly pleased with how it all turned out.

Here are some recent shots:

Since then I’ve seen other similar prams, and I realised that I was missing more than the weather cover.  Technically the Hedstrom was complete aside from the weather cover, but plenty of other similar prams had seat attachments to turn them into strollers.  Shoot.  That’s far more useful!  Some brands and models are prettier, like the curvaceous and velvety Herlag brand I’ve only spotted rarely, some are boxy and less appealing to me, and some have a bit of a following like Emmaljunga’s “Viking” model.  As with most things like this I became a little obsessed, collected a few strollers, and still ended up crossing the river and a state line to pick up an early ’90s Viking frame, bassinet, and stroller seat set after seeing a particular listing on Craigslist forever at a steal of a price.  (I just couldn’t ignore it and let it go.)

Not the best Herlag example, but I saw a shiny one just like it but in better condition that really looked amazing with the curves:

Oh wait, here is another swiped photo but of the shiny one:

98f60ee7a68820422c02a3232505622b--vintage-pram-buggies.jpg

I took these photos from an eBay listing.  If only I had unlimited funds and space I’d probably get a Herlag too… polished up it would be soooooo gorgeous!  *sigh*  This brand is by far the most elegant in my opinion, and I wish I could trade the Hedstrom for one.  The corduroy inspired me to use velvet for the Emmaljunga to get a similarly rich look if not the elegance.

Emmaljunga’s Viking is the only somewhat popular old stroller people are using out there, as far as I can tell, aside from hard-bodied varieties like Silver Cross.  They came in navy blue most frequently and sometimes forest green or bright red all with white vinyl accents.  Other models had some funky fabric and vinyl options especially in the ’80s.  While you can still buy new hard-bodied prams that look old the soft upholstered kind turned into a modern take before 2000, and it seems that Scandinavians were the last to do upholstered prams that would pass as more vintage to most eyes.  (Emmaljunga is Swedish, and more common to find, but Simo is a similar Norwegian brand with a few American strollers out there from the ’90s too.)

Here is sneak peek preview of the Viking project…  I made a lot of progress today and should complete the stroller half tomorrow.  The bassinet portion will be on hold indefinitely, which sucks, but I don’t have the time or fabric for it now.  Also, I’d banked on using a $15 “donor” seat and bassinet set in order to save and use the red whenever it suited my fancy, but that fell through.  😦  The carrycot is in better condition, so I can’t bear to take it apart aside from the time and materials dilemma.  Either I’ll never end up making the matching bassinet that I envision or it’ll be with a suitable one in poor condition later.  *Sigh*  It was going to be gorgeous.  So, hopefully I’ll get to write after I’m done tomorrow but for now here is the original red stroller and the fabric I’ve used to re-make it:

I do feel terrible about ruining the original red set.  Gah!  All I can tell myself, and you, is that the stroller seat/hood part of the set was somewhat ratty up close… even with a spot or two worn right through.  It was still super cute though, and original!  And I had a red and pink Haba stroller toy thing that matched it so well, and a quilted seat pad too…  Gah!!!  I’ll definitely be keeping an eye out for a replacement if I can ever happen upon one.  (The hood portion is all that I really need if anyone out there has one for some reason.  Well, the bassinet too if I want to re-cover one some day.  Anyway…)

Part IV: Finished Reupholstering the Rocking Chair

IMG_5657.jpg


I’m DONE!  I finished upholstering on Friday, as planned, and I am so glad.  However, I do still need to clear coat the wood.  I waited to do that thinking it would probably get marred while upholstering, and I also have some other things to coat while I have the brush out.  Now projects on hold for “vacation.”  I am getting very antsy with only having 30-some days left before the due date and too many things I’d like to have done.  A lot of those things are sewing projects or little things that aren’t necessary, but I’d sure rather be able to.

On to the chair…

Prepared for seat back fabric with cording applied to the edge:

prepared for the seat back fabric.jpg

Stapling the seat back:

stapling seat back.jpg

Side pinned for stitching:

seat back pinned at side for hand stitching.jpg

For this piece (and most) I prefer to hand stitch the sides.  Although I despise the actual process of stitching it is easier with a proper needle.  I struggled with a regular sewing needle until partway through this chair, and I’ll never go back to the sore fingers!  A long needle allows you to stab the layers so much more easily and is very much worth buying.  Anyway, there is metal edging stuff and stiff tack bars that you could buy to staple on and such the fabric edge into and to stretch and finish sides.  I have a bunch of it and have used it, but I’m able to get better results by sewing.  Besides that I’ve found that it can open up and separate over time (this is happening on our sofa, which has its factory upholstering.)  I might as was hand stitch for the durability and better look.

hand stitching upholstery seam.jpg

hand sewn seam and piping or cording.jpg

Done!  🙂  🙂  🙂


Despite the “vacation,” the other day I did organise more of Mini’s things that were stacked in the closet and under the bed.  One morning I rearranged the room multiple times and wasn’t pleased with the space taken up by the bed.  I even found a very nice old wooden twin sized bed on Craigslist for $50, but I haven’t settled on whether to downsize or not.  Meanwhile I moved the darned bed all over the room, but it ended up going back where it started.  After all that!  😀  Now I’m left with the crib and rocker in awkward locations, but I am happy enough with the hutch, dresser and bed positioning.  I don’t know…

Here is the CL bed.  I like it (and the price) very much, but I’m not sure if it is worth replacing the one we have since a full size will be better once the crib is done being used.


I’ve also planned out a quilt to make for the bed.  While I have a nice one, that I like, it is terrible about showing (and not easily letting go of) cat fur.  I like the idea of sewing a quilt too and using colours that I choose to create the look I’d prefer in the room.  I’ll post about this next time.

Part III: Reupholstering & Refinishing a Rocking Chair

Slowly I am getting there.  The chair is nearly done.  I’ve found it necessary to rest too often lately, and it has really extended the timeline.  L has been working from home which also kills my levels of productivity thanks to a lot of interruptions and time taken to make meals that otherwise wouldn’t be happening.  I naturally have a harder time with my motivation when anyone is around besides.  Finally the end came into sight yesterday though, and I’m mostly happy with the way it is turning out.

In the afternoon I had to stop work early, and I was as far as having attached one outer arm section.  Today I should do the other outer arm and the back.  Then I could make and glue the double welt trim to completely finish… except that I need a lot more of the cord to do that.  (I selected a thinner kind than the big spool I have since the velvet makes it appear even wider.)  Drat, drat, Drat!  Tomorrow I have an appointment which is right by the store to get more, so I cannot finish it until sometime after.  I’m not thrilled about this, but I’m not wasting time and fuel today to go to the store when I have to be there tomorrow.

Here is yesterday’s stopping point.  Aside from missing the finishing welt on the edge it looks done from this angle, yay!

stopping point the 19th June 2017.jpg

You may notice a flaw that I regret…  When I pieced lengths of bias for the welt trim for along the inner seat I mistakenly switched the direction of the nap of one piece, and the light catches it very obviously.  I’m irked with myself for not catching this until I was in the midst of gluing, and for thinking that the bias would keep it from being noticeable.  It sticks out like a sore thumb to me, and I am past the stage where I could tear it off and replace it.  (I was too afraid to try this when I first realised only halfway through gluing, and it could have been a big issue pulling out staples from the narrowly trimmed edge and ruining that side, I guess… so, I’m trying to ignore it.)

Bits of bias cut velvet made into cording/piping for the seat and to border the outer back:

The piping gets sewn to one seat piece, and then you go over the stitching again with it sandwiched.  All the sewing is done with a double cording foot.

stitching seat deck pieces and piping.jpg

At this point I was excited to finally begin applying the pretty fabric to the chair.  I measured and marked where the piped seam should sit to make it easier and more precise to attach.  I’m not certain if this is correct, but it seemed like a good idea to hand stitch the seam to the line in order to keep its proper placement.  All my other sofas and chairs had separate cushions, and this is similar to what is done with the seat deck in those cases.  I didn’t want it to pull out of position as I stapled or to slide with use, and I hope it works out well long term. (Not only to look better, but using a curved needle really sucks and cramps up my hand, so it better be worth it!)

Stapling the seat and then finished off with welt:

IMG_5441.jpg

Inner arms done and gluing the trim:

Attaching muslin and dracon:

Stapling outer arm:

IMG_5585.jpg

At this point I realised I could finish off the bottom with cambric and didn’t have to wait until I have the welting cord or anything.  Yay.  The straps are all hidden and clean now.

IMG_5583.jpg

Waiting for another outer arm, the back, and finishing trim:

So close!  If only I wasn’t held back by running out of the cord!  I cannot even spend the rest of the day making pillows without it.  Instead I’ll probably install blinds and do other small tasks depending on my pain and energy levels.  Needing the space to work on the chair has kept me from pulling out the crib, or anything like that, and I could today… but I probably should wait until after our vacation that starts tomorrow just to avoid unnecessary cluttering.  Perhaps I’ll plan out the quilt(s) to figure out yardage requirements or even cut out a dress?  Or just spend too much time laying flat on my back to keep it from going into full on spasm, more likely.  Sigh.

Part II: Reupholstering & Refinishing a Rocking Chair

Before I get to the chair…  I’ve been busy and working hard!  Yesterday I gave the mid-century Bassett hutch a couple of coats of satin polyacrylic, and it is done.  Yay!  I updated the post with completed photos, but here they are too:

I wanted to apply the protective coat as soon as possible to let it cure well before things are placed on it.  Next I tackled the rocking chair.

Earlier this week I had reluctantly removed a good portion of dracon and supportive layers which had been made disgusting while in storage or from my friend’s cat acting out.  The other day she told me that she had spotted the chair kerbside!  I’d just told her about scoring the Bassett hutch, and she shared the joy of found treasures.  😀  What brand or store it came from is a mystery, and I think it may have had some moisture damage before she acquired it 18 years ago given how rusted away the lower staples were.  Her cat sure did a number on it too!  (Honestly, I saw the vinyl and figure how bad could it possibly be?  Yeah, bad.)

Here is a reminder of Before in the photos she sent me to see if I was interested in taking it:

Cleaned up a bit after she brought it over to our house:

After stripping the frame and sanding:

Earlier this week while removing layers that would have been nice to be able to keep:

removing layers and a million staples.JPG

Besides removing anything nasty I also used a bunch of enzyme scent remover stuff on it.  It helped a lot, I think.  Next I stained the frame:

I love the carbon grey stain and how well all the wooden pieces are going to match!

Yesterday I set about removing more layers and staples from the rocking chair.  What an unpleasant part of the process!  It is messy, gross (when dealing with this particular item anyway,) takes a lot of hand strength, and is tedious.  Luckily I’d done most of the hard part already and by early afternoon could begin the fun part of transforming the piece into a nice newly upholstered chair.  Unfortunately my second sewing machine, with the high shank and all the attachments that can be used for upholstering, had problems.  It’s a Necchi BU that has never seemed to work 100% as well as it should ever since I bought it.  I wasted several hours messing with it before finally getting things to work sufficiently, and I was very irritated.  Thus I never go to begin applying the linen velvet to the chair yet, but I did leave off with a muslin base for the seat deck:

muslin applied to seat deck.jpg

The muslin gives a smooth base and allows the batting to be basted down temporarily (after covering with the velvet the threads are cut to let the foam spring back into place and this prevents sad, saggy, excess fabric on the seat after use.)  I find the tidy muslin layer is nice for feeling like I accomplished something and gives a good sense of “I can do this” before cutting the precious final fabric too.  It lets you get a better idea of how to handle fiddly bits, so I don’t recommend skipping it although it is tempting to save the time and fabric.

On to the gorgeous linen velvet…  I never unwrapped it in the years since it was purchased, without any set project in mind, back in 2012.  Of course I had forgotten how much yardage there was, but there was plenty for this chair, even with planning extra pillows and dealing with the nap, with 8 or 9 yards on the roll.  As I recall I spent about 80$ on it thanks to eBay, and that is a complete steal.  I don’t think L would have been very pleased if I told him I wanted to spend $600+ on fabric if I were trying to get the same sort at the store.  😀  Anyway, I love, love, love the colour and feel of it too.  I always hesitate when about to use a beloved fabric, because there is always a “what if I end up with a better project for it?” or “what if if I screw up??”  I must say that it goes so well with the frame though:

another shot to show shimmer of grey linen uppholstery velvet.jpg

As you can see, it isn’t easy to capture the true look in photos!

So, the last thing I did yesterday was to plan out the pieces required, double check, and mark the yardage:

I have a couple of yards left over for making pillow covers.  I’m planning on a lumbar pillow and will make a neck roll sort of thing too, and there is more if I want to add some throw pillows for the living room sofa or anything.  Actually, I may make a chair pad to cover the seat and save it from cat or baby messes?  I don’t know.

That’s it for now, because I need to go get to work on sewing and upholstering this thing!


On to the continuously updated to-do list.  I’ve completed quite a bit since the last post with it and have colour coded the remainder with red as high priority projects and orange for want to do but maybe/likely will not:

Mini’s room
-Brush final trim coat on nursery panelling.
-Remove storm windows
-Disassemble, and replace screens.  (Update: make new screens to install for summer instead of storms.)
-Scrape and glaze: (One,) (two,) (three.)
-Paint exterior windows.
-Install screens.
-Remove old security crap from windows.
-Patch.
-Paint windows (interior.)                                                                                                                             -Scrape and vacuum.
-Install sash locks.
-Change light switch and cover plate.
-Buy and install shades.
-Have crib sandblasted and finished or do a DIY clear coat.
-Attach casters to crib.  Create replacement hardware.
-Attach casters to walker and assemble.
-Bring dresser from Dad’s and refinish.
-Sew Kirghiz felted carpet to a dowel for wall-hanging.
-Strip rocking chair.
-Sand rocking chair.
-Stain rocking chair.
-Reupholster rocking chair and sew pillows.  
-Fix leaky sink valve.
-Set up furniture, wall art, and organise.
-Strip new mid-century hutch.
-Patch and sand hutch as needed.
-Stain hutch.
-Clear coat hutch

Main living areas and stuff
-Replace certain outlets, switches, and cover plates.
-Paint dining/living windows.
-Scrape messy paint.
-Finish painting kitchen trim and panelling
-Repaint living/dining ceiling.
-Apply sealant on entry and hearth tile/grout.
-Sew back of sofa.
-Staple cambric.
-Sew pillow covers.
-Finish sanding dining chairs.
-Stain and wax chairs.
-Paint and Mod Podge antique travel chest.
-Touch up kitchen chairs and hoosiers.
-Repair coffee table.
-Repair and sand end table.
-Paint table.                                                                                                                                     -Paint main bath.
LATER:
-Reupholster recliner.
-Reaupholster little round chair.

Exterior                                                                                                                                  
-Weed garden and path
-Stain east side of house.
-Stain or hire west side of house.
-Powerwash patios and chairs.
-and paint rusty table with hammered finish.
-Stain patios.
-Permanently attach umbrella to deck with bolts.
-Powerwash fence.
-Stain fence.

Front of house
-Patch broken front steps.
-Paint foundation a more pleasing shade.
-Buy new light fixture and install with sensor bulb.
-Last bit of patching.
-Last bit of painting.
-Wash exterior windows and skylights (uninstalling storms.  Make screens.)
-Finish glazing windows

Unfinished part of basement
-Finish painting walls.
-Rewaterproof spot on floor.
-Touch up floor paint.

Organisation
-Organise storage area.
-Organise basement.
-Organise Garage.
-Organise attic.  Sort stored items again before sale.
-Organise kitchen.
-Organise sewing room.
-Organise baby items in closet.
-Organise master closet.

-Have yard sale.

Dressing room and spiral stairwell
Done!

Sewing room
Done!

Other kinds of non-house projects 
-Remake lamp shade for hanging lamp in Mini’s room.
-Remake a play mat and arches for hanging toys?
-Stain and make a busy board for Mini
–Sew dresses for myself; light coat for myself and Mini; dresses, pants, and quilted coats for Mini; a small and queen sized quilt; sew some soft toys; …
-Crochet or knit sweaters, hats, pants, and booties for Mini
-Make a mobile?

Pushed to later:

Master
-Caulk.
-Paint master ceiling.
-Touch up master bath vanity.
-Recoat walls.
-Properly hang mirror.
-Install tub trim kit and drain.
-Install shower trim kit.
-New switches, outlets, and cover plates.

Storage room (now office)
-Remove stored items from storage/office.
-Rip out carpet and pad.
-Remove panelling.
-Patch and caulk.
-Prime.
-Brush paint.
-Roll walls.
-Paint sewer pipe with hammered finish.
-Paint ceiling.
-Change light fixtures.
-Change outlets and cover plates.
-Frame the two cinderblock walls
-Install foam insulation panels
-Drywall or panelling…
-Prime and paint newly insulated walls

Media room
-Get rid of giant speakers and console.
-Mount TV and sound bar.
-Rip out crappy laminate.
-Remove trim.
-Install DryCore.
-Lay insulating underlayment.
-Install vinyl planks.
-Reinstall trim.
-Paint touchups.  (I did re-paint a lot but need to finish since I ended up using a new gallon that doesn’t match perfectly.)
-Arrange furniture.
-Paint or replace stained ceiling tile.  (or ideally change to 2×2′)

An Unexpected Project: Refinishing a Mid-Century Bassett Hutch

I love random lucky scavenging.  Some of my favourite or most useful pieces have been spotted on on the kerb when I least expected…  

mid century bassett hutch refinished

One evening this past weekend my husband wanted to take a walk, and we decided to snake through some blocks in the flat portion of our neighbourhood.  It was a stroke of luck for me that we did happen to walk that way.  I found a new treasure much to L’s dismay.  (L is embarrassed by my kerb-side pickings and is reluctant to even buy such items let alone take them when free.  Our agreement is that I can go back alone and not involve him.)  So, we were walking along, and right ahead of us was a mid-century bookshelf with a cabinet below.  I looked it up and down and determined it was a true find: great design and in very decent condition.  Someone could sell one on Craigslist or in a store for hundreds, I was sure, but more importantly I liked it and realised it could fill a suddenly apparent storage void.  It was a similar style to the dresser that I just finished for Mini, and I wondered if I could fit it in her room… or perhaps it could go along the short wall by the stairs in the media room if not?  Some extra surfaces and spaces to organise the baby items I’ve been arranging would be so nice!…  Meanwhile L was questioning the wisdom of it all and hurried me away.  As we walked home we joked about my inevitable return with the hand-truck, but it seems now that he still thought I might not go for it.  I texted a photo to a friend who was really excited by the find too and enthusiastically suggested the same storage potential that I’d argued.  I decided to go back, probably as early was possible in the morning, to get it.  Late that night I grabbed the hand-truck and set out to collect the piece in a light rain, because it turned out it was supposed to rain a lot during the night, (and I wasn’t certain I’d wake early enough either.)

kerbside Bassett mid century hutch.JPG

Wheeling it home like a nutcase at midnight:

IMG_5284.JPG

IMG_5288.JPG

I’m super excited about it!  While bringing it home I noticed that the logo in the drawer seemed familiar, and Google shows me that Bassett Furniture made both this hutch and my old dresser!  They’ll be a perfectly matching set.   Isn’t that fantastic luck?  Also, it has a small enough footprint that I think I can squeeze it into the room without looking terrible, and I could really use the extra storage to keep things well organised but accessible.  

Yesterday I stripped it and expected it to be a nightmare kind of a job, but it actually went fairly quickly and easily.  Today I dragged it upstairs to sand and stained it.  All that is left is to clear coat.  Woot!  I’d been planning to reupholster the rocker this week, but that project is turning into a complete pain in my butt.  I did work on it, but mostly it has resulted in a mess and more work yet to be done.  There are so many darned staples, and they are thinner and harder to remove than any others I’ve dealt with.  Additional layers have unexpectedly required removal too, because they were disgusting, truly disgusting, with cat pee, slime from stripping, and who knows what.  As a result I probably have to purchase and wait for supplies, but if I don’t find a way to make do with whatever I have then I cannot really work on it until August.  August!  Not great.  😦  I exhausted myself today with it (and the staining) then cleaned up before crashing for a nap.  I’ll see what happens with it tomorrow.  I’m really antsy at every moment that I’m not accomplishing the things on my list, and L took a vacation that is coming up which means an entire week is lost besides all the weekends per usual.  It’s distressing!

Stripped and drying in lovely and lucky 53% humidity:

IMG_5331.JPG

Stripped Bassett Furniture hutch.JPG

After I dragged it upstairs to patch/glue, sand, and stain:

IMG_5346.JPG

Carbon grey to match the Bassett dresser:

charcoal stained Bassett mid-century hutch

I still can hardly believe that all of this went so quickly and easily!  I’d almost passed on taking the hutch thinking all the surfaces and nooks would make for a nightmare project, but I was very pleasantly surprised.  Tomorrow I can brush on the sealer and it’ll be all done!  🙂  🙂  🙂  I’ll share a true “after” photo whenever I do a post on the completed nursery.  (That’s going to be a while!)

Edit 14th July, 2017:

I clear coated the hutch twice yesterday and it is done!  I love how it turned out and decided to add photos here, because the clear coat makes it look quite a bit better.  Behold the after:

mid century bassett hutch refinished.jpg

hutch all done.jpg


On to the continuously updated to-do list.  I’ve completed quite a bit since the last post with it and have colour coded the remainder with red as high priority projects and orange for want to do but maybe/likely will not:

Mini’s room
-Brush final trim coat on nursery panelling.
-Remove storm windows
-Disassemble, and replace screens.  (Update: make new screens to install for summer instead of storms.)
-Scrape and glaze: (One,) (two,) (three.)
-Paint exterior windows.
-Install screens.
-Remove old security crap from windows.
-Patch.
-Paint windows (interior.)                                                                                                                             -Scrape and vacuum.
-Install sash locks.
-Change light switch and cover plate.
-Buy and install shades.
-Have crib sandblasted and finished or do a DIY clear coat.
-Attach casters to crib.  Create replacement hardware.
-Attach casters to walker and assemble.
-Bring dresser from Dad’s and refinish.
-Sew Kirghiz felted carpet to a dowel for wall-hanging.
-Strip rocking chair.
-Sand rocking chair.
-Stain rocking chair.
-Reupholster rocking chair and sew pillows.
-Fix leaky sink valve.
-Set up furniture, wall art, and organise.
-Strip new mid-century hutch.
-Patch and sand hutch as needed.
-Stain hutch.
-Clear coat hutch

Main living areas and stuff
-Replace certain outlets, switches, and cover plates.
-Paint dining/living windows.
-Scrape messy paint.
-Finish painting kitchen trim and panelling
-Repaint living/dining ceiling.
-Apply sealant on entry and hearth tile/grout.
-Sew back of sofa.
-Staple cambric.
-Sew pillow covers.
-Finish sanding dining chairs.
-Stain and wax chairs.
-Paint and Mod Podge antique travel chest.
-Touch up kitchen chairs and hoosiers.
-Repair coffee table.
-Repair and sand end table.
-Paint table.                                                                                                                                     –Paint main bath.
LATER:
-Reupholster recliner.
-Reaupholster little round chair.

Exterior                                                                                                                                  
-Weed garden and path
-Stain east side of house.
-Stain or hire west side of house.
-Powerwash patios and chairs.
-and paint rusty table with hammered finish.
-Stain patios.
-Permanently attach umbrella to deck with bolts.
-Powerwash fence.
-Stain fence.

Front of house
-Patch broken front steps.
-Paint foundation a more pleasing shade.
-Buy new light fixture and install with sensor bulb.
-Last bit of patching.
-Last bit of painting.
-Wash exterior windows and skylights (uninstalling storms.  Make screens.)
-Finish glazing windows

Unfinished part of basement
-Finish painting walls.
-Rewaterproof spot on floor.
-Touch up floor paint.

Organisation
-Organise storage area.
-Organise basement.
-Organise Garage.
-Organise attic.  Sort stored items again before sale.
-Organise kitchen.
-Organise sewing room.
-Organise baby items in closet.
-Organise master closet.

-Have yard sale.

Dressing room and spiral stairwell
-Touch up ceiling paint.
-Shift PAX and MALM to left.
-Patch.
-Brush edges.
-Roll walls.
-Paint trim.

Sewing room
-Remove sewing room door.
-Mark and chisel hinge mortises.
-Mark and drill door knob.  Install knob.
-Hang door.  Plane and sand to fit.
-Paint door.

Other kinds of non-house projects 
-Remake lamp shade for hanging lamp in Mini’s room.
-Remake a play mat and arches for hanging toys?
-Stain and make a busy board for Mini
–Sew dresses for myself; light coat for myself and Mini; dresses, pants, and quilted coats for Mini; a small and queen sized quilt; sew some soft toys; …
-Crochet or knit sweaters, hats, pants, and booties for Mini
-Make a mobile?

Pushed to later:

Master
-Caulk.
-Paint master ceiling.
-Touch up master bath vanity.
-Recoat walls.
-Poperly hang mirror.
-Install tub trim kit and drain.
-Install shower trim kit.
-New switches, outlets, and cover plates.

Storage room (now office)
-Remove stored items from storage/office.
-Rip out carpet and pad.
-Remove panelling.
-Patch and caulk.
-Prime.
-Brush paint.
-Roll walls.
-Paint sewer pipe with hammered finish.
-Paint ceiling.
-Change light fixtures.
-Change outlets and cover plates.
-Frame the two cinderblock walls
-Install foam insulation panels
-Drywall or panelling…
-Prime and paint newly insulated walls

Media room
-Get rid of giant speakers and console.
-Mount TV and sound bar.
-Rip out crappy laminate.
-Remove trim.
-Install DryCore.
-Lay insulating underlayment.
-Install vinyl planks.
-Reinstall trim.
-Paint touchups.  (I did re-paint a lot but need to finish since I ended up using a new gallon that doesn’t match perfectly.)
-Arrange furniture.
-Paint or replace stained ceiling tile.  (or ideally change to 2×2′)

Part I: Reupholstering & Refinishing a Rocking Chair

Today I meant to write about the nursery dresser restoration, but I’m very close to completing it and should wait until I have final photos.  The most important task of the day is to clear coat it, but I can never be sure when I’ll get to write the post.  So, I’m here this morning  with my next-ish project for a Before…

For a few months I’ve thought about getting a new (but fairly ugly and stupidly expensive) glider, reupholstering a small recliner (that I have waiting in a state of sad neglect,) or nabbing a (cheap, used) rocking chair.  I hated the idea of purchasing a new glider since they aren’t very attractive, cost a lot, and don’t meet my usual quality criteria.  A couple display models have been persuadingly comfortable though, and we began to seriously consider going for one.  Another annoyance with those is that it seems you must order in advance, and the few I’d liked (in the sitting test) were not available without a trip to inconveniently located stores.  Given my hesitancy I don’t know how likely it is that we’d deal with that in time?  Meanwhile I saw a very nice old rocking chair at a local sale.  The wooden frame was gorgeous and very compact, it was cheap at $15, and I was able to convince L that reupholstering would make a world of difference (and was simple thanks to the design)… then it turned out to have already been sold.  I would have snapped a photo but didn’t.  :Sigh:  Besides this I do have a comfortable and small recliner from a thrift store years ago.  I even reupholstered it once.  It could work out pretty nicely with better fabric, but I’d need to buy some for it and deal with the complicated shapes and sewing involved.  Most recently I was leaning toward doing this although L was suggesting a glider.  I still browsed CL, thrift stores, and ReStore but never felt like actually purchasing any of the many rocking chairs I found.

Then I was chatting with a friend about organising, and it came up that she had a “really cool rocking chair” from when her son was a baby, and she lit up with the idea that I might want it although it needed $1k of reupholstering.  Not a problem, I can tackle that myself!  A couple of days later she sent me a few photos, and yes!  I did want it.  She’d tried describing it, and I had imagined and Googled, but I’d never come up with the actual design or anything close:

I’m not sure what to call the style at all.  ???  I think it is pretty darned neat though, and I love having a nice backstory, so I’m excited to get it.  Hopefully that will be soon although I’m trying to be patient considering that I have painting and things that ought to be done first anyway.

The excitement of a new project has all of the fabric and refinishing options constantly on my mind regardless.  She said her cat had peed on it, but I wondered for a moment if I could save the leather (assuming it isn’t vinyl) or somehow manage to re-do it with a gorgeous new hide.  (Yeah, not likely given how much is needed and the unknowns of working with thick leather for the first time.)  Then I pondered upholstery fabrics and prices until I remembered that I have some on hand that may work too.  The most economical new fabric would be “Warsaw” linen from Grayline, which is what I used for our sofa (in wheat, I believe.)  It would look good, I think, but if I’m realistic then something a little heavier and more forgiving would be more ideal to work with and better for longevity.  Next up would be something from eBay… maybe even leather?  Maybe?  The most likely candidate is some beautiful linen velvet that I won on eBay at least seven years ago without having a plan for it.  It is fabulous steel/pearly/dark grey that I couldn’t love more.  I’m sure it would look awesome, and my biggest concern is just that I’ll have a hard time actually using the fabric for fear of messing up or wishing I had it for something else, haha.  When I looked in the closet to take a photo of the grey velvet I saw a forgotten remnant of light sand coloured velvet too.  It has some synthetic content and there might not be enough of it, but it is a perfectly decent option otherwise.  Next to the sandy taupe is a roll of sage green linen velvet, but that is slated for a sweet little round and tufted chair that I’ll hopefully get to some year.  Besides, I’d better stick to a more neutral colour.

The colours may not have come out so well in the photos, but there you go: steel grey, sage, sand, and wheat.

I highly doubt I’ll buy anything new, but I did think of using something fun like these when considering options for the recliner or this rocker:


Anyway, I need to get to work now.  I was delayed by writing this and phone calls, and it is getting rather late!  Just let me add a photo of a marble end table that I scored this week at one of my favourite thrift stores.  (I miss the thrifting on Long Island so much!  Furniture is hard to come by and pricey where I live now, but on LI I always found cool items, and it was often really cheap too!)  I ended up saving 50% off of it too, so I’m pretty thrilled.  I just have to make some repairs and then do some painting or a whitewash.  That same day I visited the Restoration Hardware outlet and scored a dresser topper (to make a diapering area) for only 20$ too!  I’m saving the photo for the dresser post though.

IMG_4120.jpg

Both the base and marble can perfectly match the coffee table in our media room, but I might use it as a night table in the nursery?  (The coffee table is supposed to be replaced some day after all, but it has hung around for five years and a move despite the broken marble top, so… I’ll see.)

DIY Re-upholstering a Sofa part III… Taking it Apart and Replacing Foam

Hi!  I know that I haven’t been posting enough, but that is changing.  The freelance thing that made life entirely insane for three months has come to an end (just in time for me to enjoy some of the summer and take a vacation to my husband’s birth-country to meet his father for the first time.  W00t!)  I have a lot of projects in the works, and today have finally been able to transfer thousands of photos onto the computer from my phone.  (For several weeks this was not working, and it was the reason I never ended up being able to post when I had found time.  Very frustrating!)  Today I want to accomplish as much as I can, but there a some topics you can look forward to: a lot more garden and flower photos, installing a functional clothesline, completion of the sewing/work room, refinishing chairs, fancy accent pillow tutorials, basement/garage moisture remediation and waterproofing, more improvements to the master and main baths, and re-upholstering several items.

For example, yesterday I jumped into the very messy and very involved project of reupholstering the vintage sofa which I wrote about this spring.  As of this morning it has been torn apart, and I have all the materials required to make it a sofa again, but I’ll admit that it is a daunting task given how it looks.  This morning: foamless

I had to tear out the the seat deck padding and foam, which I hadn’t done last time, because of a pet problem.  This meant an unexpected trip to Joann’s in the afternoon to purchase some 1″ foam.  Luckily it happened to be 40% off!  (Upholstery foam is rather expensive.  Not much about upholstering in cheap, to be fair, but DIY is still far less than sending it to a professional.)  Now with the new seat deck foam in place, and the new cushion temporarily there too:

this morning new seat deck foam

Still quite the mess, but sweeping the hundreds of sharp staples and dust out of the way made for a less tiring view.  Today I’ll sew in a muslin seat deck and upholster a base over padding with muslin before cutting the real fabric.  I’m using a heavy linen, but I suspect that a muslin base will be wise.  It will also let me decide if I actually like the look of certain changes I am making, like using a one-piece inner arm instead of a corded and more tailored two piece style.

Yesterday I wrapped the new seat cushion foam in batting.  It isn’t too much of a pain.  Just lay the foam on the batting and spray both with upholstery adhesive before smoothing them together.  Trim the edges.  You only want the batting to cover the top, underside, and front edge of the cushion.

wrap the seat foam wrapping the foam

I took this as a before photo.  Sorry it is not much.

end before

Then I started by taking off the cambric underneath:

beginning to take apart, yikes

Next I tore off the welting, unstapled the back, outer sides, inner sides, and finally the seat deck.  I cut and left the front portion from some previous upholstering to make life easier, and I left my and other previous upholsterer’s work on the arms too.  Don’t mess with anything that is doing just fine.  😉

Then I sanded the frame some.  I have to continue that now.  Afterwards I’ll use wood glue to strengthen any wobbly joints.  I want to stain and wax it to match the coffee and dining table.  I still need to hand sew the cushion cover closed.  Then I can do the muslin base and eventually cut the linen.  When I bought the linen I allowed for a couple of extra yards over my calculations, but the yardage is very little according to charts.  I figured it carefully, but I only bought 13yds, as I recall.  This sofa is 8′ or 9′ long and all charts advise somewhere around 20yds for a large sofa.  Luckily this one is short, sparing in use of fabric, and I have the experience of already doing it once before… with a velvet of all things!  I eeked it by with 12yds of velvet, so I am confident with the easier to place linen, but I still must be cautious in cutting without any silly mistake and must have a plan for the layout.  The linen was super inexpensive as far as upholstery fabrics go, but no one wants to waste, eh?

Next time I’ll show how to construct and stitch down the seat deck.  While I am here writing let me share photos of some pretty fabrics I saw at Mood.  I used a similar velvet ikat styled fabric in greys for our kitchen chairs a couple of years ago.  The damask style teal velvet is one I used on a settee going on ten years ago and my desk chair.  I really love it an how well it holds up to use and cat fur.

IMG_8770 IMG_8771 IMG_8772 IMG_8774 IMG_8777 IMG_8779 IMG_8781 IMG_8783

Here are swatches of some that I have been dreaming of for future projects.  Too bad they are far to costly for me have used for the sofa!  I’m tempted to yet again re-do the big circular chair (that I already upholstered twice in a few years) with one of the really fancy fabrics.  Actually, I have to re-do a recliner too, but I must keep in mind the sofa it will be near (for a while,) annoyingly.  It is so hard to choose!

ikat velvets desk chair teal and awesome black pretty, pretty

The velvet ikats are fun, but I already know I will not use them.  What is super difficult to decide on are the others.  I always intended to use the damask teal, but now I am unsure.  I adore the black and grey one pictured with it.  That is more forgiving in colour too.  I really like the purples in the other velvets, but those are not good choices for the round chair.  Maybe the darkest one with the large design, and the light grey one?  I suppose I’ll decide after the sofa is complete.  As for the recliner, it will be in the basement with the rust colour-way sofa.  Purple and teals aren’t compatible with it at all,sadly, and even the neutral colour ways aren’t compatible in style.  😦  That sofa is slated to be replaced some day, according to the husband, but it may be years.  I’ll have to keep thinking, because I’d love to use the lighter purple!  They are all so pretty.

What to do with an ugly sofa: Part II -planning

Hi!  So in part I of the sofa series I talked about supplies and promised photos.  Today I am including some and will talk about the first steps of tackling the project.  Let me start with the photos.

Remember when I said that the sofa was covered in some rather hideous baby blue brocade when I bought it?  Here is that fabric:

original sofa fabric

I still have to try and dig up photos from back then, but they are all saved on a hard drive somewhere and…  I’m just glad I had saved a cushion cover.  Imagine eight feet of this fabric!  Not for me!  😀

At the time the sofa had two seat cushions, and I have changed it to a single one.  I think it will look better.  Let me continue to describe the original design before showing the current “before” look.  It had two seat sections and four matching back pillows.  They were all box construction with cording at the seams.  The arms also had a corded seam and were a two-piece design.  It was all very tailored and formal.  When I began ripping everything apart I found that the thing had been reupholstered at least twice before.  I know I took photos of this evidence, and I really will have to find them to share.  😉

As for now?  Well, I’ve mentioned the temporary solution of wrapping a blanket around the cushion, but I made some other changes to it when upholstering it last time.  I kept the corded seam on the arms, but I didn’t want to do corded box cushions for the back pillows.  Instead I simply used two pieces front and back for each but dressed up with pleated corners.  That also made them boxier which seemed better for their use than plain corners which would have been weird.  Oh, and I didn’t get around to using the matching velvet for those and chose dark blue silk dupioni instead (to tie in with the other blanket I was using for the seat cushion.)

Here is the result and current look with the temporary blanket cushion cover in all its glory:

sofa

The new plan is to eliminate the corded seams on the arms.  (I’ll need to prep the padding better than I did before too.  You may see the ripples?)  This time I want a less tailored look, and changing to a less fussy construction also hides a few amateur mistakes better too, I think.  😉  I am considering adding a final layer of padding using memory foam, but I have to make sure that isn’t unwise first.  The back pillows covers will be made just like the silk but cut a little larger since I think they ended up undersized.  I’m also making four matching throw pillow covers to replace the ratty old ones.  Maybe I’ll use some sort of self fabric embellishments on two of those?  Lastly, I think I’ll keep the cording for the seat cushion.  It shouldn’t look strange since the edges around the wood will be finished with double cord.  Perhaps I’ll cord the throw pillows too?  Yeah, I like that idea.  My plan had been to get the pillows and cushion done first since I dislike that sort of sewing and never get around to it at the end, but it seems I may need to leave the throw pillows until later for cording and deciding about embellishments.

Moving on, I obviously did some rough yardage calculations before buying supplies, but today I began the cushions and pillows by figuring the dimensions to cut.  The four throw pillows require eight pieces of 19×19″ fabric.  The back pillows need eight 20×27″ rectangles, and the seat cushion two 25×84″ oblongs, one 4×125 for the front and side edges, and two 2 1/2×93″ pieces for the back zippered piece.  I’ll be sewing it in the muslin first in case I messed up.  😉  The muslin is mainly being used to add strength, but it is also a cheap way to be sure I like the looks of the changes I’m making.

Something I recommend for calculating yardage is to not only use online charts but grab some graph paper and a pen.  Use it to plan the layout on the fabric and you’ll see a more accurate number for your project.  I just did this, and unless I made a mistake, there is a significant difference in yardage require from last time (due to the nap of the velvet) and from charts!  I’d estimated 12 yards in my head, I bought 16 yards allowing for extra throw pillows and just to be safe, but the layout shows that exactly 10 yards may suffice if I am careful.  Sketching a layout also makes you consider the nap or direction of a print if that applies, and it should allow you create a less wasteful layout.  If I had just started cutting to begin the pillow cover then I would have wasted yardage for sure.

Before penciling in the cutting layout on graph paper I made some very rough sketches of the pieces required for everything noting the dimensions.  Like this:

sizes

Quite rough, eh?  😉

I decided that the graph paper lent itself best to half scale with each square representing 2×2″.  I drew the boundaries of the fabric in pen then switched to pencil for the layout to avoid headache.  It made sense to begin by sketching in the largest pieces required, and from there I just fit things in as looked wise.  The shaded areas are waste.  The section reserved for bias isn’t drawn to scale.  For some pieces I rounded up to make using the graph more quickly, but it should all give a general idea of the yardage required.

cutting layout

I am quite happy about only needing 10 yards.  Even if it takes a little more I definitely have plenty extra.  (Although I keep wondering what huge mistake did I make?)  There should even be more than enough to do the matching loveseat-sort-of-chair that I’d planned for later, yay!  Using a plain fabric is the <strong>best</strong> way to save money on upholstery fabric.  Any pattern, stripe, or nap will add yards upon yards to the purchase.

Well, I think this is a perfectly good stopping point.  I don’t think I am up for cutting and sewing today, so this is probably the last post about the sofa for a while since I have to pack, paint, do repairs… but I’ll try to post about other things over the next few weeks.

What to do with an ugly sofa? Part I -supplies and where to get them

I meant to write sooner, but I’ve been sick.  😦  Today I slept in again and awoke feeling quite a bit better, so here I am.  (Actually, I began writing this a couple of weeks ago and am posting now that I finished the post.)   I had some normal cleaning to do, like vacuuming, and one thing led to another until I’d organised a very messy (embarrassing) closet and made the living room look a little better.  The closet project was very satisfying and was due to seeing a box of Space Bags at Costco.  I used all of them and shrunk my hoarded linen pile into comparative nothingness.  Yay!  It also eases my concerns somewhat about bedbugs in the building, because Do Not Want!  Anyway, I’ve mentioned an upholstering project that I plan to write about in the coming weeks, so here it begins…

A few years ago I was at the Salvation Army thrift store on half off day, and I saw a great vintage sofa.  It was mid-century-ish with a sleek wooden frame and rather ridiculously was upholstered in a pale blue brocade featuring some sort of blossoms.  (My mother loved the fabric.)  I’ll have to try to dig up photos.  Anyway, wooden frame sofas really appeal to me, and I figured I could re-upholster it.  Myself.  After all I was able to buy it for only $50, and surely upholstering wasn’t *too* hard, right?  Soon I’d bought some supplies, a book or two and tackled it.

It didn’t go too badly although there was a big mess for a while.  The only trouble is that one of my cats is really, really dumb… and she peed on it a few times to protest being left alone too much while I dated my husband.  Ugh!  Now all that work was ruined when the only things left to complete had been the pillow covers and part of the seat cushion covers.  :cries:

My solution for a while, which turned into more than two years, was to remove the cushion batting, wrap the foam in heavy duty trash bags, seal it with tape, and pin a heavy blanket around them as a sofa cover.  It worked very well, but it sucked.  😀

These two years I’ve wanted to re-reupholster the sofa, but my husband didn’t seem bothered by it and wouldn’t agree to fabric and foam as suitable holiday gifts to me.  This year I finally talked him into it, and the pain of having to redo the work has faded too.  My birthday was in November, I have finished sourcing my supplies, and I need to tackle the project before we move (in less than a month?)  In December I purchased new seat foam and wrapped it temporarily with a smaller throw blanket.  The new foam was a joy to sit on compared to the old worn out stuff, and my husband seemed to be happier about the project.

First things first: supplies and suppliers

For this project I knew I wanted to use heavy grey or natural greyish linen fabric.  Last time I tried velvet, and it is of course a cat fur magnet.  It also is trickier to work with due to the direction of the nap, and it requires more yardage.  I ordered a pretty dark grey swatch from a wonderful seller on eBay, but the fabric was too thin for a sofa.  The reason I mention them is that their customer service was excellent, and when the swatch didn’t work out they sent me other options at their own expense.  I feel bad for not ending up buying from them, so here is a shout-out instead.  😉

I did a little research and found several mentions that the Warsa linen line from Gray Line is suitable for sofas and chairs.  I had a colour card of their Judy linen since I use it a lot in clothing, but Warsa has fewer to choose from.  When I finally made it to the store last week the only colour that came close to what I wanted was “dark wheat,” and I bought 16yds.  I’m pretty sure that is enough.  I hope so and know I used less last time, but I’m covering more pillows this time around.  I almost bought extra for a round loveseat thing that I might want to match, but I can always go back for more.  Anyway, if I ever buy so much again I’m looking into the shipping cost, because lugging the heavy bolt home via the subway was awful!!

The cushion foam I wanted was 24×84″ and 4″ thick.  You may not know this, but aside from the fabric the most expensive item you may need for an upholstery project is likely the cushion foam.  Bigger pieces are pretty insane!  (Normally upholstery fabric can be 15$ a yard and goes up to hundreds or more, depending, but you can be thriftier with effort.)  In this case I could have spent more on the foam than fabric!  You don’t always have to buy new foam, but I sure had to.  First I planned to use diyupholsterysupply, but it was soooo much money that I shopped around first.  Joann’s often has coupons, so that was an option, but they didn’t quite have the size I needed.  I actually ended up purchasing it on Amazon even though it wasn’t a prime item and there weren’t many reviews or clues about the quality.  The foam turned out to be perfect and something like 50$ less than diyupholsterysupply.  (Gawd, from now on I’m writing DIY instead, because that is so unwieldily.)

I did order other things from DIY such as cambric for finishing off the bottom of the sofa, muslin to pre-upholster with, and seat decking.  From Joann’s I bought a roll of upholstery zippers and batting.  They didn’t have the invisible zippers I needed, so I purchased them in the city at Pacific.  I already have a staple gun, a roll of tack strip, a tack puller, thread, hot glue, and foam adhesive.  I’m not sure if I’ll end up using cording, but if I do I have a whole reel of it from last time.  As a note on the staple gun, if you will be doing a large item or many over time then try to get one that is air operated as long as you can use a compressor.  Living in an apartment building I couldn’t.

Alright, it is time for me to actually go work on this instead of writing about it!

Just a note, I have decided to give links to products that I use or stores that I mention.  At this point I am writing for myself and not encouraged, paid, or compensated for anything on this blog although it would be cool to become an Amazon affiliate or something eventually.  Anyway, I wanted to link to certain things and figure I better link to anything mentioned, wherever it is online, although it looks kind of weird and commercial .