Happy Halloween 2019! This year: a toddler swan costume

Mini started going to nursery school twice a week this fall, so I’m beginning to have some time on my hands.  (Kind of.  Ha!)  While I have actually been working on various projects in the months since I last posted I have not been able to make writing a priority. I’m here now though, and I hope to get back with increasing frequency going forward.  On to the costume!

IMG_5106


Recently I’ve felt less motivated, inspired, and more pressed for time, so I was going to re-use Mini’s bumblebee costume.  Unfortunately I couldn’t find it despite doing some major sorting and reorganising.  The idea of a swan costume struck me suddenly, and it seemed wiser to quit wasting time searching for the old costume and make a new one.  I’m so glad it worked out that way, because Halloween has always been something I look forward to creating for, and it would have been a shame to waste the chance.

I thought a swan costume could re-use a lot of ideas from the bumblebee, and that made it seem doable.  I knew what I was getting into time-wise and with the construction except for a headpiece.  After a trip to Joann’s for tulle and to scout out other materials I had some ideas, and I decided to start with the headpiece to get it out of the way.  First I tried making some crude sketches and then dove into it.  It came together more quickly and easily than I ever expected, and in just an afternoon the headpiece, (maybe it could be called a fascinator… I’m not sure,) was done!

After that I made a pattern for layers of feather-like pieces for a wing shaped cape to attach to a bolero which would be worn over a bodysuit all sewn with my now familiar patterns in Alabama Chanin style.  The wing cape pattern was quick to draft too.  I’d ordered some white cotton jersey sheets from Amazon in advance, but I regretted not going for a black swan when I was doing the rest of the shopping at Joanns.  There I decided to merge some aspects of inspiration photos in a way nature does not by adding some black tulle to the mix of whites (matte, sparkle, and shimmer.)  This continued by using more black in the fascinator than a white swan ought to have had, but I am happy with how “swan” the ensemble reads, and I think it is prettier than it would have been if I stuck to reality.  Going with fantasy is so fun, I keep learning.

Mini didn’t want to wear the fascinator until she saw what other kids were wearing at our town’s costume event this weekend, so I only have a couple of shots with it worn properly.  I think pinning it to the wing cape wasn’t too bad either, but it was pretty darned cute worn on her head.

For the inspiration I just did a Google image search for swans, and here are some photos I referred to while making decisions:


The supplies:IMG_2687.jpg

Starting with the fascinator:

IMG_2694.jpeg

On to the wing cape:

Bolero, wings, and bodysuit:

And the tutu:


It was a really fun project!

Progress and plans

I just completed the last few centimetres of binding on the poppies bodysuit, and the appliqué stitching is all done too.  Today I’ll be able to construct the bolero, and I’m still on target to complete the outfit for the last predicted nice weather which we’ll be having this weekend.  The plan is to go to a pumpkin patch for photos.

IMG_1788

Meanwhile, I’ve been considering Halloween costume ideas.  I had nothing, but yesterday I was looking at the bees on a blanket that I made for Mini recently, and the idea of a little bumblebee suddenly seemed nice.  I think it’ll be a great costume for a toddler.  I’m starting to plan it in my head and figure it may involve black and yellow tulle, some kind of black pleather for a stinger, wire and pantyhose wings, yellow and black T-shirts A. Chanin-ed into a bodysuit, pom-poms on a headband, and black tights?  Maybe a few fake flowers?  We’ll see.

This is the blanket.  It’s just one of those no-sew fleece things.  I saw the fabric and gave in to the cuteness.  :shrug:

IMG_0248

I carefully cut the two layers and then fringe strips to tie.  It was really quick, and Mini likes it a lot.

IMG_0189.JPG

IMG_0247

That same day I also impulsively grabbed a yard of cheap (97-cent/yard) vinyl that looked cute to make a little rain coat.  I’d been meaning to make a mini-cloak-coat, like mine, for her.  I tackled that and made the pattern right away.  The raincoat is all cut out, but I didn’t sew it up yet.  After all, I doubt she’ll actually use it until spring.  I’d like to make a wool version too, but I haven’t found a large enough thrift coat to cut up yet.  I’m hoping for red, but maybe I’ll find some pretty shade of some other colour.

Time now to sew a little!


Alabama Chanin baby bolero: completed

It’s entirely complete!

IMG_4423

I’ll need to grade the pattern a bit larger now.  It fits but rather snuggly.  Gah.  She grew a lot since I began!

IMG_4392

That’s all.  I just wanted to share better photos of it.  The next few days are a tad busy for me without leaving much sewing time, but I hope to complete a few basic onesies soon before another bolero or anything else.  I’m also really thinking about some dresses and outerwear for myself, but that’s not so realistic.

Nearly done! (Progress)

I’ve been so slow with this little Alabama Chanin style baby bolero.  It was supposed to be a quick project, ha!  In reality I only pick it up for a few minutes at a time every few days if I have a chance, so I shouldn’t be surprised that it took probably a month (like everything seems to.)  Also, it has the time consuming reverse appliqué.

Soon (I hope) I’ll be done and have nice modelled photos, but for now here is a peek:

IMG_0273

Baby bolero Alabama Chanin style

I’ve also cut out some simple onesies that truly are fast to stitch.  For these the worst part is pinning on the binding and the decorative stitch for it.  Even very small T-shirts can fit this pattern until Mini grows some more, so I was able to thrift a few very nice colours.  I can carefully fit a bolero jacket too most times!  (She grew overnight from 28,5″ long to 30″ so I am afraid I may be needing new patterns again.)  With the appliqué and thickness of layers I found the bolero could use more width in the sleeves and perhaps to be lengthened too?  The pattern is a few months old and this is the first time sewn, so perhaps she is just bigger too, but I had tried to plan ahead of that.

For this bolero, which was supposed to be oh so quick, I roughly drew a design to reverse appliqué.  I’ve found a Sharpie works best for me most times and will not venture into fabric paints for a while.  This pattern did not make an ideal stencil for such stitching and cutting, but I can work with it.  I’ll improve it.  For now it was haphazard, and I also free hand drew random circles to fill the voids a little.   I tried to let loose and not plan ahead like normal.  This means I see less than ideal placement now.  Sigh.

IMG_0267

This time I felled the seams, but it becomes very bulky with the layers involved.  You may notice that the pattern pieces look wonky.  I should fix the arms?  Bleh.  So much for copying ready-made clothes for patterns.

The lavender onesie is almost as complete now as this jacket with a few minutes of stitching, hah!  I’m using pink thread for it.  The fabric colour doesn’t show well here at all, but eventually I’ll take decent photos.

That’s all for now!


Another completed Alabama Chanin style piece (and a sneak peek of what’s in progress now.)

IMG_1195

I finished this a few weeks ago but couldn’t post about it until I’d presented it to the recipient, so first I’ll ramble a bit about the other pieces that I’ve begun since and will be posting about:

Yesterday I traced out and drafted a little bodysuit pattern for Mini in her current size.  It has spaghetti strap shoulders for the upcoming hot weather, the usual onesie shape, and an optional overskirt.  It was based off a sleeveless bodysuit that I really like but without a ruffle flutter sleeve, and then I added the overskirt from another dress waiting in her closet.   I began a 12-18m size too, but then I thought I better test the smaller pattern first.  If it looks good then I might do another pattern adding to the chest area and giving it long raglan sleeves?  With the overskirt it takes a very large T-shirt to fit all the pieces, so I couldn’t use the first pretty colour I hoped to… or the next seven.  Oops.  Finally I found a large enough shirt in a colour that made me happy and cut out all the pieces.


Before that I’d been sewing a little every day to make a Mini sized test version of my wrap dress.  I wish so badly that I could already dress in all the things I plan to make.  If only I could!  There are long, elaborate, and flattering A.C. dresses and skirts; full linen skirts topped by slim singlets or flowing tunics; cloak-coats; layers of harem pants or skirts with draping hems of wrap tunics and scarves; long wrap dresses…  I want to dress like this and feel comfortable, but alas it would take ages to complete (especially any elaborate and long A.C. clothes!)  Instead I can make a piece or two for Mini each month.  Eventually I hope to make a few of my wrap dresses in knit, but I need to test the pattern first to make sure it doesn’t need to be altered for the difference in fabric type.  Making a little dress is so much faster, less a waste of material, and as a lonely bonus leaves a nice dress for Mini to wear!  Wonderful!

For several days now that little dress has been entirely done… except that I still need to fell one long seam.  It is ridiculously close, but I’ve chosen to begin other things when I had a little time for sewing.  Today or tomorrow I’ll complete it.  I’m very pleased with the way it turned out, but it is probably too large for her to wear yet?  Oh, and I used the leftovers of a T-shirt from the project I’m supposed to be writing about now.  I only purchased pink for that reason, but I actually like it now and may look out for more.


On to what I meant to post about: One of the first things that I thought to make when I was getting the hang of A.C. techniques was a little gift for a friend who owns our favourite local pub.  She encourages the arts and has a lot of cool artwork displayed and decorating the place, and I’ve never had anything that I could contribute until I thought of making a tapestry piece.  Perhaps I could have been more imaginative, but I simply copied the bar logo and carefully made stencils from it.  (I just cut bits out of the paper with an Xacto knife and trace with Sharpies.)

IMG_1378

I went to the thrift store to find the right colours in men’s t-shirts, and it was lucky there were any left at all in greens unfortunately, because it was at Saint Patrick’s.  Oops.  I did find two in about the right shade though.  I only needed a tiny piece of pink for the nose, so I had plenty for that little dress.  There is a bunch of mustard yellow to use too, so I had better begin to like it better heh!

A bigger stencil would have been far better for all the detail and stitching, but I couldn’t enlarge it any more on one piece of paper.   T size of the t-shirts also limited the dimensions of the square besides.  I started by determining that base size on the white and black under layers, basting at the eventual cutting point, and basting around the area to stitch.  Then I used a silver Sharpie to trace out the words before stitching them.  The logo has a little green around the letters, so I used green thread, but you can barely tell it isn’t black.  I decided to embrace the knottiness throughout the piece (except in a few details later.)  At first I was going to have a white background like the actual logo, but I didn’t like how that would look with fabric or to think it may eventually turn dingy.

IMG_0849

Then I cut the green layers and appliquéd them.  The yellow layer was next, but I decided to unpick the green a little to allow placement behind rather than over as I’d first planned to.  I switched to black thread to mimic the logo.

IMG_0906

Then it was time to cut away and reveal the white!  I traced out the teeth with chalk, but it didn’t wash away even after a few rounds.  Shoot!  I had to leave off the knots in the teeth and select other portions of the backstitched details to keep it from looking like a mess.


IMG_1088

Getting there!  Time to make circles…


IMG_1192

… and to finish with a blanket stitch and DONE!  It took forever and a day (late March until June!)

IMG_1199

Clip Clop the Wonder Horse is done!

Well, almost done.  I’d like to clear coat it after it dries and cures for a while.  Mode Podge seems like an excellent thing for the job, but I only have matte and semi-matte but figure this horse should stay shiny?

Today I wanted to work on it, but I still hadn’t settled on a plan.  I thought I’d start by using the paints that I have on hand and see how things went.  Obviously I made a decision or two, and it is done.  Gold isn’t really a tone I’m fond of, but my husband is even less keen on it.  It is classic though, and suddenly Clip Clop has been gilded!

IMG_1193

IMG_2148

The handles needed a coat or two of something dark, and the eyes needed some life.  The other aim today was to add depth to the tail and mane.  By now I thought that the horse already looked splendid and wasn’t entirely sold on messing with it, but wouldn’t the hair look more alive with some shadows defining the moulded strands?  I had to just add a little of the dark iron paint in there…


Then I toyed with the dark and light silver metallics on the the saddle.  Impulsively squeezed out a bit of bright golden paint, dipped a brush into it, and painted the blanket stars.  Well, didn’t it need a bit more gold then?  I hesitated and pondered for a while not wanting to ruin what I liked.  Finally I went ahead and committed to a gilded saddle and bridle.  I didn’t start it timidly with a dull polish or anything.  No, it was to be a fully golden saddle for my little girl!

IMG_1203

It is actually a very true and less dull gold in real life.  I guess I need to change some settings on my camera to capture it, and my phone had trouble with the shine which led me to use the camera.  It seems I missed photographing the golden horseshoes, but Clip Clop has those now too!

I can tell you that she loves it.  Already she seems to know that this is her horsey and where to find it.  Although I’ve moved it a few times to different rooms for various reasons she has set off each morning on a rapid crawl directly to her horse.  Then she uses it to stand, slaps and bounces a bit, and smiles back at me.  I’ve lifted her into the saddle, and she surprised me by balancing without trouble and makes it bounce by whipping her torso ahead.  Obviously I’m there with hands waiting to catch her, and I don’t(didn’t) plan for this toy to be used for a while.  Anyway, I suspect she likes shiny things?  And Springs!

I can’t believe the difference Before and after:

During (and really good enough looking) vs done:

Details:

IMG_1202


IMG_1190


In progress: painting a vintage Wonder Horse (Bouncing rocking horse)

Well, that was fast.

After posting this morning I managed to do some chores and spend time spraying the horse.  I started with medium grey (metallic) over the primer covering everything as a base.  Then I used the darkest grey (metallic) focussing on the muzzle, underbelly,  hind quarters and lower legs.  Finally I sprayed pearly white using cardboard scraps to mask the areas I wanted left dark.  Holes were cut to stay the dapples.

The dark layer went well and so did the white initially.  I was really happy with the dapples and look.  Then I thought “I’ll just add a little more…”

Shoot.  I did not take photos at the point, but just as well probably since it would only remind me.  I wasn’t pleased by the time I sprayed a little more.  Meanwhile my little one was getting sick of her play-pen inside, so I rushed on, took breaks, and rushed through.  I believe I’d have had different outcome if able to focus the way that I used to.  😉  Anyway, I left it to dry all afternoon and was somewhat more pleased when I saw it again.  Yes, the dapples were all but lost, but it still looks good if you didn’t know my original vision for it.  The white paint has turned into a very silver metallic that blends too much with the other two shades, and that is part of the dapple problem.  Again, it is pretty enough if you don’t know the intended look.  It seems that a rather aged and then polished iron kind of  style won out despite my plans!

During the afternoon I dug around the mess of our attic (my fault!) to find the little bottles of paint from the Borg Queen costume after not finding them in the basement paint storage area or in the sewing room.  They were in the attic, and I did find them eventually, and that is a win given a poor streak of luck I had the past few days.  (I wouldn’t have purchased more, because I already did that for the last Borg Queen when I couldn’t find the original paints!)  So next I’ll either enhance the details on the mane, tail, and tack with these paints and tiny brushes or I’ll detach the stand and spray that.  Tomorrow we’ll have some rain before clear weather again, so that and life may delay this.

Ideally I’d maybe like some blues or other colours in the saddle, but I have only copper, silver, black (spray,) and gold to work with.  Unless the project is delayed and I suddenly go shopping then those are all I’ll be using.  It already looks pretty nice as is and could certainly stay without any additional work.  Perhaps, but I don’t think I can leave well enough alone.  That would be too easy!  I still might mask off the horse fur area after today’s paint is cured and spray the saddle a flat black first?  I don’t know.

Here it is with the dark layer:

IMG_1428

and white:

IMG_1434

Dried later on and in different lighting:

IMG_1444.jpg

Closer:

IMG_1448.jpg

IMG_1447.jpg

IMG_1454.jpg

See how metallic silver it appears rather than pearlescent grey and white?  Notice that the neck area no longer shows the dappled paint I’d done?  Oh well, I suppose…

Let’s not forget before:

IMG_1152


In Progress: Reviving an ugly old “Wonder Horse” bouncing rocking horse

I’ve been working on many projects at once lately, and always the choice is between writing or making some progress (that and the treadmill of my normal chores.)  Tonight I could write about a few different things, but I’d like to take a break from sewing and feel inspired by a painting project that is only in the beginning stages.

When I was a child there was a toy that brought me hours of screeching glee.  Memories of playing with it stick out through the vague mists of about 30 years, and I decided months ago that my daughter simply had to have a springy-bouncy-horse like mine.  Marketed as “Clip Clop the Wonder Horse” in the mid ’80s I was a lucky kid to own this newest version of plastic horse (now with sound effects!) suspended by springs from a metal frame to bounce on merrily like other fortunate children since mid-century.  Mine was named Clippity Clop, and I loved him.

It seems Radioflyer still makes a similar Wonder Horse, but I wanted a fixer upper.  (Shocking, I know!)  After all, the ’80s or ’70s orange and browns of these horses is just not appealing to my design sense, and the new ones look about the same.  For a while I’d check out Craigslist whenever I remembered to but none of the listings grabbed me until a few weeks ago when there was a Wonder Horse from the ’70s offered at the lowest price I’d ever seen and decently nearby.  (When we moved here it was farther away from all the wonderful listings to be found on Long Island to a less popular and overpriced CL region.  sigh.)

IMG_1152.jpg

The model isn’t the same obviously, but sound certainly isn’t required.  I thought surely Clip Clop was bigger, because I was surprised at how small this horse was when I picked it up, but as a little kid everything seems bigger.  Googling shows that they measure the same.  The downside of the horse I’ve picked up is that it doesn’t have the stepping rail to get and off that mine had.  Perhaps I can add something for that?

I did some reading on painting plastic but ended up grabbing all-purpose spray paint from Home Depot instead of hunting down Krylon.  In the store I was undecided and selected a variety of paints to play with or return once I figured out what colours and effects to use.  Some ideas ran through my head.  First being to use chalk paint or a super matte in greys and whites (typical, I know.) My next thought while looking at a wall of spray paint options was to maybe dive into colour with a little soft sea foam or purple or something (woah!) accenting a pearly white horse.  There was a great selection of metallics, and I always have found hammered finish very forgiving so that was another direction…  Either hammered or a smooth aged iron kind of look blackened in the crevasses.  I still like that idea a lot.  A can of silver glitter paint made me consider that my little girl may think a glittery horse is fantastic, but I couldn’t make the leap.  Lastly is a dappled grey and white horse reserving the metallic for tack.  This is the plan right now; dapple grey and white with darker legs etc and salt and pepper tail/mane.  Honestly I’m a little tempted to do glitter after all, but I don’t have that paint now.  😀  Let’s see how things go when I get spraying…

IMG_1154.jpg

Screen Shot 2018-06-12 at 07.17.58.png

First I had to clean the horse, then sand, and prime everything.  Last week I did this.  I scoured the stand too and probably will try some paint on that also but done thinly and using dark metallic just to freshen it up.  The springs polished up nicely to look brushed and silvery.  The horse itself is full of imperfections in the casting.  I cut off some of the worst seams, but I’m not about to fill all the voids and air bubbles so had to quit worrying about it.  The original paint was peeling a bit, besides being a hideous colour choice, and it was very sloppily done.  I’ll have to try to emulate that vagueness to a degree since the detail of the plastic is so rough.  Anyway, I sanded it well and washed it all down before masking the frame and carefully priming on a warm and dry day.  The primer instructs to wait 5-7 days before painting if the object is plastic, so I have been patient.  She isn’t going to use this thing anytime soon anyway, and so I’ll be going slowly and letting layers cure well between work although I’d like to just have it out of the way soon.

IMG_1146.jpg

IMG_1157.jpg

IMG_1162.jpg

With the primer it already looks pretty good!  Almost good enough to be done, heh.

Today I’ll test out the first base layer in either pearly white or shimmering grey.  If it enhances every flaw and looks horrendous then I’ll reconsider glitter or something else.


More Alabama Chanin DIY

I’ve been a busy bee.

Today (the 11th but let’s see if I can post today…) I completed another baby dress for my daughter done entirely in hand stitching a la Alabama Chanin.  This one had a complicated motif, comparable to the last dress I wrote about, but I was able to complete it much faster possibly due to more practice and since the design made for quicker stitching.  Between these two complex dresses I also did an unembellished version and made plans for several gift items.  The gifts took all of April, and now that we are into May I’ll be doing some sewing for D and myself hopefully.

IMG_2496


I adore the aqua colour  and feel of the fabric of this one!  Too bad there isn’t much of the original T-shirt left for anything else, because I love, love, love it.

I must rush and complete one gift by Saturday and have to hide its existence from my soon to turn 40 year old husband.  I’m not even sure I should write about it here in case he checks out the blog again, but he probably will not…  Of course I didn’t get the time to finish this post until after the gift was done.   

For L I made a T-shirt with a Star Trek inspired design on the chest.  I kept it simple in hopes of quick progress but also keeping in mind that he only wears plain shirts.  I would have liked to do a heavily stitched motif of the Enterprise or something cool, but due to procrastination and his tastes in fashion I skipped that and chose  “Darmok & Jalad at Tanagra” instead of an image.  I even planned to only decorate a purchased shirt, but then he told me how much he especially likes the seam stitching on Mini’s dresses, and so the project quadrupled in work.   I only made and cut the pattern (tracing off a shirt that fits him well) this morning, because I work best under pressure, and I didn’t get serious about making a gift until so late!  Unfortunately I discovered that 2XL Vneck shirts didn’t allow me to cut sleeves for his M sized shirt.  Drat!!!!  I had to run to the store and throw another package of shirts in the wash this evening, but I did cut the front and back, cut a paper stencil, traced with a Sharpie pen, and began basting the pieces.  The stencil is too small for the best results, so I’ll be using a back-stitch instead of running.  (I found the backstitch looked messy and went back to the running stitch.)  I didn’t want to enlarge the letters any more, and I hope it turns out okay.  Wish me luck!  I tried using a few nicer fabric options, like dark red and black, before settling on grey and black due to limitations of “yardage.”  I have three thread contenders: one matches the grey, one is a lighter grey, or I could go with black.  I’ll try swatches tomorrow to settle on something.

IMG_0301


The dress that I completed today was a sort of test for the motif of a gift.  There is a local artist who creates lovely black&white cut paper bee designs (I’d have liked to get one for the nursery, actually,) and I was inspired to rip off do something similar when brainstorming for a decoration that a good friend of mine might enjoy.  She has a couple of the artist’s works, and I’ve been trying to come up with a good gift for her for a long time now to show my appreciation of the many, many, many things she has done for me.  She had told me she loved the Mini dresses and loved the idea of making something for a mutual friend when I mentioned the idea as a test.  I’m excited to start that project, but I keep having to do other things.  The practice dress has helped me refine the bee and honeycomb, so it was worth the delay?

IMG_4122

I’ve been making these dresses a bit large, so they don’t look so great yet in the modelled photos, alas.


I didn’t copy any of the bees exactly but simplified one, and I wanted to add honeycomb.  For the next piece I might mix larger hexagons with smaller to work better with the bee?  I was extremely unhappy with the way the two stencils I made came out and had to play around with them a lot and even cut out new ones.  The plan was to have a bee at each end of the wrap, but I wasn’t happy enough with it to do the other panel.  Luckily the honeycomb stitches up super fast compared to anything else, so it worked out great to use that instead.

IMG_0146

IMG_0130


IMG_0135


IMG_0150

The black blanket stitch around the edge doesn’t show very well.  I like how it turned out. Perhaps I’ll make one similar for myself someday, but I’ll probably never get around to it.  😀  This post sure grew long in the nearly month that I’ve been adding to it!

Baby Clothes… Alabama Chanin Style

IMG_1002So, I have a new crafting obsession.  I’m quite late to the Alabama Chanin DIY party, but I recently discovered Natalie Chanin’s books.  I’ve spent a lot of time gathering inspiration by reading the many blogs posts people have shared over the years about creating their own clothing using her methods.  Now that I’ve made a couple of things of my own I’d like to add to the sea of posts on the subject, and to add something fresh I’ve used the techniques to begin building a unique wardrobe for my baby.  In all my Googling I found pretty much nothing made for babies with the Alabama Chanin hand stitching and embellishment techniques on cotton jersey, so…

IMG_1165


IMG_1720

I’d actually heard of Project Alabama back in the early 2000s, but it seems that Natalie had to branch out on her own to maintain the made in the USA for fair wages aspect of her vision, and that is how Alabama Chanin came about.  I found an Alabama Chanin wrap dress pattern while looking for inspiration for drafting my own dress, and one thing led to another.  (As far as the dress, I ended up transforming my standard tunic dress into a wrap, and I love it!  Something for another post, I suppose.)  I decided to purchase the AC pattern and then realised it was going to be quite the endeavour.

Normally I do not sew knit fabrics.  Okay, I never do.  Back at FIT we did one project in jersey and used highly specialised machines for it.  I never considered knits after that since the machines are ridiculously expensive, heavy, and huge.  While I saw others using modern sewing machines to make clothing from jersey I never cared to learn about that realm thinking it would be too much a bother when I could just buy the items more cheaply.  After a while I didn’t find so many suitable shirts and did wish I could make things that would fit better, not have such thin fabric, or were more to my taste, but construction still presented a problem since I couldn’t really picture a way to do nice seam finishes or achieve a remotely professional look.  Then I was looking for wrap dress ideas and found the AC pattern, which led to reading blogs, discovering that apparently one can hand stitch cotton jersey, and buying one of Natalie’s books.  Hand stitched knits?!  Who knew!

Of course I wanted to make the dress, and I wanted it long.  I went out and bought 4yds of fabric and it occurred to me that this was a pretty big project to begin with.  Even so I was all set to dive into the deep end and figured it wouldn’t be too time consuming, but I was a bit nervous to cut into the somewhat pricey fabric without doing a toile.  Instead I thought it might be fun to make something tiny for D.

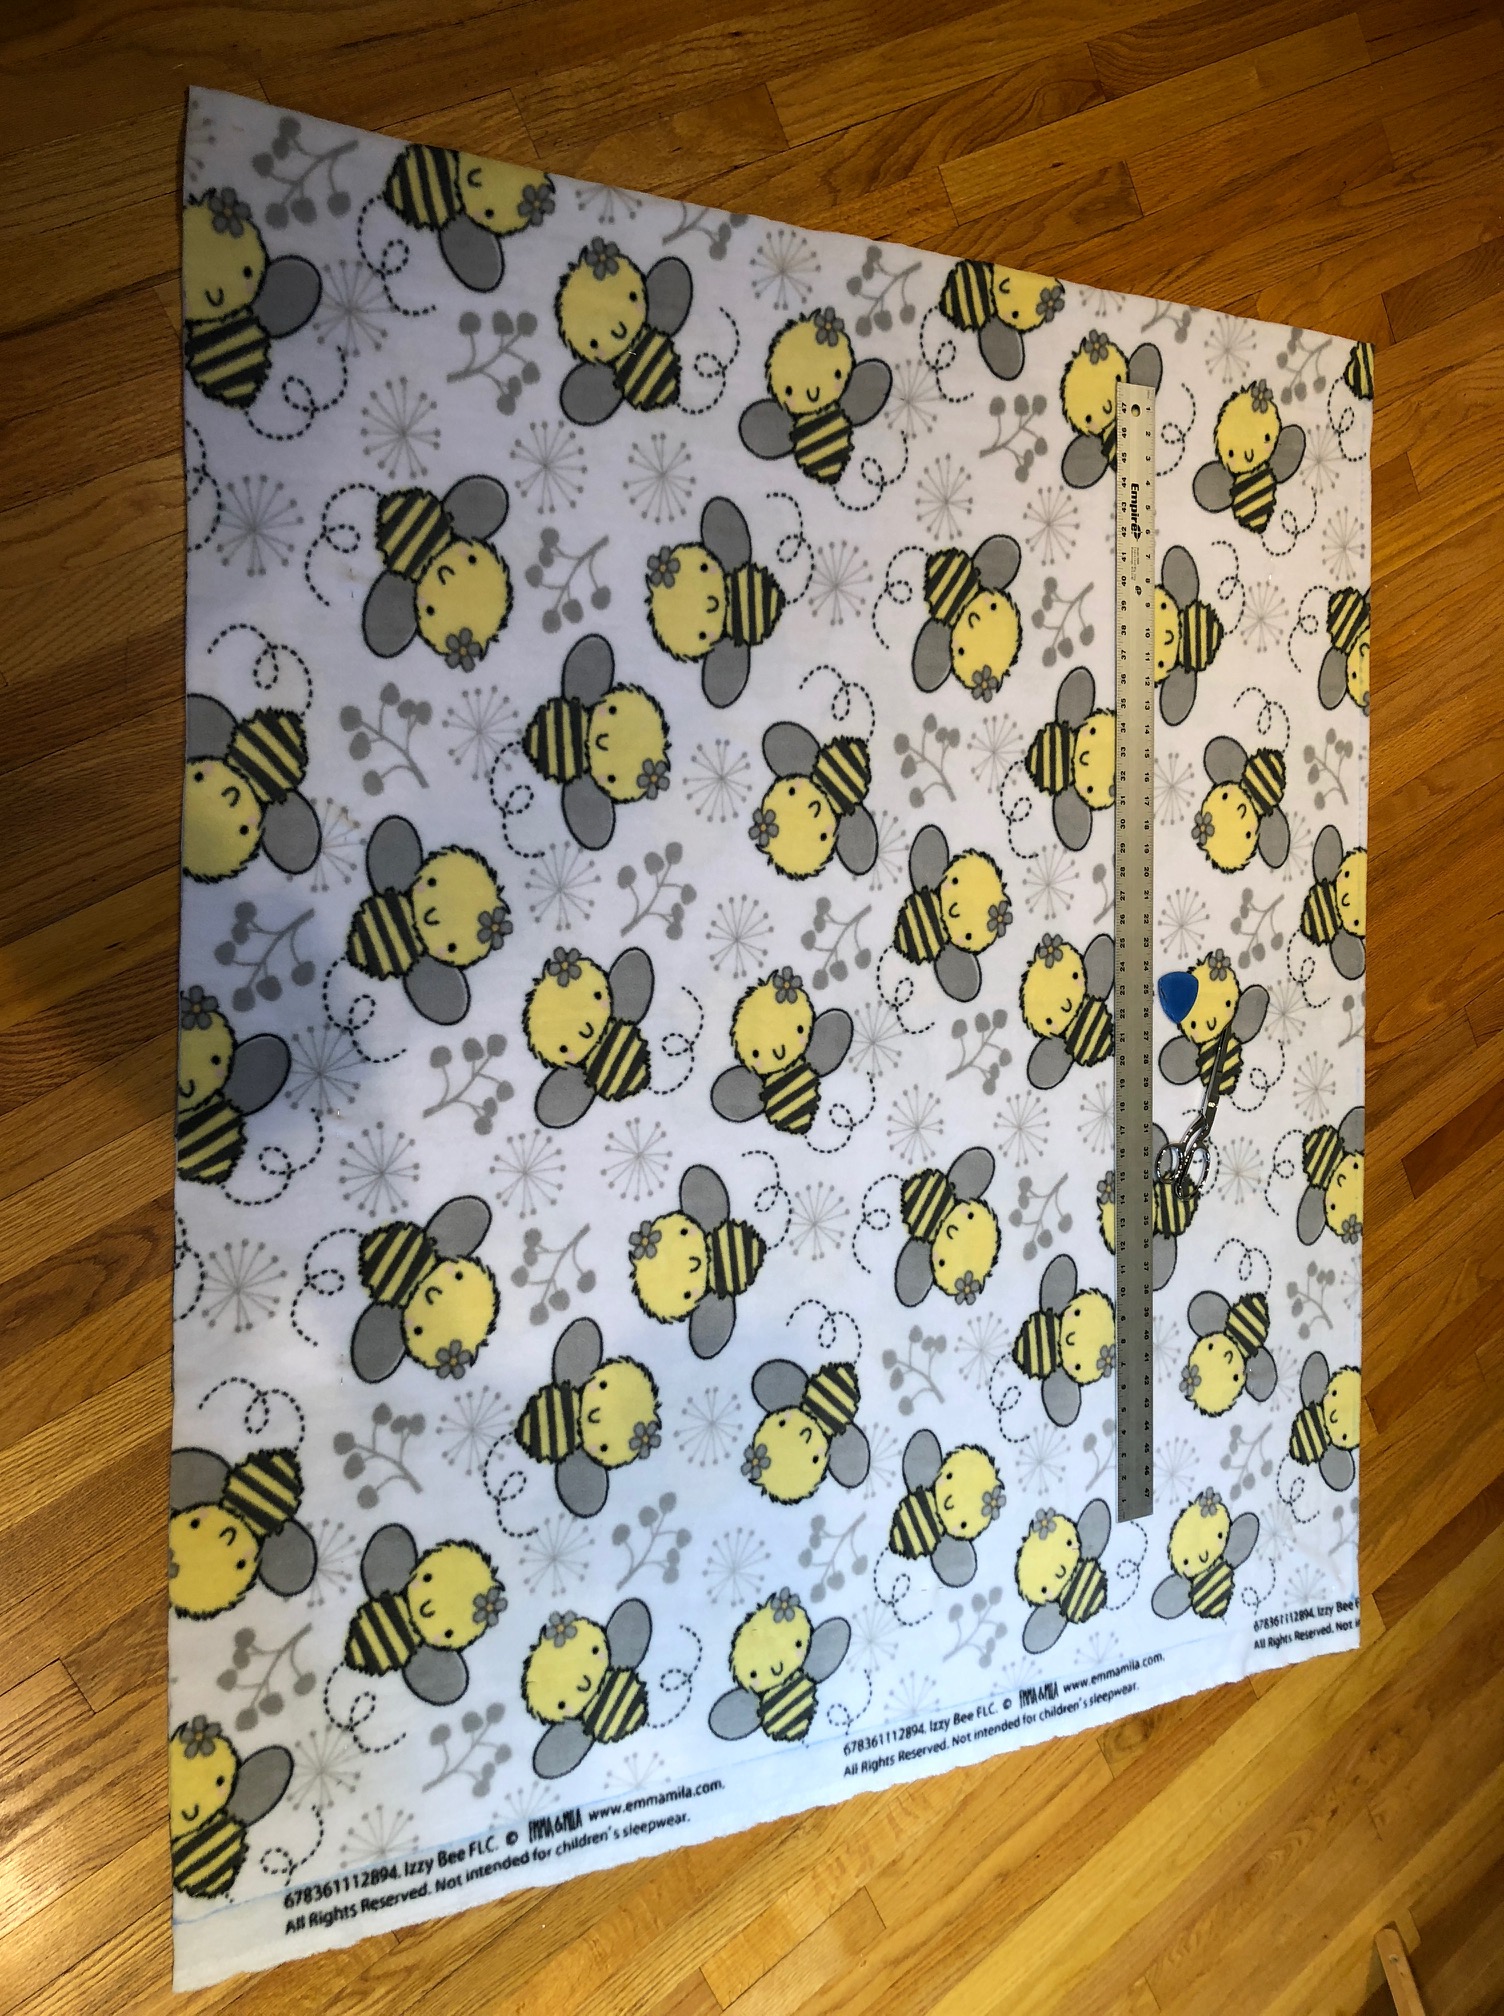
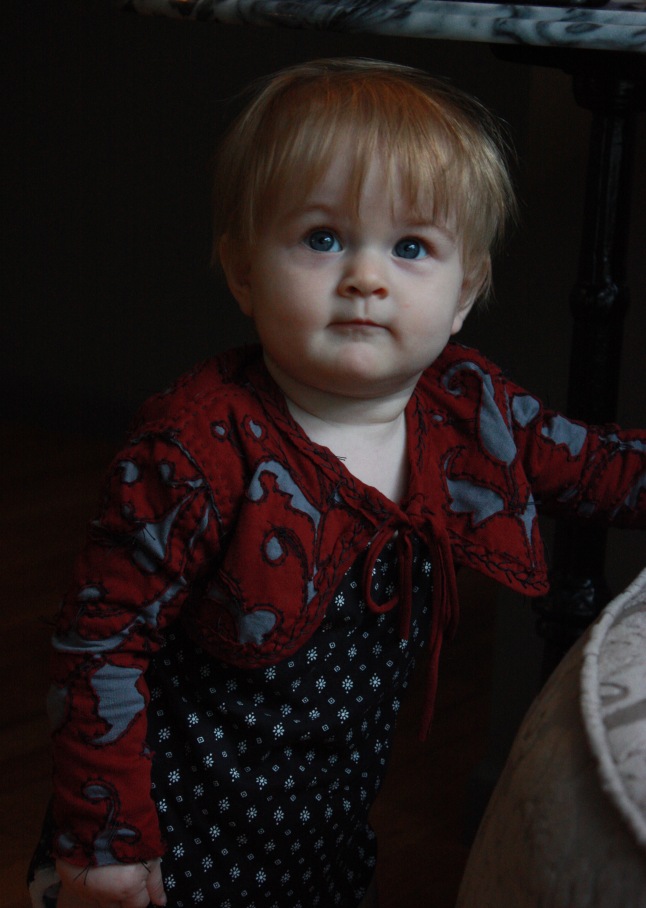
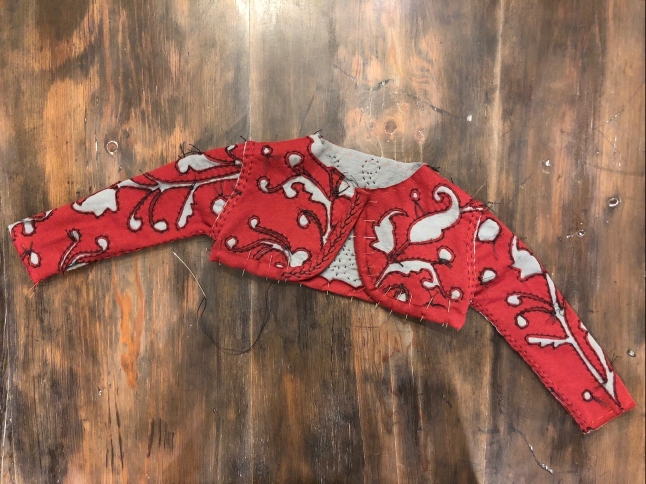
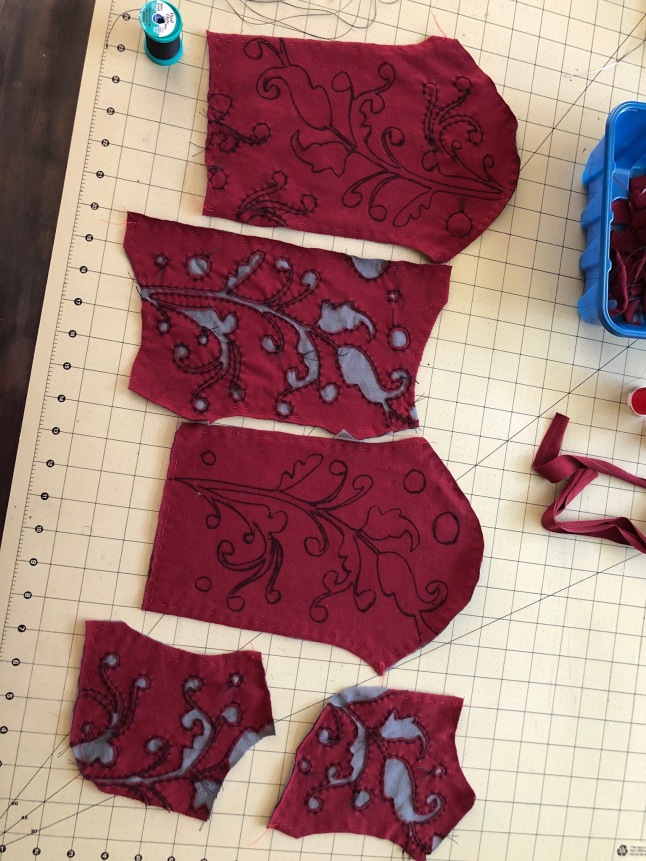
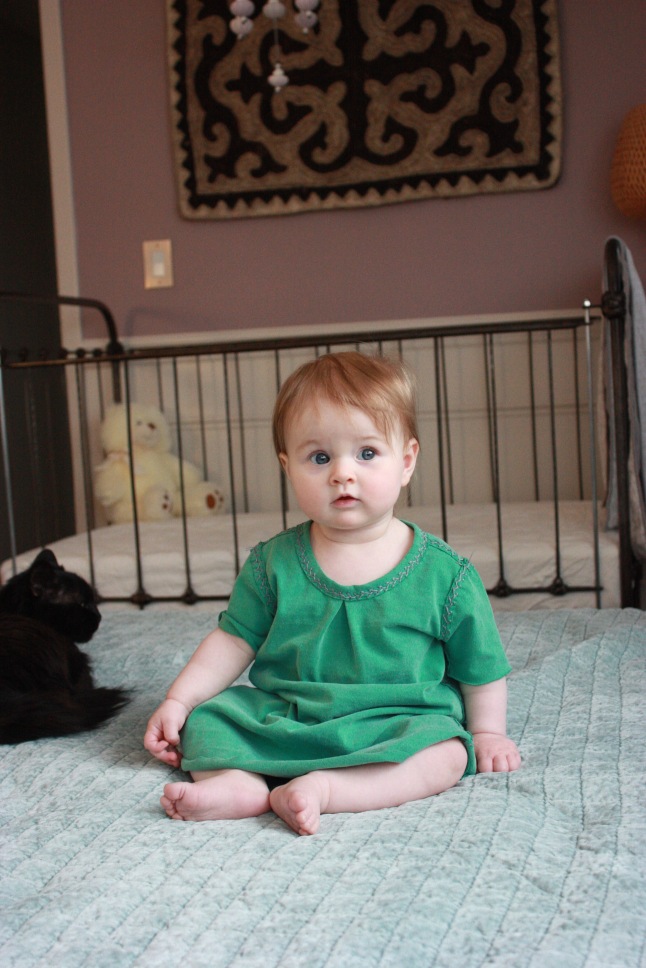
Never doing things in moderation, I went to the thrift store and came home with a dozen or more XL mens T-shirts to turn into baby clothes.  While going through the racks inspiration hit, and my own dress was all but forgotten.  I loved that I could use old T-shirts for fabric while D is still small, and making her clothes solves my problem of building her a wardrobe in the next sizes up.  Besides, I rarely like what I find in the stores anyway.  I used some purchased pieces as reference and drafted little dress, T-shirt, pants, and bolero patterns in a size somewhat larger than needed now.

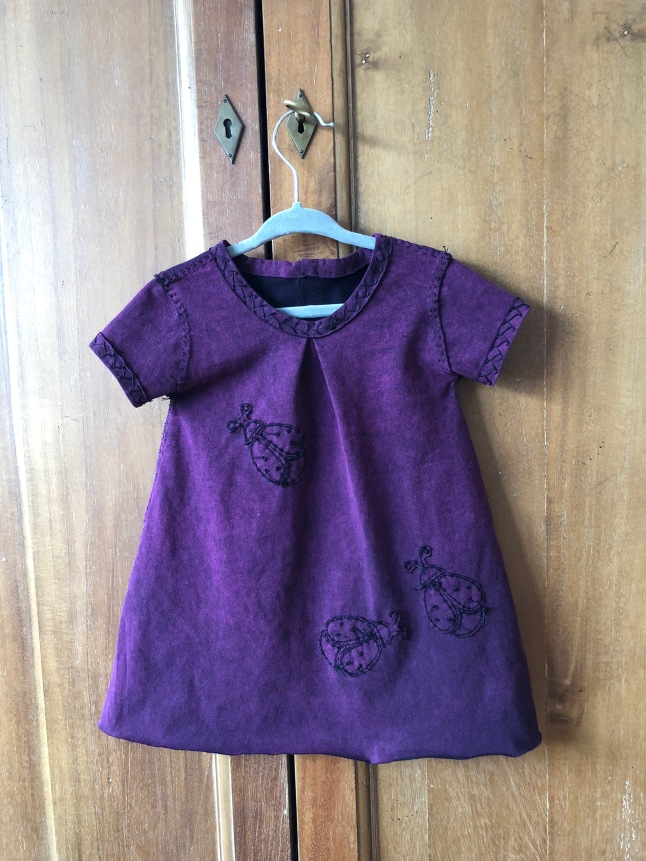
I began the first piece with a really cool fabric.  It was a garment dyed T in a lovely purple from a jazz festival.  I cut out a simple shift dress and decided to appliqué a few lady bugs cut from the scraps for embellishment.  Note: I actually was starting with a lovely dark green T and the same dress, but when I tried using fabric spray paint and a stencil it was ruined entirely.  The very thin paint wicked instantly into a sad blob.  Instead of spray paint I tried a Sharpie to mark the lady bugs.  I traced them onto scraps and carefully pinned them onto the dress matching grain lines although I see from the photos in the book that AC doesn’t seem to bother with the grain.  It was a fun project, and I discovered I’d underestimated the time involved by a fair amount.  Yup, a dress would be a major commitment, so baby clothes that are “quickly” completed would give a much better accomplishment high.  I wonder when I’ll try tackling a large project for myself knowing now how long it all takes?

The jazz shirt wasn’t all that large, and I was lucky it was made without side seams allowing for creative placement of the pattern.  The sides did have a faded streak, so I centred the back on that line to avoid too much weirdness.


IMG_3396

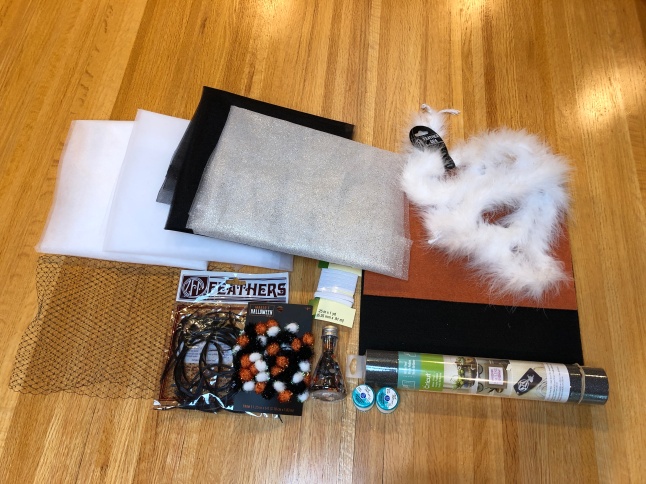
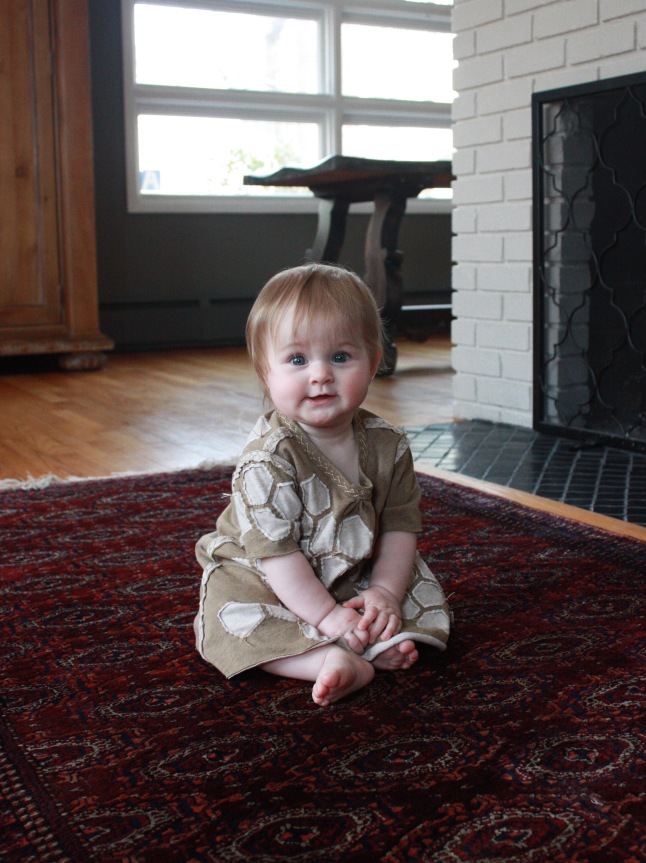
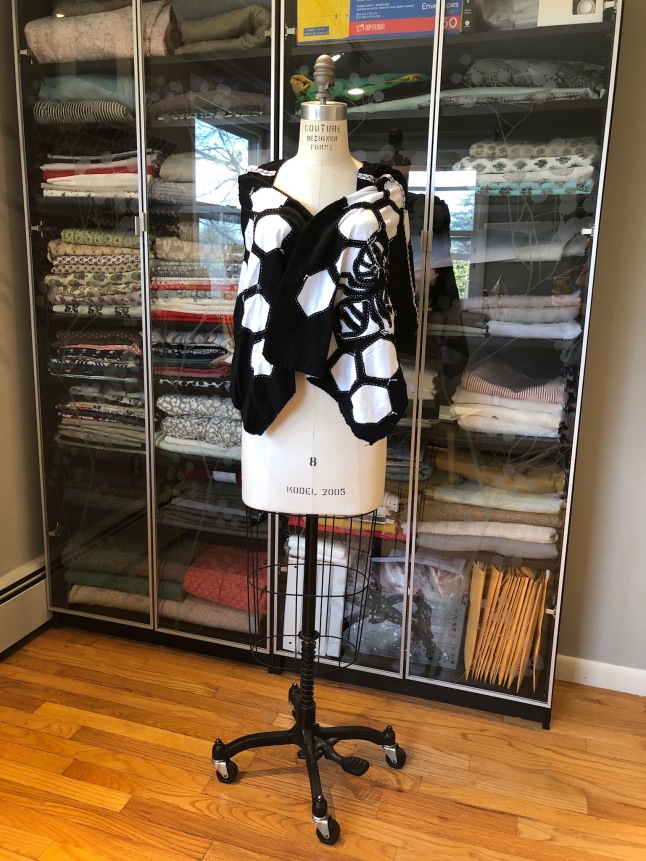
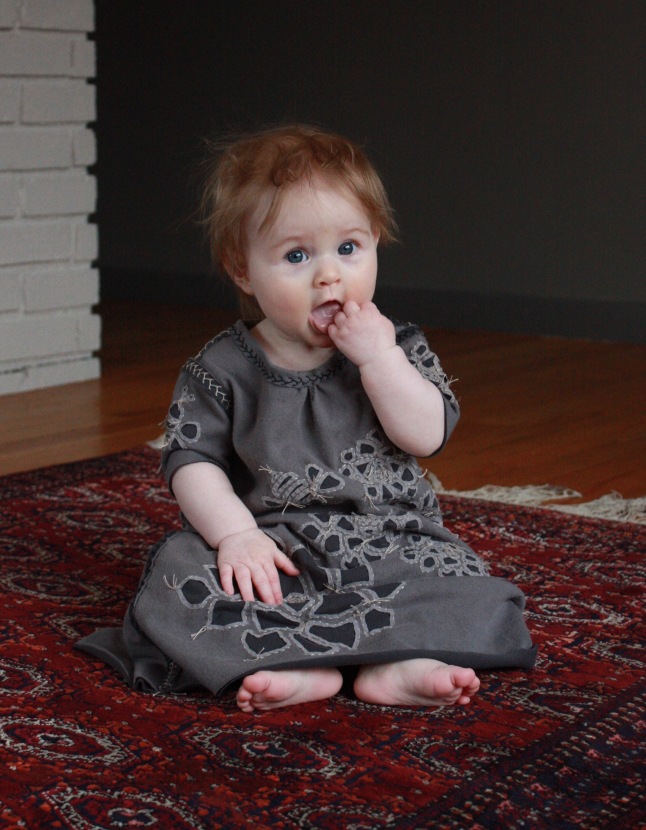
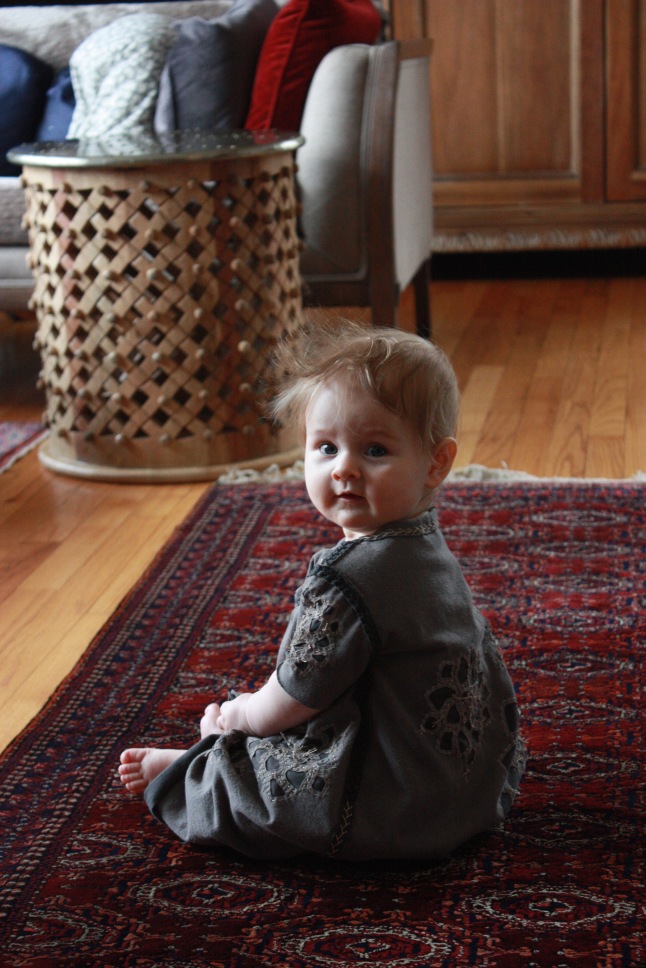
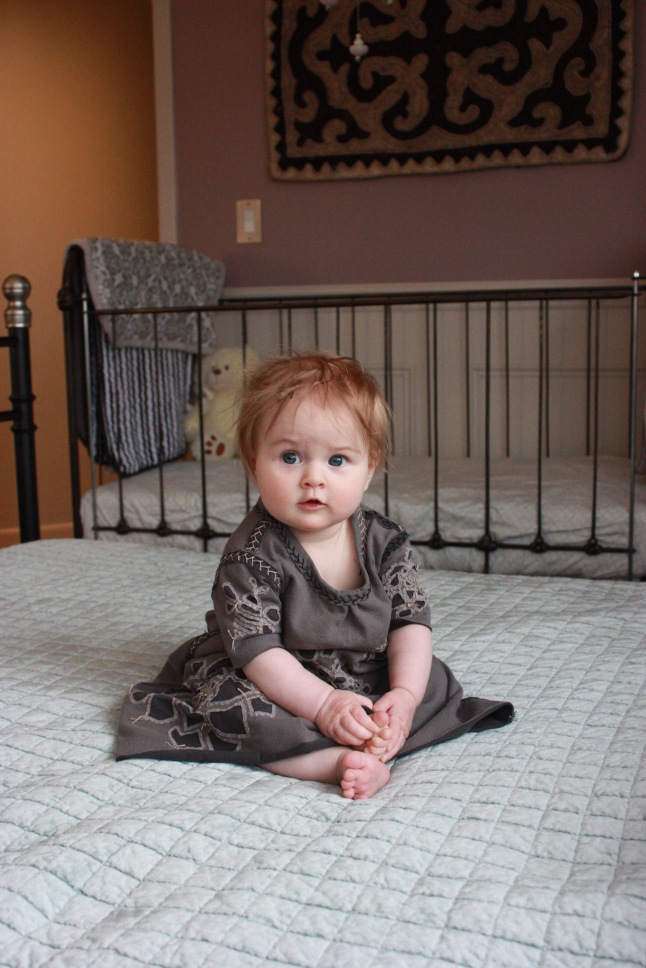
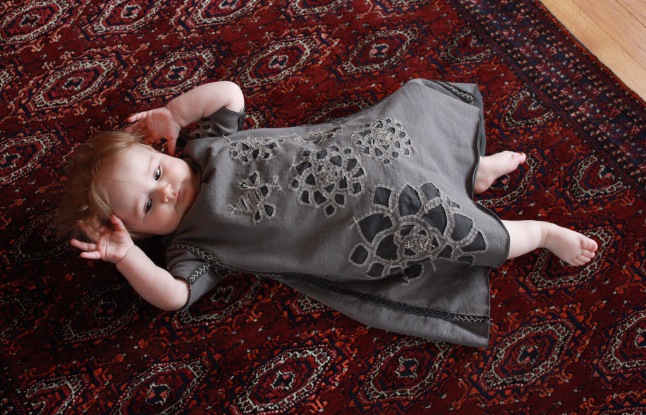
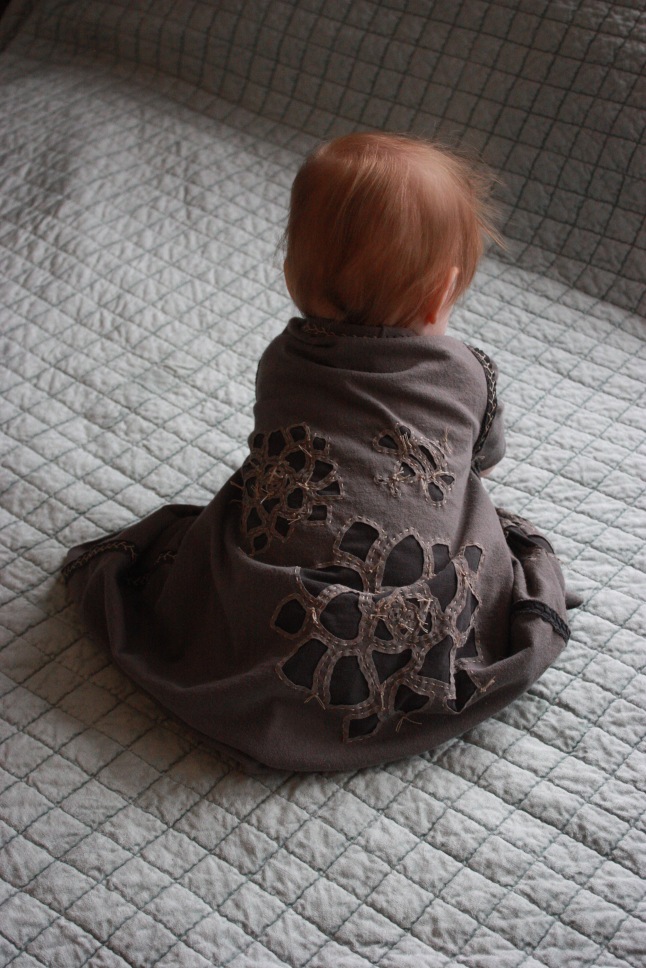
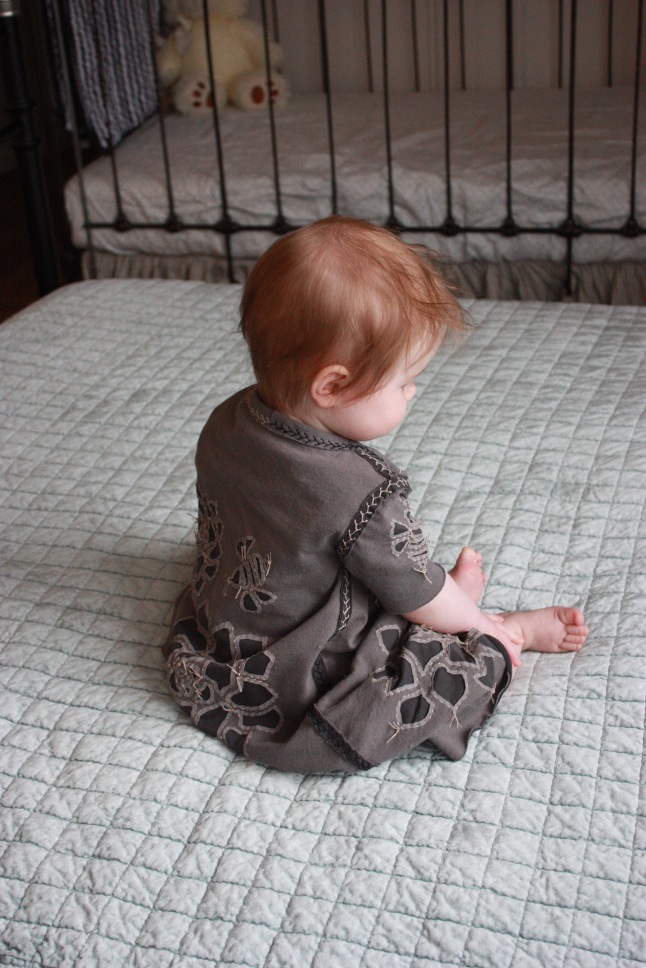
The purple dress really didn’t take awfully long though, because it did not involve cutting and basting two layers or tonnes of decorative stitching.  I was very pleased with the end result and motivated to begin more.  It was time to try the signature AC look with two layers of jersey and reverse appliqué.  I carefully cut out a grey-beige layer and used a thinner dark navy T-shirt for the inside.  I’d searched the local craft stores and bought a few stencils that I liked and which looked somewhat suitable for the process, (but I also have plans to make some of my own with better motifs.)  For this dress I chose the fluffy flowers but also thought it would be cute to add bees.

IMG_0073.jpg

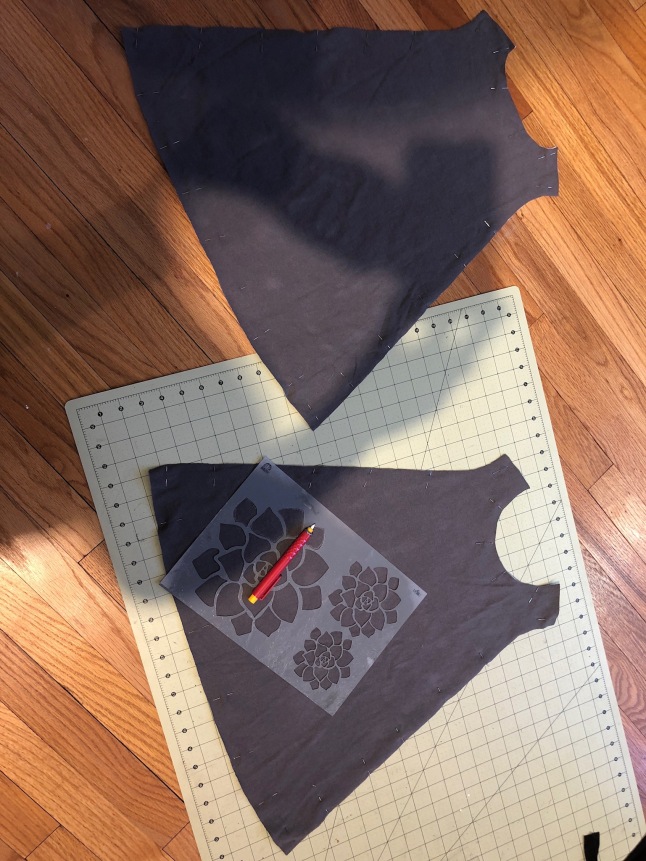
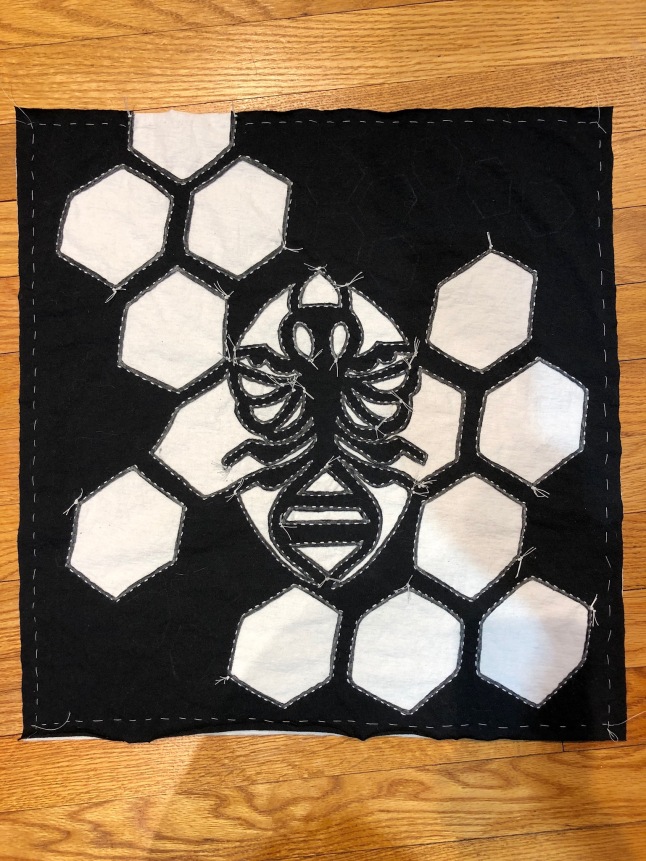
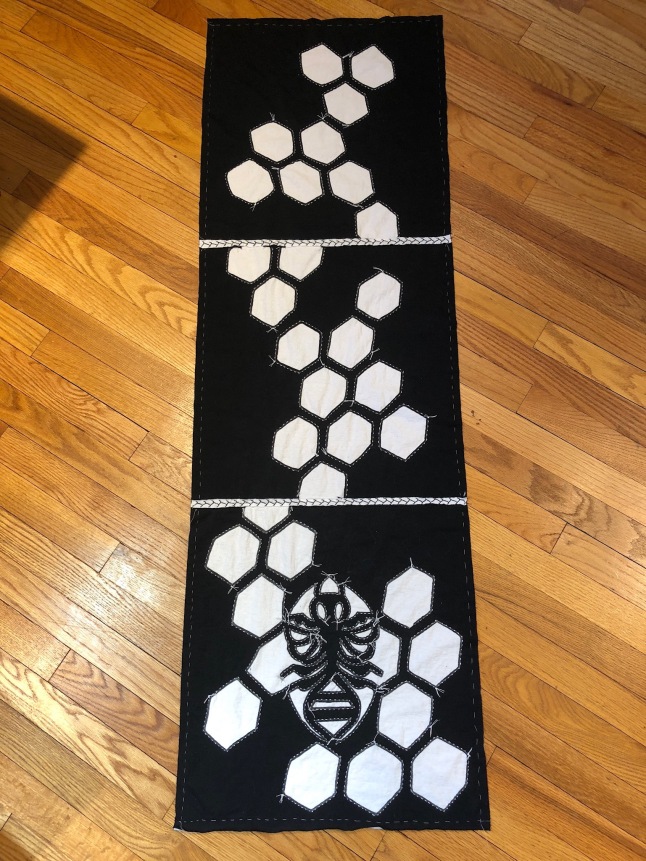
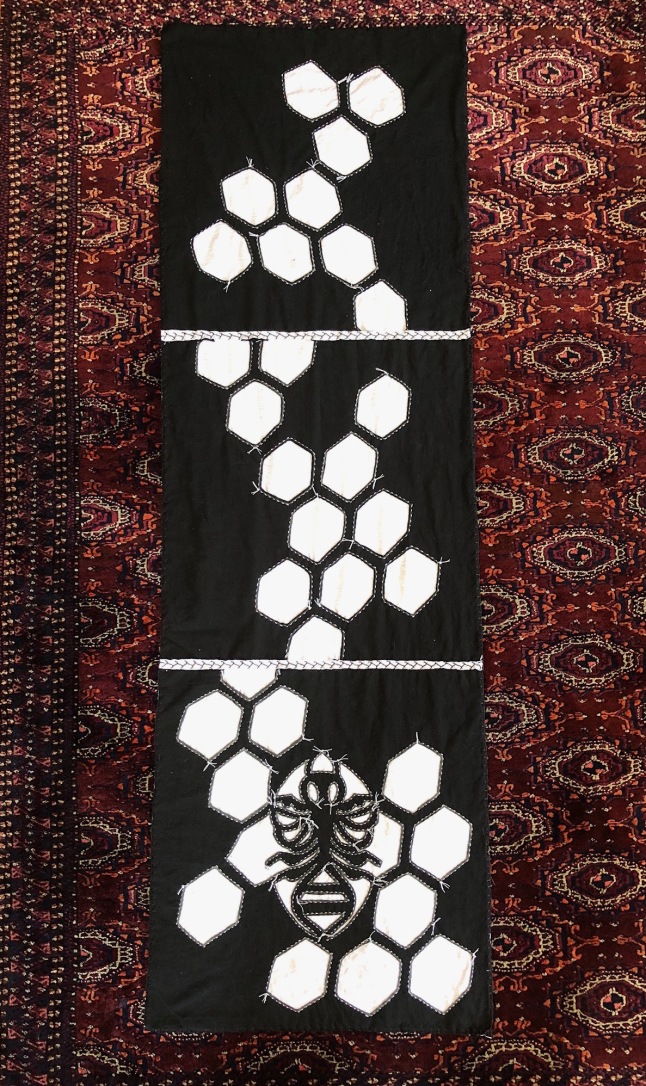
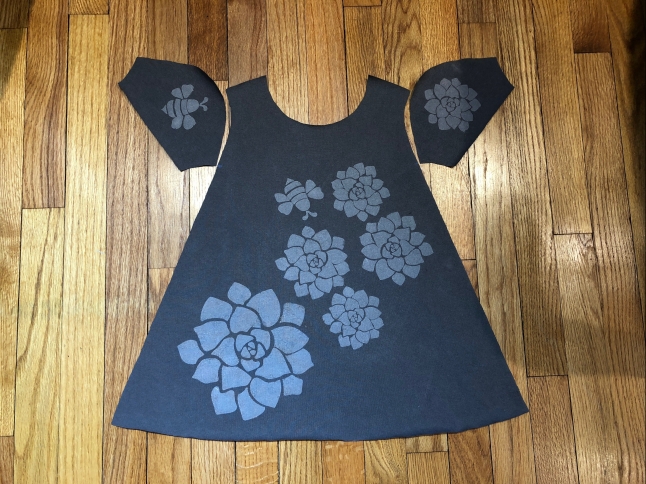
Instead of spraying paint and ruining the fabric I tried Tulip fabric paint applied with a foam stencilling dauber.  The colours available to me locally were too bright and the wrong palate, but the ugly ballet pink-beige paint actually worked for this.  Next time I’ll see about using Jacquard.  Adding the bees was fun, and I ended up deciding to put one on a sleeve too with a flower on the other side.  My plan was to tie knots on the outside and embrace the handmade look.

IMG_3924

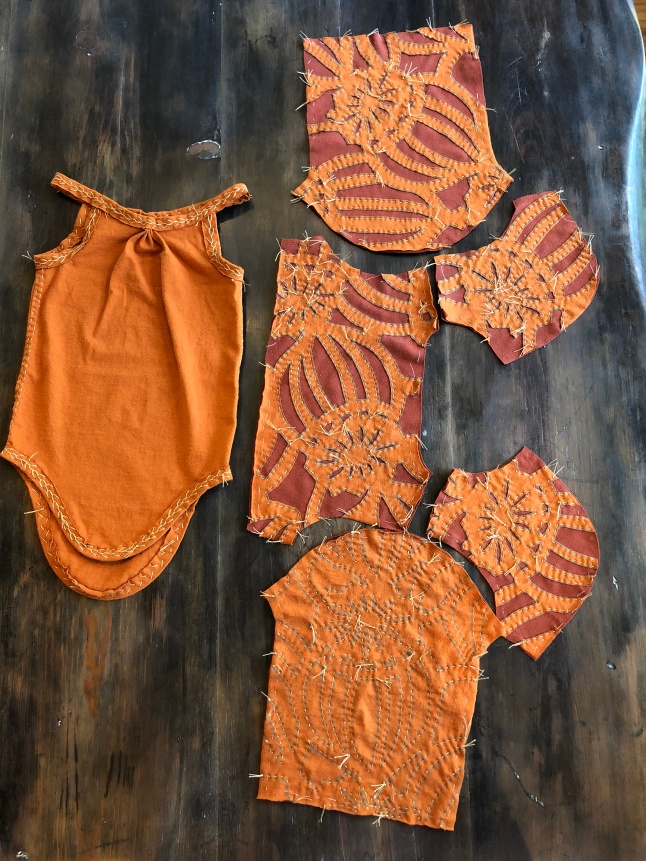
After carefully basting the layers together I started by stitching the back, and it went well.  Then I did the sleeves quickly.  My attention had begun to waver by the time I was working on the front, and it had the most stitching to do.  Being able to pick up and drop what I was doing or take the panel to another room made it an ideal project to try working on while caring for a six month old.

IMG_0099

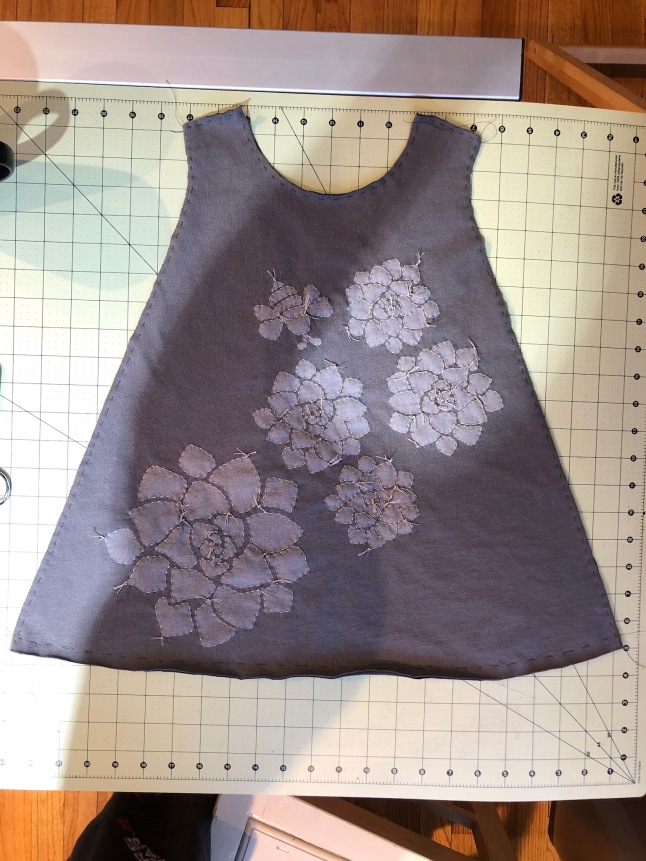
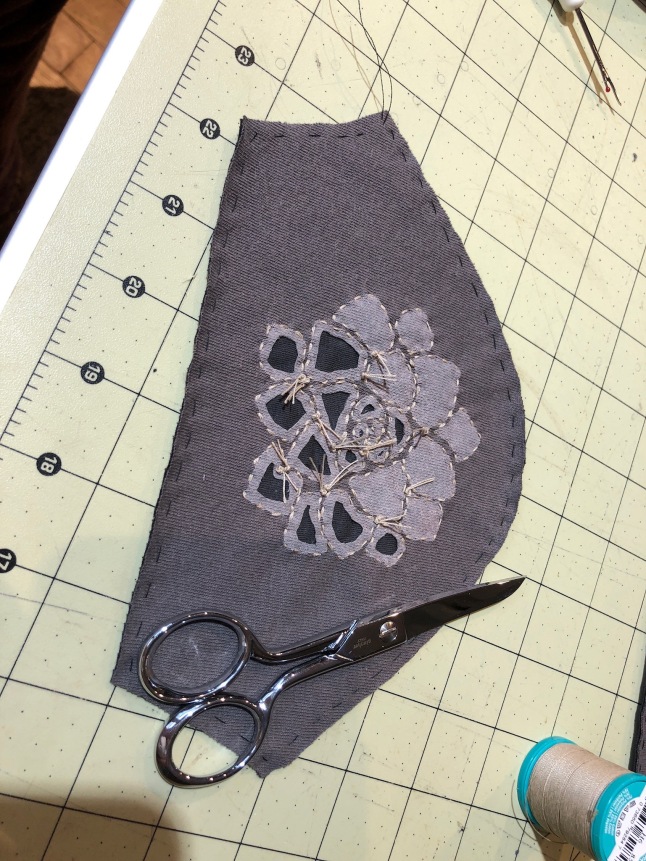
Finally it was time to carefully cut out the top layer from the stitched areas.  This is where using smaller and less appropriate stencils makes things tricky.  I started on a sleeve in case I cut through both layers thinking is a less painful piece to re-make.  I did not have any such accidents until the last section: the complicated and time consuming front panel.  I ended up darning those bits to the best of my ability.  Gah!

IMG_0081.jpg

I didn’t have many chances to work on the dress, and completion took a few weeks.  When it came to construction I first had wanted to use floating seams, on the outside, as a part of the design.  I liked how this looked with the two colours, but I was not keen on the appearance of the running stitch in light thread.  So, I tried the decorative stitching that I used on the purple dress, but I thought the light thread and busy stitch took away from the reverse appliqué.  L agreed, but I was reluctant to un-pick both shoulders and sleeves of work.  First I un-picked one to re-do in dark thread.  I liked it far better and nearly finished the entire garment with it, but L suggested combining both light and dark.  I went with that and am mostly pleased.  I like it, but I also have the original vision in my mind too and would have like it.  Even the decision of where to use which thread on each seam caused some angst over the different directions of look to go with, but I am not unhappy with the choices.  Finally the dress was all done!


IMG_0854.jpgIMG_1659.jpgIMG_1658.jpg


I have already cut out some more double and single layer dresses.  The simple single layer one is half complete despite only a few minutes of work, but I’ve discovered that it is more pleasant to hand stitch when using two layers.  Interesting.  Perhaps it is only the particular fabric, but the needly just doesn’t find its way through without a lot of effort.  The plan is to make a decent number of simple shifts and a few fancy ones in a size the might work as a dress and tunic for a while.  I have also drafted a pixie hat pattern besides the pants and bolero, and before the hand-stitching craze hit I’d made a few similarly flexible patterns for woven fabrics that I’ll write about next.