In progress: painting a vintage Wonder Horse (Bouncing rocking horse)

Well, that was fast.

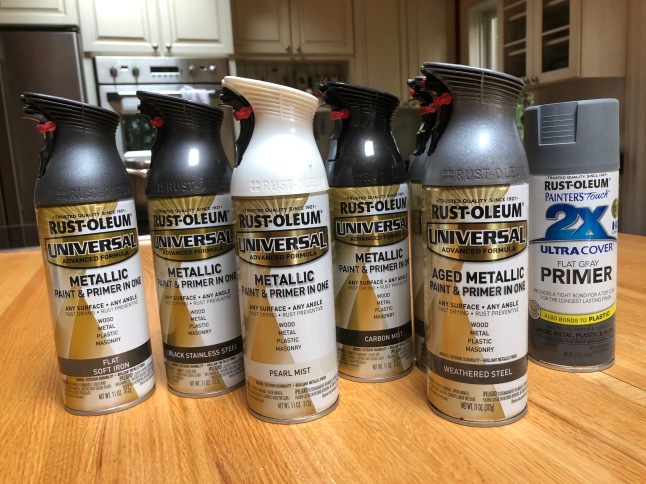
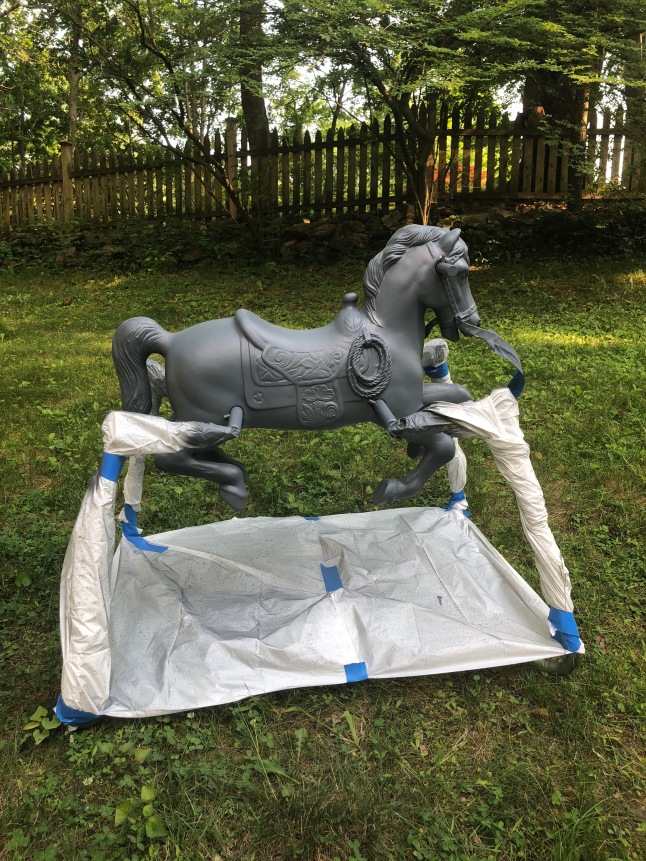
After posting this morning I managed to do some chores and spend time spraying the horse.  I started with medium grey (metallic) over the primer covering everything as a base.  Then I used the darkest grey (metallic) focussing on the muzzle, underbelly,  hind quarters and lower legs.  Finally I sprayed pearly white using cardboard scraps to mask the areas I wanted left dark.  Holes were cut to stay the dapples.

The dark layer went well and so did the white initially.  I was really happy with the dapples and look.  Then I thought “I’ll just add a little more…”

Shoot.  I did not take photos at the point, but just as well probably since it would only remind me.  I wasn’t pleased by the time I sprayed a little more.  Meanwhile my little one was getting sick of her play-pen inside, so I rushed on, took breaks, and rushed through.  I believe I’d have had different outcome if able to focus the way that I used to.  😉  Anyway, I left it to dry all afternoon and was somewhat more pleased when I saw it again.  Yes, the dapples were all but lost, but it still looks good if you didn’t know my original vision for it.  The white paint has turned into a very silver metallic that blends too much with the other two shades, and that is part of the dapple problem.  Again, it is pretty enough if you don’t know the intended look.  It seems that a rather aged and then polished iron kind of  style won out despite my plans!

During the afternoon I dug around the mess of our attic (my fault!) to find the little bottles of paint from the Borg Queen costume after not finding them in the basement paint storage area or in the sewing room.  They were in the attic, and I did find them eventually, and that is a win given a poor streak of luck I had the past few days.  (I wouldn’t have purchased more, because I already did that for the last Borg Queen when I couldn’t find the original paints!)  So next I’ll either enhance the details on the mane, tail, and tack with these paints and tiny brushes or I’ll detach the stand and spray that.  Tomorrow we’ll have some rain before clear weather again, so that and life may delay this.

Ideally I’d maybe like some blues or other colours in the saddle, but I have only copper, silver, black (spray,) and gold to work with.  Unless the project is delayed and I suddenly go shopping then those are all I’ll be using.  It already looks pretty nice as is and could certainly stay without any additional work.  Perhaps, but I don’t think I can leave well enough alone.  That would be too easy!  I still might mask off the horse fur area after today’s paint is cured and spray the saddle a flat black first?  I don’t know.

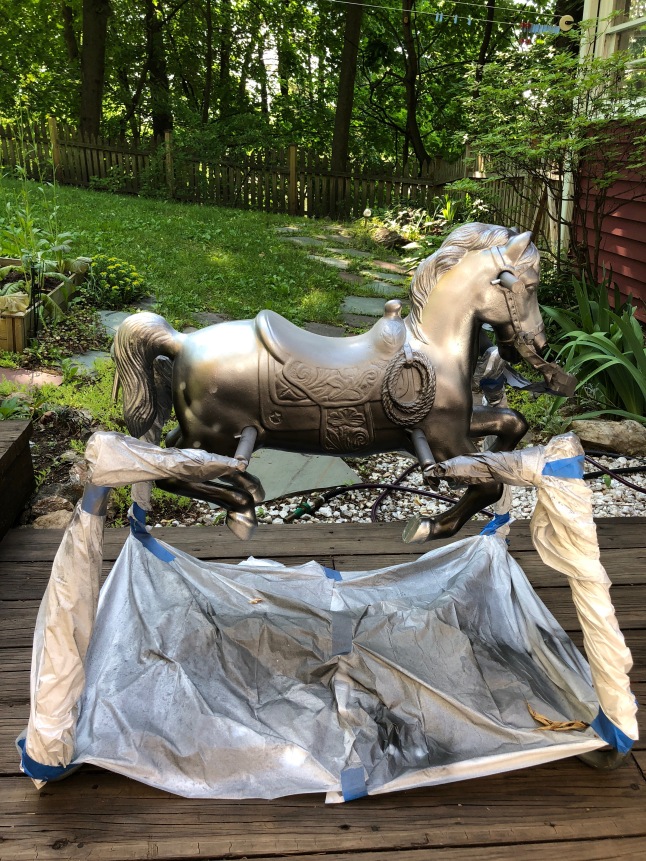
Here it is with the dark layer:
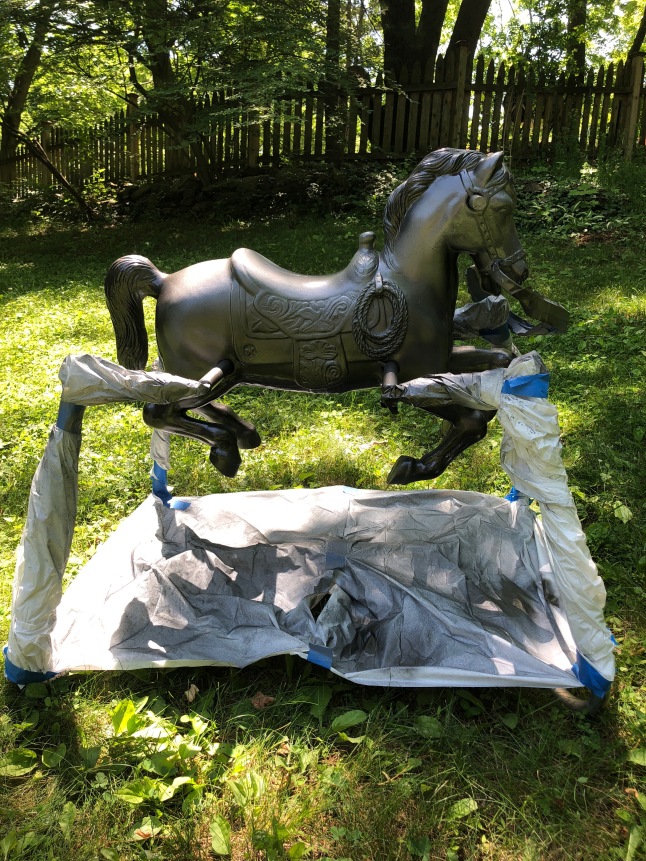
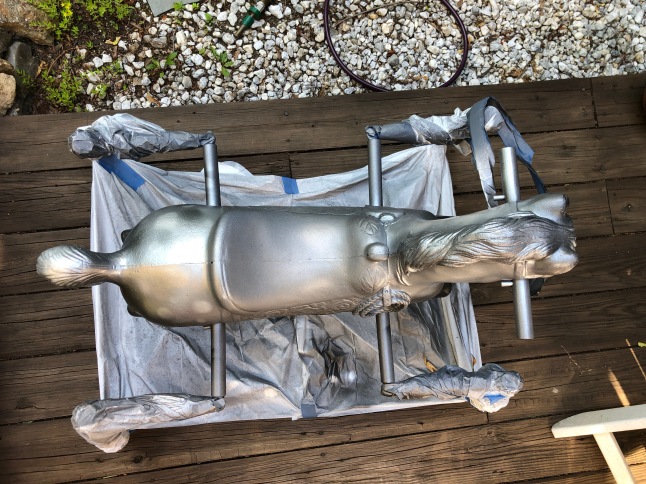
IMG_1428

and white:

IMG_1434

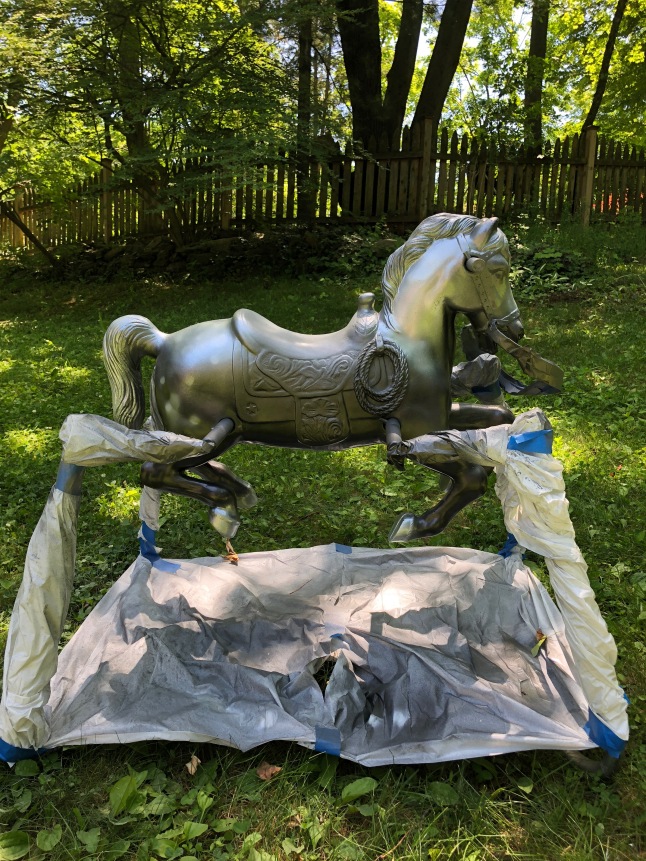
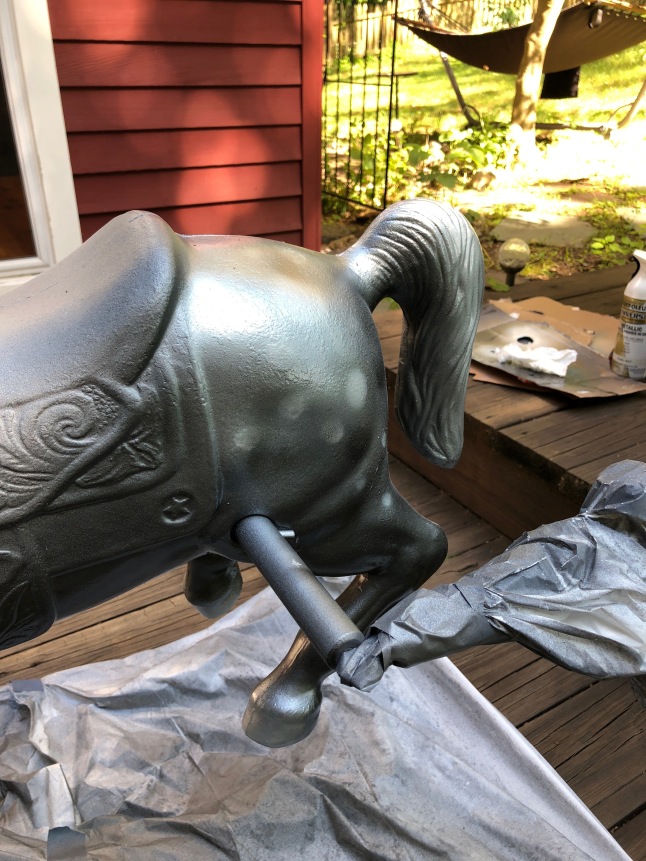
Dried later on and in different lighting:

IMG_1444.jpg

Closer:

IMG_1448.jpg

IMG_1447.jpg

IMG_1454.jpg

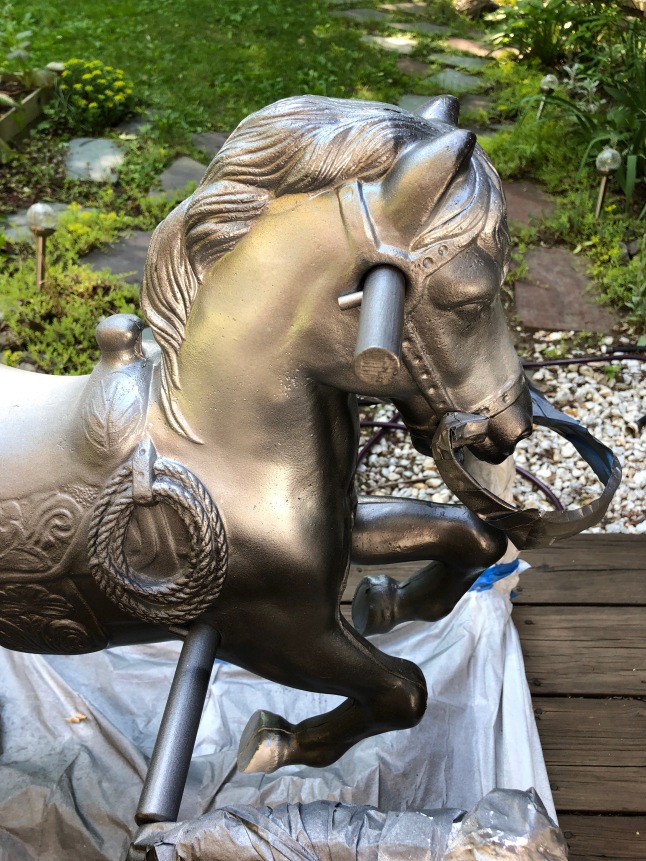
See how metallic silver it appears rather than pearlescent grey and white?  Notice that the neck area no longer shows the dappled paint I’d done?  Oh well, I suppose…

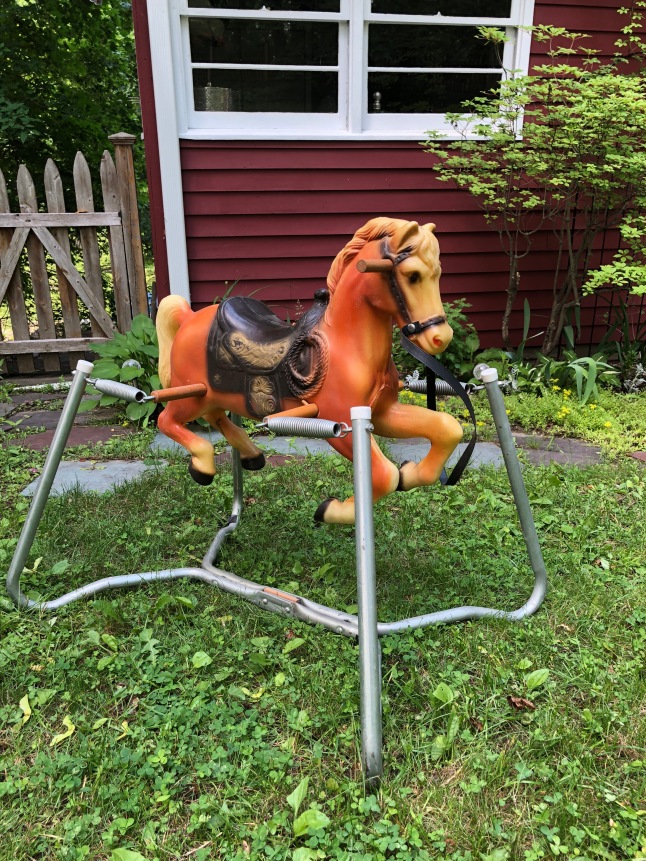
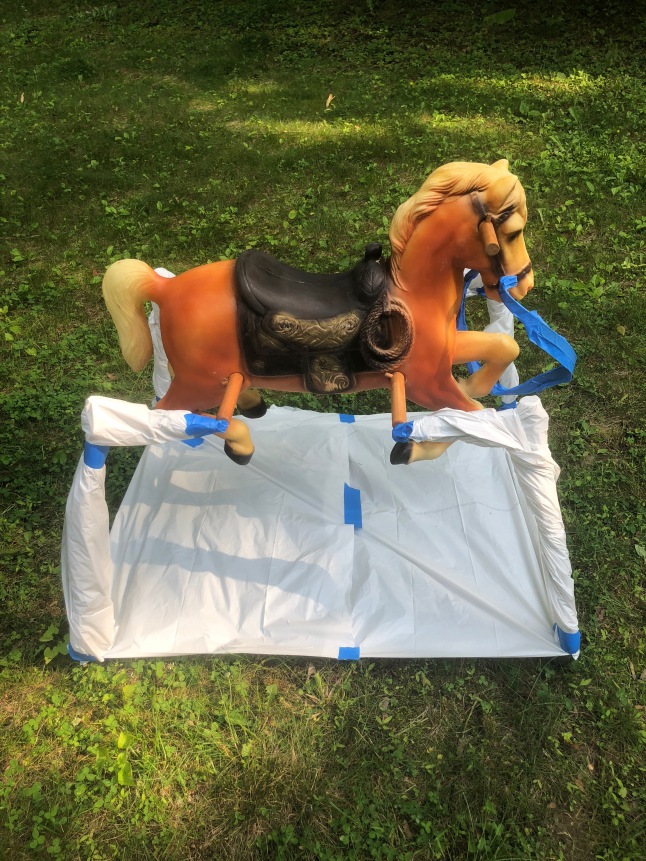
Let’s not forget before:

IMG_1152


In Progress: Reviving an ugly old “Wonder Horse” bouncing rocking horse

I’ve been working on many projects at once lately, and always the choice is between writing or making some progress (that and the treadmill of my normal chores.)  Tonight I could write about a few different things, but I’d like to take a break from sewing and feel inspired by a painting project that is only in the beginning stages.

When I was a child there was a toy that brought me hours of screeching glee.  Memories of playing with it stick out through the vague mists of about 30 years, and I decided months ago that my daughter simply had to have a springy-bouncy-horse like mine.  Marketed as “Clip Clop the Wonder Horse” in the mid ’80s I was a lucky kid to own this newest version of plastic horse (now with sound effects!) suspended by springs from a metal frame to bounce on merrily like other fortunate children since mid-century.  Mine was named Clippity Clop, and I loved him.

It seems Radioflyer still makes a similar Wonder Horse, but I wanted a fixer upper.  (Shocking, I know!)  After all, the ’80s or ’70s orange and browns of these horses is just not appealing to my design sense, and the new ones look about the same.  For a while I’d check out Craigslist whenever I remembered to but none of the listings grabbed me until a few weeks ago when there was a Wonder Horse from the ’70s offered at the lowest price I’d ever seen and decently nearby.  (When we moved here it was farther away from all the wonderful listings to be found on Long Island to a less popular and overpriced CL region.  sigh.)

IMG_1152.jpg

The model isn’t the same obviously, but sound certainly isn’t required.  I thought surely Clip Clop was bigger, because I was surprised at how small this horse was when I picked it up, but as a little kid everything seems bigger.  Googling shows that they measure the same.  The downside of the horse I’ve picked up is that it doesn’t have the stepping rail to get and off that mine had.  Perhaps I can add something for that?

I did some reading on painting plastic but ended up grabbing all-purpose spray paint from Home Depot instead of hunting down Krylon.  In the store I was undecided and selected a variety of paints to play with or return once I figured out what colours and effects to use.  Some ideas ran through my head.  First being to use chalk paint or a super matte in greys and whites (typical, I know.) My next thought while looking at a wall of spray paint options was to maybe dive into colour with a little soft sea foam or purple or something (woah!) accenting a pearly white horse.  There was a great selection of metallics, and I always have found hammered finish very forgiving so that was another direction…  Either hammered or a smooth aged iron kind of look blackened in the crevasses.  I still like that idea a lot.  A can of silver glitter paint made me consider that my little girl may think a glittery horse is fantastic, but I couldn’t make the leap.  Lastly is a dappled grey and white horse reserving the metallic for tack.  This is the plan right now; dapple grey and white with darker legs etc and salt and pepper tail/mane.  Honestly I’m a little tempted to do glitter after all, but I don’t have that paint now.  😀  Let’s see how things go when I get spraying…

IMG_1154.jpg

Screen Shot 2018-06-12 at 07.17.58.png

First I had to clean the horse, then sand, and prime everything.  Last week I did this.  I scoured the stand too and probably will try some paint on that also but done thinly and using dark metallic just to freshen it up.  The springs polished up nicely to look brushed and silvery.  The horse itself is full of imperfections in the casting.  I cut off some of the worst seams, but I’m not about to fill all the voids and air bubbles so had to quit worrying about it.  The original paint was peeling a bit, besides being a hideous colour choice, and it was very sloppily done.  I’ll have to try to emulate that vagueness to a degree since the detail of the plastic is so rough.  Anyway, I sanded it well and washed it all down before masking the frame and carefully priming on a warm and dry day.  The primer instructs to wait 5-7 days before painting if the object is plastic, so I have been patient.  She isn’t going to use this thing anytime soon anyway, and so I’ll be going slowly and letting layers cure well between work although I’d like to just have it out of the way soon.

IMG_1146.jpg

IMG_1157.jpg

IMG_1162.jpg

With the primer it already looks pretty good!  Almost good enough to be done, heh.

Today I’ll test out the first base layer in either pearly white or shimmering grey.  If it enhances every flaw and looks horrendous then I’ll reconsider glitter or something else.